Your recent repair? - 2021 to ?

.........

BTW, the replacement anode rod I bought from Home Depot was $10. A 1/2 inch drive plug-in impact wrench from Harbor Freight is $40. A single 1 1/16 inch impact socket (do not use a regular one!*) is ~$20 on Amazon. So for less than $100 you can save bundles of money by increasing the longevity of the water heater, perhaps by 2 or 3 times.


* If regular chrome steel sockets are used with an impact wrench there is a good chance it'll virtually explode in pieces. You'll probably get away with it a few times but at least wear eye protection. And the 1 1/16 size for the nut on the anode rod is a standard across all (or almost all) water heaters.

Any reason not to buy the impact sockets from Harbor Freight, since an entire set is $25 ?
https://www.harborfreight.com/12-in-drive-sae-impact-deep-socket-set-13-pc-69560.html
 
When I had a water softener, the water heaters lasted 2 or 3 years. And because we had 2 of them (52 gal each) in order to store production from the solar heater panels, they took turn failing, and I was always replacing them. Sodium in the soft water is really bad for water heaters.

When the 2nd water softener failed, I said to heck with it, and learned to live with hard water, the 2 tanks lasted a long time. I did not keep record, but it had to be 20 years or more. One of the pair just leaked a couple of months ago, so I removed it and did not replace it, because our solar panels failed some years ago. I now run the sole heater with electricity from the PV panels.

No, too general, must be something else in the water. We are on a well and a water softener, and our water heater was still fine after 30 years. I know others in the same situation with same results. Our TDS is ~ 700 ppm, so that much sodium is in the water.

Might be the pH? Did you have an expansion tank? If the pressure is not relieved from the heat/cool cycles (water expands ~ 4% from room to boiling), that keeps stressing the tank.

-ERD50
 
Walt is correct about using impact sockets, the issue I had with my water heater is that the head of the anode rod is recessed in the top of the tank and my impact socket wouldn't fit in the recess (too wide), had to use a standard socket and that just barely fit. I'm of the belief that the manufacturers would prefer that you didn't replace the anode rod and just replace the tank.
 
A lot depends on the water that's going into it. Where we used to live in the D.C. area no one changed anode rods and water heaters all lasted 20+ years. When we moved to WV the water is harder so we run a water softener that adds small amounts of salt, which of course is corrosive. Our first water heater lasted nine years, the second about the same, and the $1400 installed cost replacement for the third got my attention so I started looking into maintenance. It turns out that both regular flushing and changing the anode are important for water heater longevity in areas where the water is the least bit corrosive and/or has high mineral content. Heat, of course, accelerates almost all chemical reactions and corrosion is one of them.

I just checked the anode a few months ago. When it needs replacement it'll be obvious as most of it will be gone! The manufacturer of the water heater, A.O. Smith actually recommends using an impact wrench, and that makes quick and easy work of getting the anode out. I put mine back as it was not near the end of useful life; I'll check every two years. It takes longer to drain some water out than to check the anode. You want to get the tank water level below the top so you don't get a minor flood when you take the anode out.

I also flush the water heater every two months and keep a log taped to the side of it.

BTW, the replacement anode rod I bought from Home Depot was $10. A 1/2 inch drive plug-in impact wrench from Harbor Freight is $40. A single 1 1/16 inch impact socket (do not use a regular one!*) is ~$20 on Amazon. So for less than $100 you can save bundles of money by increasing the longevity of the water heater, perhaps by 2 or 3 times.

.

Good on you, but to be honest, compared to THAT much maintenance effort, I’d rather just ignore the whole thing and replace the heater every 9 years (your case). At least for now (that I’m still reasonably healthy), I have no problem swapping out a water heater by myself for a total of maybe $600-700 and an hour’s worth of work (some of that hour is waiting for the tank to drain). I take the same approach with my rental properties also. I find flushing heaters too tedious, certainly too tedious to do it every other month.

Edit: I do flush my DMIL’s heater every year because that’s what she remembers her husband always doing before he passed away and therefore it makes her sleep better at night. Alas, if it weren’t for her peace of mind, I’d happily take my chances on that one too.

For our water quality around here, water heaters (untouched by any maintenance) seem to last about 10 years, interestingly, there seems to be very little difference between a $600 dollar heater and a $1500 heater in terms of how long it lasts (based on the small, but still significant, sample size with rentals, and my own home over several decades.
 
Last edited:
The hot water at my place and at many of my friend's places (those of us with wells) sometimes smells. There are various solutions but removing the anode rod worked for me. My last HW tank lasted about 12 years with an anode rod, although I'm sure it had corroded to nothing within 2-3 years.

My current tank is 3 years old, I took the anode rod out after 6 months when the hot water started to smell. We'll see how long it lasts.
 
I'm also a complete failure when it comes to water heater maintenance.

Our well water is extremely hard and we're on the third (electric) water heater since building the house 22 years ago. The first made it 4 years, the second 7 and the current one will reach its 11th birthday in May. Based on age, I'm considering replacing it now rather than wait for it to fail and have to do it in a rush.

I did the last two replacements myself but this time I'm going to pay someone else to do it for me. Looking at buying one, having it delivered and then hiring a local handyman to install it and, most importantly, dispose of the old one. Compared to what I was quoted by a plumbing company, this should save me several hundred bucks.
 
Any reason not to buy the impact sockets from Harbor Freight, since an entire set is $25 ?
https://www.harborfreight.com/12-in-drive-sae-impact-deep-socket-set-13-pc-69560.html

No reason that I can think of. I just used the example of the cheapest way out (single socket) since most people don't have use for a whole set of impact sockets and Harbor Freight doesn't sell single sockets.

The hot water at my place and at many of my friend's places (those of us with wells) sometimes smells. There are various solutions but removing the anode rod worked for me. My last HW tank lasted about 12 years with an anode rod, although I'm sure it had corroded to nothing within 2-3 years.

I've read that replacing the aluminum rod with one made of magnesium sometimes addresses the odor issue. The magnesium ones cost half again more than aluminum but they're still cheaper than a new tank.

Re the DIY replacement water heater, there was a time when I'd have done that but with my back issues those days are long gone.:( Writing the check still hurts, but not as much.
 
No, too general, must be something else in the water. We are on a well and a water softener, and our water heater was still fine after 30 years. I know others in the same situation with same results. Our TDS is ~ 700 ppm, so that much sodium is in the water.

Might be the pH? Did you have an expansion tank? If the pressure is not relieved from the heat/cool cycles (water expands ~ 4% from room to boiling), that keeps stressing the tank.

-ERD50


Wow. I cannot argue with success. Maybe I had a string of bad luck with the earlier water heaters.

I don't have an expansion tank, and do not need one. There's no check valve at the mains, and the expanded water would just flow back.

However, your post made me wonder if the solar water panels did have some other sneaky effects. The pump circulated the cold water at the bottom of the tank to the panels on the roof, and the heated water was returned to the top of the tank. This causes a larger temperature difference between the top and bottom of the tank, compared to the heating effect of the built-in electric heating element. This will cause more uneven thermal expansion, and perhaps early failure of the glass lining of the interior wall of the heater.

With electric heating, usually, it's the bottom element that turns on, and convection causes the water to circulate inside the tank, and the differential temperature inside the tank is less than with the heating from the solar panels.
 
Just today sat down with DW on the back porch, she with a glass of wine and me with a homemade Scorpion drink lol...and we made out our home maintenance list for the summer. We will do all this work ourselves. We had our house built in 1999.

1) Pressure wash the driveway and walkways, then treat the concrete
2) Repaint the back screened in porch wood (small area, should take a couple hours)
3) Remove Yucca plants from front yard
4) Restain wood timbers on egress window to basement (easy job...1 hour)
5) Apply fresh coat of clear sealant on our Therma-Tru Fiberglass front door
6) Do a whole house home inspection (see below note)
7) Oil changes on all 4 cars (I used to be an auto tech)
8) Wax two cars (the other two rarely get outside, only need done every 2-3 years)
9) Repaint garage doors (we have one large double door and one single door)

Overall the list is quite short and most jobs are very simple. Last year we had some tough ones such as installing leaf guards on our gutters (we have a 2700 sqft ranch with many rooflines, so we have lots of complex guttering), sanding/painting all lintels above windows below the brick, and replacing 3 exterior doors that were rotting.

Note: I am a retired home inspector...so this is easy for me...about 3 hours. I will inspect the entire roof, crawlspace, operate every faucet and check for leaks under all sinks/tubs/etc., operate every window and look for signs of rot/etc, inspect skylights, operate all switches, test all outlets, check all doors for proper latching, remove dead-front from electrical panel and inspect wiring, test furnace and AC units, inspect exterior brick/vinyl siding, soffits, foundation, check inside toilet tanks, inspect gutters/downspouts, etc. I do this about every 3 years on our house. I write up a full report (about 25 pages), and we then use this to fix anything that needs addressed. I keep all reports for any future home buyer.
 
Here is our Fiberglass front door...these pics are from a few years ago when I restained it. It does not need restained again, just need the clearcoat reapplied....which Therma-Tru recommends about every 4-6 years.

DSCF8605.jpg

DSCF8607.jpg
 
A lot depends on the water that's going into it. Where we used to live in the D.C. area no one changed anode rods and water heaters all lasted 20+ years. When we moved to WV the water is harder so we run a water softener that adds small amounts of salt, which of course is corrosive. Our first water heater lasted nine years, the second about the same, and the $1400 installed cost replacement for the third got my attention so I started looking into maintenance. It turns out that both regular flushing and changing the anode are important for water heater longevity in areas where the water is the least bit corrosive and/or has high mineral content. Heat, of course, accelerates almost all chemical reactions and corrosion is one of them.

I just checked the anode a few months ago. When it needs replacement it'll be obvious as most of it will be gone! The manufacturer of the water heater, A.O. Smith actually recommends using an impact wrench, and that makes quick and easy work of getting the anode out. I put mine back as it was not near the end of useful life; I'll check every two years. It takes longer to drain some water out than to check the anode. You want to get the tank water level below the top so you don't get a minor flood when you take the anode out.

I also flush the water heater every two months and keep a log taped to the side of it.

BTW, the replacement anode rod I bought from Home Depot was $10. A 1/2 inch drive plug-in impact wrench from Harbor Freight is $40. A single 1 1/16 inch impact socket (do not use a regular one!*) is ~$20 on Amazon. So for less than $100 you can save bundles of money by increasing the longevity of the water heater, perhaps by 2 or 3 times.


* If regular chrome steel sockets are used with an impact wrench there is a good chance it'll virtually explode in pieces. You'll probably get away with it a few times but at least wear eye protection. And the 1 1/16 size for the nut on the anode rod is a standard across all (or almost all) water heaters.
We have really hard water too (about 320 mg CaO3 equivalent per liter) and have a water softener that replaces the calcium ions with sodium ions, so the water is more corrosive. I looked into checking the anode in our Bradford-White water heater that is about 9 years old. I discovered unfortunately, Bradford-White manufactures its water heaters without a separate anode rod threaded hole. The anode rod shares the hot water outlet (via a unique design, see picture) on top of the water heater. What this means, in order to replace the anode, the water must be shut off and the connection must be disconnected (ours is a threaded connection to copper then to CPVC pipe) from the house plumbing and then the inlet nipple with anode rod must be unscrewed. There is no hex fitting that can be unscrewed using an impact wrench. A pipe wrench (with long cheater bar) must be used, with the tank counter held. And then, if the nipple is seized in it's threaded hole (as ours appears to be) there is a high likelihood of breaking off the nipple where the threads exit the tapped outlet hole. On ours, I can see the substantial corrosion and hardened water deposits on the nipple threads and decided to leave well enough alone.

Also, anode rods are made from one of two metals. Magnesium is for hard water and aluminum is for softer water (I believe).
 

Attachments

  • 20200508_134428.jpg
    20200508_134428.jpg
    286.2 KB · Views: 20
...............Also, anode rods are made from one of two metals. Magnesium is for hard water and aluminum is for softer water (I believe).

Long ago and far away, I had smell problems with hot water from a new WH in new construction that I built. Two water heaters, both fed by a water softener fed by city water: One WH for the main living area that was used for kitchen, laundry, a full bathroom in the more public area of house, so this WH had a lot of use, water didn't sit in it for long. No smell.

The second WH was for a full bath for bedroom level, a lot less use. It started smelling, the worse the longer it sat. Would blow some gas out first with initial water faucet turn-on if no water used from it for a good part of a day. Hydrogen Sulfide. I pulled out the Magnesium anode rod it came with, and put in an Aluminum one, it was the link-sausage type that you can flex to install when you don't have the overhead clearance to install a rigid rod. Problem solved. Never had a problem with the heavy-use WH.

At the time, nobody ever talked about water softeners vs. WH vs. type of anode rod. All reasonable-quality WH came with Magnesium. It was just by chance that I came across an Aluminum rod, and thought I'd try it. Many years later, read a short article in a DIY homeowner magazine about anode rod type vs. reaction with water.
 
When I had a water softener, the water heaters lasted 2 or 3 years. And because we had 2 of them (52 gal each) in order to store production from the solar heater panels, they took turn failing, and I was always replacing them. Sodium in the soft water is really bad for water heaters.

When the 2nd water softener failed, I said to heck with it, and learned to live with hard water, the 2 tanks lasted a long time. I did not keep record, but it had to be 20 years or more. One of the pair just leaked a couple of months ago, so I removed it and did not replace it, because our solar panels failed some years ago. I now run the sole heater with electricity from the PV panels.
With an ion exchange water softener (the most common type used), the hardness of the water being softened determines the maximum amount of sodium being added (less than the maximum may be added, depending on how much softening is added per user adjustment on some water softeners). This article explains how they work: https://www.ag.ndsu.edu/publications/home-farm/water-softening-ion-exchange
 
When I prophylacticallty replaced my glass-lined AO Smith water heater, it was 41 years old! No anodes were ever harmed in the upkeep of this heater. :)

AFAIK my in-laws are still using the same electric water heater that came with their home bought back in the 1960s...a few anodes and heating elements replaced over the years, of course.

Once a year my father-in-law drains the tank, inspects the anode, and removes the drain valve so he can clean out any debris on the bottom via his wet-dry vac.

BTW there are powered anodes...did I need a water softener I'd probably buy one of those to replace the standard anode rod.
 
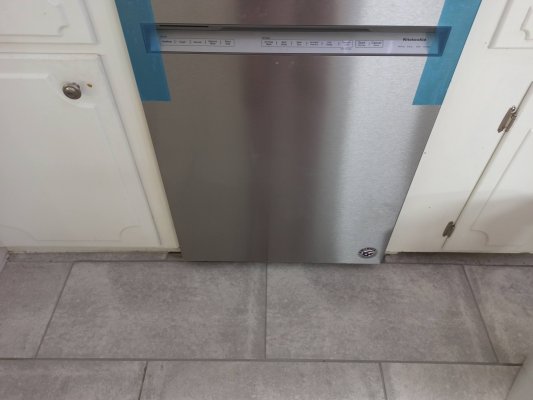
My pool pump quit. It's a Hayward SP3400VSP, a nice big 2.7-HP variable-speed pump. My record shows that I paid $1455 for it including tax and installation in 2014. The display shows an error message that many owners reported on the Web.

EcoStarPump.jpg


Searching for clues led me to stories about the failure of the pump electronics being confined to the final output drive module. My pump lasted more than 6 years, but a few owners were irate that theirs lasted just a couple of years, not long after the warranty expired. And the electronic assembly cost more than $700. This pump is discontinued, and replacing the electronics assembly is not even an option to me anymore.

But, but, but, is it possible to replace the hybrid output drive module, which should be a lot less than the entire assembly? The hybrid module has also been discontinued by the chip maker, but many sellers are still offering it on eBay and Amazon, for a price of $20 or so. They even say "for repairing pump SP3400VSP". :)

SIP-23_DSL.JPG


Yes, some guys have done it, and it takes quite a bit of work to remove the circuit board from its encasing aluminum plate. But for the reward of not having to spend another $1500, I am willing to take up the challenge.

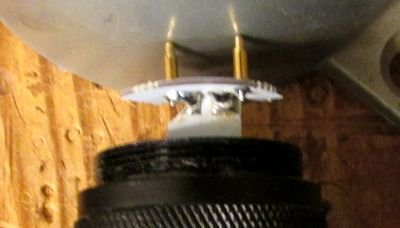
After ordering the chip, I set out to tear apart the pump. Darn, this is a very well built pump, with the electronics encased in an aluminum clamshell to make it weatherproof. The circuit board was turned upside down, and several large parts (toroid inductors, electrolytic caps) were potted with epoxy into pockets of the aluminum support case for robustness against vibrations.

Quite a bit of brute force was needed to separate the board from the tenacious grip of the high-temperature solder used on the large terminals of the potted parts. When I was done, I wondered if some inadvertent damages had been done to other more delicate surface mount parts. And then, on Youtube, quite a few guys said that the hybrid module would fail again after a couple of years. Arghhh!

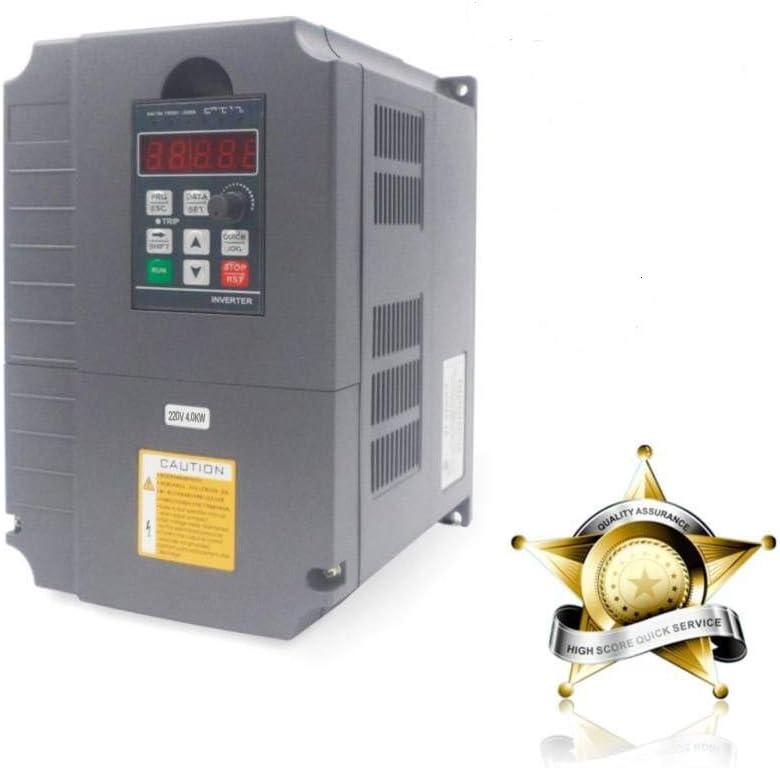
Well, I have gone this far, so when the ordered module arrives, will still continue with this repair to see if it works. But, I think I'd better make a backup plan. And that is, perhaps I can use an after-market VFD (Variable Frequency Drive) on this pump motor.

Enter the Huanyang VFD, which I bought on Amazon for $200. This 4-HP VFD is oversized for the pump, which costs me a bit more money for safety margin and reliability.


51E5ydTRGbL._AC_SL1000_.jpg


It arrived yesterday, even before the hybrid module which should be here tomorrow. Of course, I had to try to immediately hookup this VFD to the motor to see if it works.

It took quite a bit of fumbling around to play with different parameters on this universal VFD, so that it can drive my pump motor, which is a permanent-magnet 3-phase motor. At some point, I thought I would have to give it up, and to return this VFD.

In the end, I got it working with a lot of severance and a few hours of experimenting. The pump is running as I write this. And it's time too, as my pool needs some cleaning after a week of not having the pump running.
 
Last edited:
Replaced the battery in my MacBook Pro Retina yesterday. The replacement battery, pentalobe drivers, and magnetic project mat set me back $150. The local Mac store charges $450 for battery replacement. It is a very tedious process that took me 2 hours total to complete. Saving $300 put a smile on my face!:dance:
 
I received the pump drive hybrid module, installed it and the pump ran great like new.

Hayward has a new version of my pump, and it costs $1420 before tax. On the Web, some distributors still have the electronic subassembly for my discontinued pump, and they want $1149 for it. Outrageous. Hayward used to charge $700, which was also outrageous. I am glad to be able to repair it with a $30 part.

I ordered the IGBT output module from a US seller on eBay and paid a higher price than from Chinese sellers because I wanted it fast. I have just ordered the same on AliExpress, and paid $12 including shipping. It will be stocked as a spare, because the module may burn out again. The mechanical design of this pump is excellent, but it appears that the output drive electronic module made by International Rectifier (Infineon now) is either short-lived or undersized for the motor.

One thing of note: when programmed to drive the motor at 1800 rpm, the universal Huanyang VFD draws 425W, but the Hayward drive draws 350W. I guess the difference is due to the original VFD being specifically tuned for this motor, hence more efficient. The 3-phase permanent magnet motor has a plate saying it's made by A.O. Smith. Interesting! I thought A.O. Smith only makes water heaters.


PS. Prior to this brutish 2.7-HP pump, I had a smaller 1.5-HP variable-speed pump, which also had its electronics fried. This one lasted only about 1.5 years, and the failure was due to water getting inside the electronic casing. I did not throw it away, but kept it for possible repair, and only got to it just now after 6 years!

This smaller pump is nowhere as well built as the current pump. I will need a special tool to remove a couple of long bolts to remove the electronics to examine, and also to get access to the leads of the motor. If I cannot repair the electronics, will try to drive it with the Huanyang universal VFD. I guess it will be a spare pump once I get it working. :)
 
Last edited:
I was about to replace my 16 year old steel Nexgrill LP grill but on closer inspection it is still in great shape. The only things need to be replaced are two rusted burners. I ordered replacement parts for the burners and flame tamers. Now I just need to add a fair amount of elbow grease to clean it up. Will save me $900 over buying a new one.
 
Replaced the transmission drive belt on one of the Scotts/John Deere lawn tractors today (we have one at each of our two homes). Drained the gas and oil and was able to jack the front end up off the floor a good bit before grabbing the front axle and flipping it up on it's end with some blocks on the floor. Thank God for Youtube videos. NO WAY I would ever have even thought to try this with it on all 4 wheels. Not all that hard, and one YT video had a great trick to use a dog leash to stretch and release a clutch spring. Ended up using a ratched cargo strap (my own idea) two stretch the spring back to it's perch with the new belt on.


In New England, another 3-4 weeks before anything gets green and might need some mowing. For now, the tractor is a trailer tow'er to collect brush and branches until burn season ends May 1.
 

Attachments

  • 20210327_142016[1].jpg
    20210327_142016[1].jpg
    421.1 KB · Views: 27
I totally got the order of things backwards with my flashlight. I repaired it last, after buying a replacement first and getting the company to send me a replacement second. So now I'll have two extra flashlights in addition to all the backups I already had.

It looks like the problem was a solder connection that was used as a structural element. When you screw the battery cover on it rubs against two pins. The pins have springy ends like the spring bars for a watch band, but still, they're soldered to a circuit board that's soldered to another circuit board and there's pressure on all that. The connection between the two boards easily broke when I pulled the first one out, if it wasn't already broken before. The connection between one of the pins and solder glob on the opposite side of that board didn't look so good either and was blackish. I resoldered everything and it worked.

It's a 3-AA Nite Ize Radiant flashlight, which it looks like they don't make anymore so I guess they're sending my their mini 1-AA version.
 

Attachments

  • Niteize-Radiant 3-in-1-LED-flashlight-repair.jpg
    Niteize-Radiant 3-in-1-LED-flashlight-repair.jpg
    18.4 KB · Views: 172
I totally got the order of things backwards with my flashlight. I repaired it last, after buying a replacement first and getting the company to send me a replacement second. So now I'll have two extra flashlights in addition to all the backups I already had.

It looks like the problem was a solder connection that was used as a structural element. When you screw the battery cover on it rubs against two pins. The pins have springy ends like the spring bars for a watch band, but still, they're soldered to a circuit board that's soldered to another circuit board and there's pressure on all that. The connection between the two boards easily broke when I pulled the first one out, if it wasn't already broken before. The connection between one of the pins and solder glob on the opposite side of that board didn't look so good either and was blackish. I resoldered everything and it worked.

It's a 3-AA Nite Ize Radiant flashlight, which it looks like they don't make anymore so I guess they're sending my their mini 1-AA version.

I also had a fragile designed flashlight.
I unscrewed the bulb end, and when I did the soldered wires broke. A terrible design that probably helps them sell more flashlights :cool:
There is no warning to NOT unscrew the bulb end.
 
Yesterday after painting the kitchen I replaced some 50 year old plugs. Today I replaced the plugs in the living room plus the switch for the ceiling light. I think now every single plug and switch in my house is new, as well as 98% of the wiring.
 
Ordered replacement roller wheels and track for a sliding door that is not very old, but is out of warranty. Heavy, heavy door. Had to remove to get the roller size. If this doesn't work, going to french doors. Tired of screwing with it.
 
Not for me, but a client's dishwasher went caput after the ice storm. Had to break out the old one as the tile floors were laid after the fact & locked it in. Re-laid the tile after installation of the new one... Beat down.
 

Attachments

  • IMG_20210324_130737.jpg
    IMG_20210324_130737.jpg
    362.3 KB · Views: 31
Back
Top Bottom