Your recent repair? - 2021 to ?

Performed coolant flush and refill on 2 of my vehicles today. Jeep was more hassle, had to remove a skid plate and the grille to access the radiator drain. Flushed 2 times with distilled water, then filled with new coolant. Other vehicle Explorer was easy, same 2 times flush and then refill with new coolant. Probably saved $300-400 vs having it done.
 
Not actually a repair, but I just converted my 20-year old Trek road bike to a flatbar bike. New flat handlebar required new shifters, brakes, cables, and grips. A couple of YouTube videos helped make the project pretty easy. This gives new life to the most reliable bicycle I ever had. I couldn't stand to part with it.
 
Yawn, replaced the heater defroster in our 23 yo GE side by side. ordered another for a spare just to make sure that the GE goes 26 years.
 
Got back to the painting project I have been procrastinating on.
Did more prep for the actual painting. Blue tape etc.
Opened the bucket of drywall mud and found mold.
Hopefully I can scrape it off like mold on cheese and do my thing.


Refreshed my memory on why I don't like painting.
 
My window well was flooding last night and would have reached the window if I hadn't caught it in time. Seems like a drainage problem I need to troubleshoot. In the meantime I put a small automatic sump pump in the window well to be safe
 
Gave up on my plan to repair the exhaust on my Versa. My repair worked, to stop the leak, but I don't think it would have passed inspection, which is coming up soon. So I had it welded by an exhaust shop. Cost $90.
 
Replaced the old mulching mower blade on a toro with a Maxpower blade from Amazon. Glad to see it makes a major improvement in how fine the grass is mulched and leaves almost no clumps on the side track.
 
Originally Posted by ERD50 View Post
Probably not a solution for your cabin, but when I was on a private well, I hooked up a micro-controller to email me if the pump ran outside of defined conditions (too long or too short of a cycle). I've got that set up on my sump pump now that I have a finished basement.
ERD, do you have any references on how to do this that a non-EE but moderately technical person could understand? My newest house has a sump pump, and I've been considering a backup, but your solution sounds a lot better (ie. cheaper).

Inspired by that post by BlueberryPie of the water in the window well....

A little update on this, and if I get further I'll start a thread in the "Tech" forum.

I've been working on making this more generic (so it could be used for sump pump, well pump, fridge/freezer - anything you could put some sort of on/off sensor on) and setting up the code and hardware so that a non-programmer could use it. You'd still need to install an app on your computer (Win/Mac/Linux friendly) that programs the micro-controller, but that's easy and all point/click plug/play stuff.

But relevant to that post about the water in the window well, we've had an extremely dry spring. My sump pump hasn't run for (I could look it up), but at least 6 weeks. So my 3x daily status emails all report zero on/off cycles. Until yesterday - it ran 3 times overnight. Hmmmm.

So I check, there's water in the pit at the normal 'off' level, no water leaks in the basement, I walk around outside, can't see anything. Then...

I take the hose that DW waters plants with, it looks to be off, but I stick it in a bucket, and do another walk around the house. Well, that hose was dripping, filled about a 1/2 gallon in a few minutes. So running almost 24 hours, right along the foundation wall right by the pump, that eventually ran right down to the pump. So my sump monitor came in handy!

Although, the next day when she watered, she'd probably have got it turned off 100%, so not a huge deal. Oh, our water meter did detect a possible leak (not very useful, you need to jump through a hoop to check it, there is no notification system).

And of course, I reminded DW that I told her to stick the hose end in that bucket, so we'd see if it was left dripping. Dropped on the ground, it's hard to notice.

-ERD50
 
Last edited:
Got back to the painting project I have been procrastinating on.
Did more prep for the actual painting. Blue tape etc.
Opened the bucket of drywall mud and found mold.
Hopefully I can scrape it off like mold on cheese and do my thing
.
.

Refreshed my memory on why I don't like painting.

I've had the moldy mud issue as well. I bought a new one, as I was worried I'd spread mold all over the walls, and it would show up months later after painting.
Mud is cheap.
 
Mud is cheap. Just get new.

But I will tell you I have scraped off the mold before. More than a scrape, but removal of the top 1/3 of the bucket. I had no problems with it. I was in a bind that day and couldn't make a run to Big Box.
 
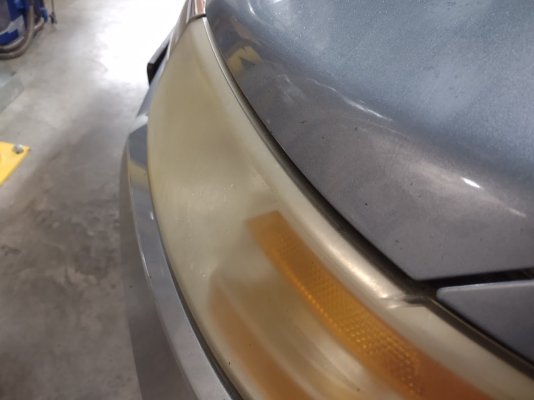
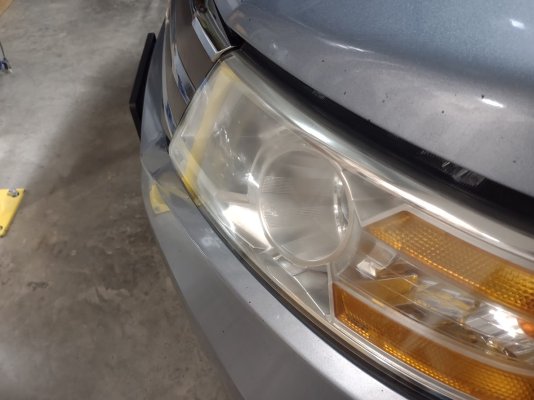
Clearing up the brown/fogged headlights.

Using the Sylvania product, I cleared up my headlights. What a difference!
 

Attachments

  • lightfog1.jpg
    lightfog1.jpg
    84.7 KB · Views: 28
  • lightfog2.jpg
    lightfog2.jpg
    120.9 KB · Views: 26
I was going to go to an R/C club meeting/fun fly but DW was up most of the night sick. She's had gastrointestinal issues off & on for years now and the docs don't seem to be able to diagnose what exactly is the issue. So I stayed home with her, neither one of us was comfortable leaving her alone. She started feeling a bit better so I went outside and pressure washed two sides of the house, I'll probably do the other sides tomorrow.

While doing that I realized that I really need to repaint the foundation wall and some of the trim, so that'll be the next maintenance project. I have nice airless sprayer that helps a lot with painting. It takes longer to mask everything off than to actually do the painting.
 
Using the Sylvania product, I cleared up my headlights. What a difference!

Wow! That is quite the difference.

I've gotten good results using water and a progression of superfine sandpaper. I put a miniscule amount of dish soap in a spray bottle, fill the bottle with water, then spray on the lens of the headlight. I start with 1500 grit sand paper and sand the same direction (horizontal), spritzing more water on the lens as I sand. After a couple minutes of that I thoroughly rinse the lens and start in again, this time using 2000 grit or 2500 grit sandpaper. Repeat the procedure.

Completely rinse and spray with soap/water solution and sand with 3000 grit sandpaper. When finished, thoroughly rinse and let dry. Then apply some wax, let it dry, and buff it off. The wax will put a protective layer on the lens.

I think I spent about $12 on the different sizes of sandpaper.

Or just buy the kit that JoeWras got.

The kit is very similar. $21

First step is some sort of cleaner, fairly strong. Just spray and rinse off

Then sandpaper 400-1000-2000.

Then some sort of abrasive paste/polish.

Then cleaner.

Then this very special liquid plastic and UV protector.


The secret sauce is the cleaner and the final coating.

I also did a round of 3000-5000-7000 sanding. Not part of the kit, just something to add. The 3000 was worthwhile. The 5000, not so sure. The 7000? Might as well have rubbed it with a diaper.


The hardest part is the rounds of wet sanding.
 
3dprinter wasn't printing properly. Since the plastic filament wasn't advancing through the machine properly, I figured that something was wrong with the extruder. Saw $11 extruder upgrade on Amazon - with more than 1000 purchased in the past month with 4,226 4.5 star review. Figured these folks had similar issues and figured it out. So I bought the upgrade, put the pieces together and appears to be fixed.
 
Last edited:
RV water pump on our camper bit the dust on the first camping trip this year. Removed the water filter on the pump to see if it was clogged and the bottom of the filter fell off. Took the filter & fitting out and connected the pump directly to the inlet still wouldn't suck up and water. Watched a youtube video on the shurflo pumps and opened the pump up and found a stuck valve. That fixed the problem.
I suspect the bottom of the filter broke out when it froze during the winter. So next year when I shut it down for the winter I'll remove the filter cup and empty it to prevent a repeat.
Replaced with a new filter for $10.
 
I moved 90% of the plumbing at our 3-season cabin that was underneath in the non-conditioned space to the inside. I also put a new pressure tank and the related controls and gauges into the conditioned space. The existing pressure tank is still under the cabin, it will be removed once I connect the new pressure tank to the submersible well and make the electrical connections.

$600 for the pressure tank, gauges, fittings, etc, and about $150 for the various PEX fittings and water line. Once the job is done 100% of the plumbing will be in the heated space with internal shut-offs for the outside faucets.

By fall I hope to add Heatline and insulate the skirting with spray foam, at which point our cabin will be come a 4-season residence.

Would it be worth it (and possible) to insulate the floor from underneath, either with foam sheets or fiberglass held up with chicken wire ?
 
Back
Top Bottom