Your recent repair? - 2021 to ?

Just replaced the power window regulator in my 2001 Silverado for the 8th time in 22 years. At least the price has been going down on them over the years.

Old GM guy here. In 2009, I switched to Subaru primarily because of stuff like this. It is unnecessary that GM produce such unreliable parts for creature comforts. They all break down way too fast. GM window regulators are notorious for their crap design/quality.

I had a 2000 Olds Alero and became expert at window regulator replacement. In 2007, we had a church intern come on staff for a year. He had an Alero. I asked him how it was? "Fine, except I can't roll down my windows."

With my experience (about 30 minutes to repair, like you), I had him come over to the house and fixed him right up as a "welcome" present.
 
I would break down and buy a new truck but every time I see what the dealers want to charge for them, I just can't pull the trigger. It looks like I'll continue doing repairs on window regulators for a while yet. Hey, 99,650 miles on a 2001 Silverado is just barely broken in after all.
 
I would break down and buy a new truck but every time I see what the dealers want to charge for them, I just can't pull the trigger. It looks like I'll continue doing repairs on window regulators for a while yet. Hey, 99,650 miles on a 2001 Silverado is just barely broken in after all.

Buy 'em by the case. :)

I never had any problems with engine or tranny on the GMs, which got to 150k miles or so. I would have kept them longer, but after interior stuff falls off, windows don't work, and alternators keep needing replacing, I got tired of them and never found out what the engine or tranny could do.
 
I just cleaned out the traps under both bathroom sinks. Got lots of gunk out of both, and they flow freely now. But one of them has a slow drip from one of the connections. Turns out the pipes in the downstairs trap setup have a weak spot. A plastic pipe butts up against another pipe, and the only thing holding the two together is pressure from the general assembly of pipes. No screwdown cap and no washer to tighten up, etc. Huh. It has the same hardware it had when I took it apart. Nothing lying around unused. The drip is obviously coming from this 'weak connection point'. For now I put a tub under it to collect the drip, but may take it apart again. I noticed the weak connection point had a burr on the lip of a cut pipe, and that burr would prevent the rest of the pipe end from mating flush. But why wasn't it leaking before? That's the mystery. No gasket. Why no gasket? Why wasn't it leaking before? Maybe because the gunk inside was sealing it. I could take apart the upstairs sink trap and see if anything's different. Don't want to, though, since it isn't dripping, ha ha.
 
I just cleaned out the traps under both bathroom sinks. Got lots of gunk out of both, and they flow freely now. But one of them has a slow drip from one of the connections. Turns out the pipes in the downstairs trap setup have a weak spot. A plastic pipe butts up against another pipe, and the only thing holding the two together is pressure from the general assembly of pipes. No screwdown cap and no washer to tighten up, etc. Huh. It has the same hardware it had when I took it apart. Nothing lying around unused. The drip is obviously coming from this 'weak connection point'. For now I put a tub under it to collect the drip, but may take it apart again. I noticed the weak connection point had a burr on the lip of a cut pipe, and that burr would prevent the rest of the pipe end from mating flush. But why wasn't it leaking before? That's the mystery. No gasket. Why no gasket? Why wasn't it leaking before? Maybe because the gunk inside was sealing it. I could take apart the upstairs sink trap and see if anything's different. Don't want to, though, since it isn't dripping, ha ha.

Under sink plumbing is all about geometry. You have to think in 3 dimensions and get everything aligned properly. Forcing together a connection when not aligned will lead to a leak.

In North America, the standard plastic sink trap is cone friction fit to the outlet pipe. Yes, there must be no burrs on these contact points. And if it has been leaking before, there may be schmutz at the contacts, which will also foul it up. Get a new trap and outlet pipe. They are very cheap.

The big thing that most people miss is that the outlet pipe is a slip-connection. You should be able to loosen the nut at the wall and slip it back and forth to get a perfectly aligned connection.

See the following diagram. Correct me if I'm wrong, but I believe your leak is a D. One thing that is not obvious to most DIYers is that you can loosen the nut at E, and adjust the alignment of that pipe to D. Make sure it is solidly aligned before tightening all nuts. Also note, if you loosen E, there IS a gasket there and once loosened, if it is old, it may be challenging to get it to seal.

For less than $10, it is best to just buy some new materials and start over.

PP940B.gif


PP940B.gif

Thanks. Great diagram. My leak is at E. It looks to me like the installer had the setup shown in the diagram, but the distance from trap to wall was non standard, and he cut off the wall band tube, hence the burr at the end. He cut off the cone at the end of the wall bend tube, and I am left with just a round flat end of the pipe, with a burr on it, which butts up against an internal lip inside the stub-out. Yes, I have a gasket at B, but no gasket at E. Maybe he threw it out. If I buy a new trap-pipe kit, it might not fit, since my distance to wall may be non standard.
 
Last edited by a moderator:
PP940B.gif


Thanks. Great diagram. My leak is at E. It looks to me like the installer had the setup shown in the diagram, but the distance from trap to wall was non standard, and he cut off the wall band tube, hence the burr at the end. He cut off the cone at the end of the wall bend tube, and I am left with just a round flat end of the pipe, with a burr on it, which butts up against an internal lip inside the stub-out. Yes, I have a gasket at B, but no gasket at E. Maybe he threw it out. If I buy a new trap-pipe kit, it might not fit, since my distance to wall may be non standard.

The "cone" in the diagram near E that you refer to is a gasket (a plastic, beveled, slip-joint gasket). There isn't a "standard distance" to the wall. Instead, a slip joint connection is used. The bend tube in the diagram comes over length, and you cut it to fit comfortably within the piece marked "Marvel connector" in the diagram. The plastic beveled slip joint then makes the seal at the right place.

Here is a typical one on Amazon:

https://www.amazon.com/Danco-81086-Washer-Assortment-Plastic/dp/B000JFK12S/ref=sr_1_1?crid=1WOEVCQ9EDR8L&keywords=plastic+slip+ring+gasket+plumbing&qid=1701279041&sprefix=plastic+slip+ring+gasket+plumbing%2Caps%2C72&sr=8-1
 
Last edited:
Under sink plumbing is all about geometry. You have to think in 3 dimensions and get everything aligned properly. Forcing together a connection when not aligned will lead to a leak. ....
The big thing that most people miss is that the outlet pipe is a slip-connection. You should be able to loosen the nut at the wall and slip it back and forth to get a perfectly aligned connection. ...

Another little tip when connecting these is to treat it like you do lug nuts on a wheel, or torquing down an engine head - loose fit everything, wiggle it around just a bit as you alternately tighten each connection just a bit at a time.

Doing that will help everything come into alignment. If you tighten one connection first, it could force another out of alignment.

Also, these connections rely on gaskets, so you really should NOT use any Teflon tape. The tape will just get in the way of tightening the nut which could keep it from fully compressing the gasket.

That said, I have found some of the lubricating type of pipe 'dopes' to be helpful, just a bit can help everything slide together better, and are thin enough to not interfere with the seal. I was having a heck of a time getting a drain basket to screw on under the sink, it kept cross threading no matter what. A little of that lube, and it went right on.

Maybe this?

51rvvqVznCL._AC_SS450_.jpg


https://www.amazon.com/Rectorseal-23710-4-Ounce-Thread-Sealant/dp/B000BKXGXM


-ERD50
 
The "cone" in the diagram near E that you refer to is a gasket (a plastic, beveled, slip-joint gasket). There isn't a "standard distance" to the wall. Instead, a slip joint connection is used. The bend tube in the diagram comes over length, and you cut it to fit comfortably within the piece marked "Marvel connector" in the diagram. The plastic beveled slip joint then makes the seal at the right place.

Here is a typical one on Amazon:

https://www.amazon.com/Danco-81086-Washer-Assortment-Plastic/dp/B000JFK12S/ref=sr_1_1?crid=1WOEVCQ9EDR8L&keywords=plastic+slip+ring+gasket+plumbing&qid=1701279041&sprefix=plastic+slip+ring+gasket+plumbing%2Caps%2C72&sr=8-1

Thanks! I think that is the missing puzzle piece. The slip joint gasket. I was wondering why I could tighten up E but it wasn't tightening up onto anything useful, and I could still pull the tube straight out. A gasket there would make sense.

Either the gasket was never installed, or I lost it during one of my many trap cleanings. I already looked through my big-bag-o-plumbing stuff and didn't find a gasket. Will buy one (or maybe a big bag of them).
 
Another little tip when connecting these is to treat it like you do lug nuts on a wheel, or torquing down an engine head - loose fit everything, wiggle it around just a bit as you alternately tighten each connection just a bit at a time.

Doing that will help everything come into alignment. If you tighten one connection first, it could force another out of alignment.

Also, these connections rely on gaskets, so you really should NOT use any Teflon tape. The tape will just get in the way of tightening the nut which could keep it from fully compressing the gasket.

That said, I have found some of the lubricating type of pipe 'dopes' to be helpful, just a bit can help everything slide together better, and are thin enough to not interfere with the seal. I was having a heck of a time getting a drain basket to screw on under the sink, it kept cross threading no matter what. A little of that lube, and it went right on.

Maybe this?

51rvvqVznCL._AC_SS450_.jpg


https://www.amazon.com/Rectorseal-23710-4-Ounce-Thread-Sealant/dp/B000BKXGXM


-ERD50


Yes, I have been doing the 'alternate tightening bit by bit' thing for decades. It's an essential in my book.

Thanks for the referral for the pipe thread sealant. I have some already, and also some teflon tape. Have used both in frustrating situations. Helped sometimes, not always.

The bit by bit method brings back memories of reattaching a power steering pump on my 85 Caprice. Darned thing came off, why wont it go back on ? Finally got everything back in their perfect places, and got it back on. Wow.
 
Thanks! I think that is the missing puzzle piece. The slip joint gasket. I was wondering why I could tighten up E but it wasn't tightening up onto anything useful, and I could still pull the tube straight out. A gasket there would make sense.

Either the gasket was never installed, or I lost it during one of my many trap cleanings. I already looked through my big-bag-o-plumbing stuff and didn't find a gasket. Will buy one (or maybe a big bag of them).

There ya go! As out-to-lunch mentioned, E does have a gasket/washer. It is usually referred to as a slip-joint washer.

You can buy just one or two at any hardware or big box. You can even buy big bags of them, no joke! They come in both harder plastic and softer silicone rubber. I use whatever works, although I'm having more luck with the new style softer silicone versions. The hard plastic was old school and usually used with metal drain tubes.
 
Last edited:
Took out the Christmas lights, and several were not completely lighting up. Even though I had bought additional sets last January when they were priced at a 90% discount, I decided to repair them. For me the simplest method of finding the bad bulb was to remove a bulb from the working section and test each bulb from the non-working section in that socket. The bulb that did not cause the working section to light was the culprit. I had another strand that was not lighting but still in the "pile of stuff to take to metal recycling and get paid" section of the basement, and that is where I am getting the replacement bulbs from.

It may seem like tedious work, but doing this while watching the various college football conference championships makes it go very quickly :LOL:.
 
Replaced all my irrigation controller valves last month hoping leaking valves were the reason for my higher than normal water bill.

Got the water bill today and it was shockingly LOW. Down by over $100 this month.

Problem solved!
 
Replaced all my irrigation controller valves last month hoping leaking valves were the reason for my higher than normal water bill.

Got the water bill today and it was shockingly LOW. Down by over $100 this month.

Problem solved!

Wow! Outstanding.
 
Our dishwasher developed a leak, it was from the water input.

I used that as an excuse to replace the shut off valve, input hose and the 90 degree connector , the old connector washer was cracked and the source of leaking.
I already had the parts as I wanted to replace the input hose since I suspected our old one (which has auto shutoff if large leak) was restricting water flow.


Regardless of how I fussed with tightening the 90 degree connector, it would always have a slow leak. Finally I decided to apply a thin coating of silicone plumbers grease to the threads and the washer, it did go on easier and didn't leak.

These are the things I mentioned:

th


danco-faucet-hardware-80360-64_300.jpg
 
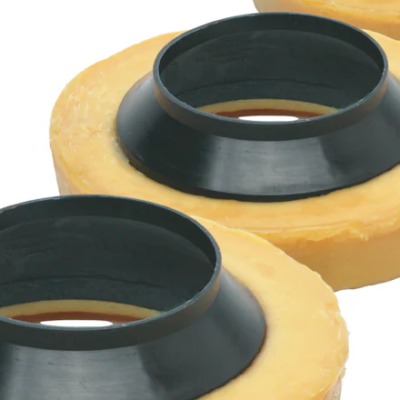
This morning I was reacquainted with everyone's favorite old friend, the wax ring. The repair actually went much easier than I anticipated.

And in my book, plumbing is still preferable over painting any day.
 
And in my book, plumbing is still preferable over painting any day.

Just proves "different strokes..." and all that. I loathe plumbing with a passion and it takes about 1/2 oz. of arm-twisting pressure to get me to call a plumber.

I actually like painting. Go figure.
 
This morning I was reacquainted with everyone's favorite old friend, the wax ring. The repair actually went much easier than I anticipated.

And in my book, plumbing is still preferable over painting any day.

Replacing a toilet is pretty easy.

This past summer I spent most of a day under our cabin with 18" of crawlspace replacing a well pump line, pressure tank, and old plumbing. I'd rather paint that ever do that again.
 
On a recent volunteer job, we replaced toilets. The facilities guy gave us wax rings. He asked about the new all rubber ones. I told him: "Don't bother, wax rings are 140 year old proven technology, nothing better."

And I believe that. The pro plumbing forums have nothing good to say about these new all rubber devices. Sometimes proven old technology is just that: proven. Maybe a little messy and gross, but it works.

I've never done a toilet replacement, but I've had two replaced by pros as a part of bathroom remodels. The guy insisted on getting the taller wax ring, said the success rate was much better and that the wax ring included with the toilet was a real crap shoot.
 
The plastic deflectors shown in the photo are not really gaskets, but are helpful and generally and widely accepted.

The "new" glue on rubber devices may become a standard device, but in most cases of repairing or even new installations, in my experience, the devices cannot be made to adhere effectively to the porcelain base.

I've found adding another thinner ring to the large wax rings with deflectors can be helpful with difficult sealing issues like uneven floors or recessed toilet flanges. Just squish them together a bit.
 
Neighbor out of town for medical care for a couple of months. My job was to drive cars. My better half made soup and I delivered prior to their arrival late that day.

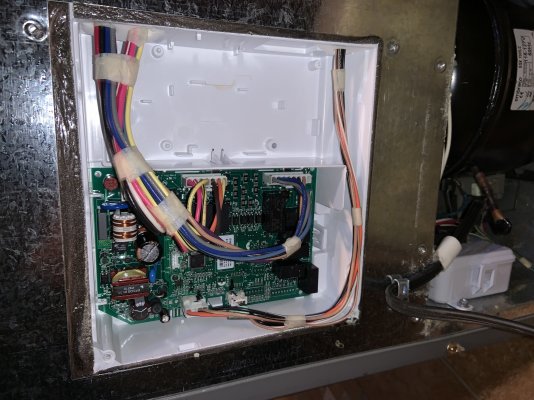
Entering house odd musky smell ... yeah, refrigerator compressor had stopped working. Got OK from neighbor to take a look. All else was working so pulled power for a few minutes. Restarted but still no compressor (or condenser fan). Powered off and pulled covers off main control board. Powered back on and wiggled each connector. When wiggling power connector on the board that I think goes to the compressor and fan (lower right but since somehow the photo is rotating on loading, it is the connector with the larger wired, one bright blue), got twitches from the fan motor - lower right. Powered off, disconnected connectors, pulled board and examined back side - nothing obvious. Flexed board back and forth - sometimes this will move pins into better contact with bad solder connections. All back together and works.

Neighbor likely to get a new refrig, but we will try to reflow the solder on the pin connectors and use as backup garage frig. Will also carefully examine the connector itself.
 

Attachments

  • IMG_2322.jpg
    IMG_2322.jpg
    659.1 KB · Views: 14
Last edited:
Back
Top Bottom