Your recent repair? - 2021 to ?

Speaking of garage door openers, I had a problem with mine. I moved into a new apartment development where all the lighting was LED.
When I hit the remote, the door would go up, but would not go down. If I turned the lights on the opener off, it would work. I had the maintenance people remove the lights. He told me there was a placard on the opener that said "Do not use LEDs".
Apparently the electronics in the LEDs interfered with the remote signal:confused:

Garage door opener lights do not stay on long, and do not use much electricity because of the short duration.

So, I have been using the incandescent bulbs I have left over the years. They will last me a long time.
 

Garage door opener lights do not stay on long, and do not use much electricity because of the short duration.

So, I have been using the incandescent bulbs I have left over the years. They will last me a long time.

Yes, it really makes no sense to spend $13 per special LED bulb, or $22 for a 2-pack (my openers take two bulbs), when an incandescent will work just fine. Energy savings is minuscule for the amount of time that light is on, and might even be negative considering LEDS take more energy to manufacture. IIRC, you can still get "utility" lights as incandescent, they are designed to work in high vibration areas like garage openers and ceiling fans.


edit/add: Here you go, $2.44/bulb in a 2-pack:

https://www.homedepot.com/p/Sylvani...ncandescent-Light-Bulb-2-Pack-11971/303762169

-ERD50
 
Last edited:
Garage door lift cable let go when opening the door this morning. Frayed and shredded. Check the others on both doors and starting to shred. You would think they would last longer than 30 years. $45 for 4 cables and 1 1/2 hours to replace.
 
Yes, it really makes no sense to spend $13 per special LED bulb, or $22 for a 2-pack (my openers take two bulbs), when an incandescent will work just fine. Energy savings is minuscule for the amount of time that light is on, and might even be negative considering LEDS take more energy to manufacture. IIRC, you can still get "utility" lights as incandescent, they are designed to work in high vibration areas like garage openers and ceiling fans.


edit/add: Here you go, $2.44/bulb in a 2-pack:

https://www.homedepot.com/p/Sylvani...ncandescent-Light-Bulb-2-Pack-11971/303762169

-ERD50

I like the LED’s because they put out a lot of light with little heat. I think they limit the incandescent bulbs to 60W. The ones I have seem brighter than that. Maybe because of there high kelvin rating.
 
I like the LED’s because they put out a lot of light with little heat. I think they limit the incandescent bulbs to 60W. The ones I have seem brighter than that. Maybe because of there high kelvin rating.

True, the 60W "rough use" bulbs are lower efficiency than standard incandescent, so the LEDS could put out a lot more lumens. Depends if that's important to you, for me, the 2x60W incandescent put out enough light for what I need. So I keep it simple.

-ERD50
 
I have had CFL's in my 3 garage door openers. They now are in there for 6 or 7 years with no issues, plenty of light.
 
I have had CFL's in my 3 garage door openers. They now are in there for 6 or 7 years with no issues, plenty of light.


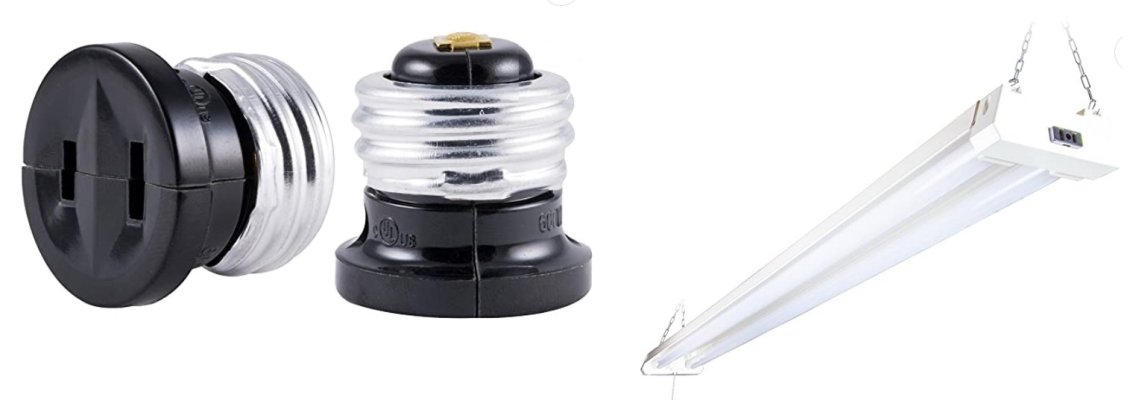
I removed the bulb and installed a Light Bulb to Outlet adapter. Then I hung a 4ft dual Led strip fixture from the ceiling. Lights up the garage well, although I have 3 more in selected areas.
 

Attachments

  • AC adapter.jpg
    AC adapter.jpg
    94.5 KB · Views: 13
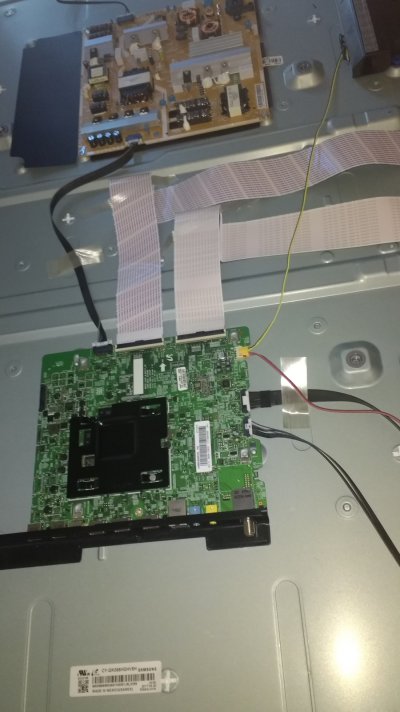
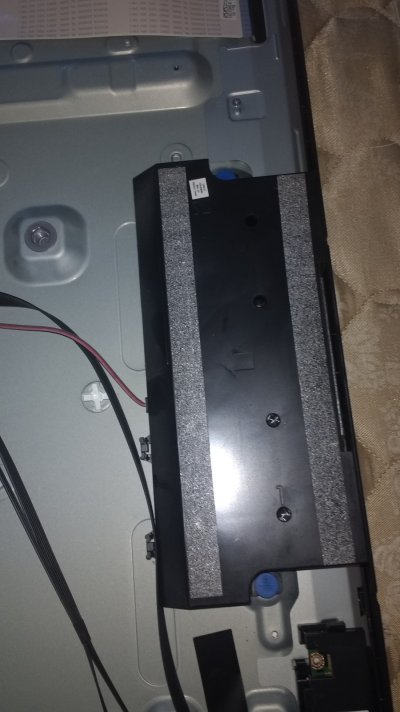
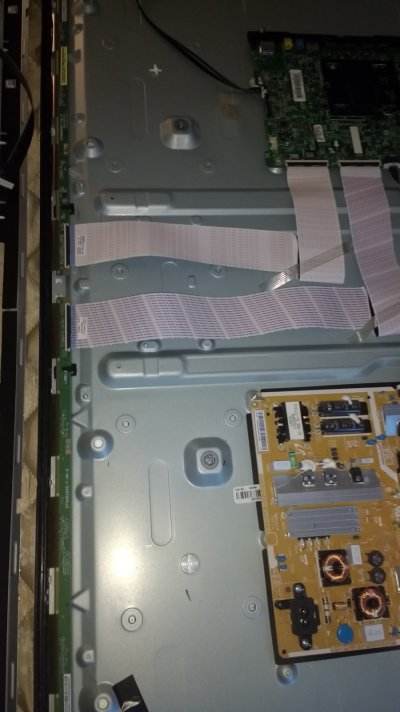
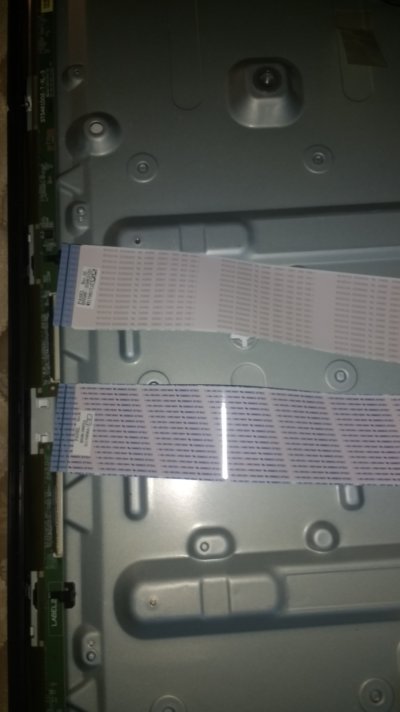
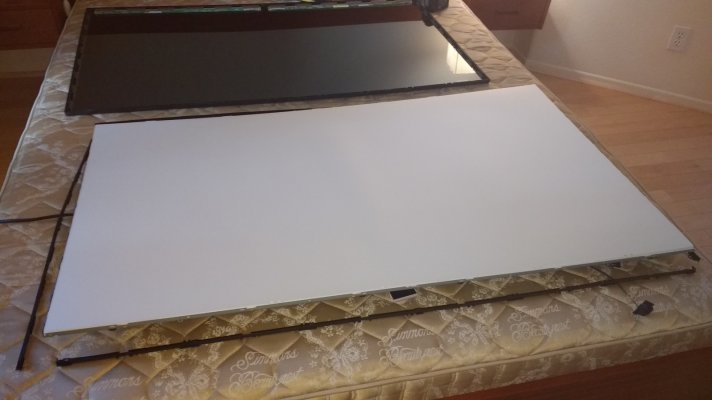
One of our 55" Samsung TVs started exhibiting a purple background on light images. This appears to be a common problem with Samsung TVs as the LED backlighting burns out over time. We bought the TV in 2018 and the LEDs they used clearly did not meet their rated lifetime. The cost of repair was more expensive than what a new 55" TV costs so we bought a replacement TV. However, I didn't want to throw this one away so I decided to see if I could repair it on my own. Since many of you may encounter the same problem or experience a complete burnout of some or all of your LED backlight, I thought I would share how to do this repair. This is part one of the repair. I found a replacement set of LED backlights on eBay for $29 with free shipping. They should arrive next week and I will complete the repair after I receive and install them. Here are the steps to get to the point of installing replacement LEDs.

1- Lay your TV on a flat soft surface (like a bed). with the screen face down and remove the back cover (easiest part of the repair). You should see the power supply and controller board plus the speakers.

2- Remove the speaker cable and speakers and set them aside

3- Remove the metal bezel on the bottom and detach the flat ribbon cables from the LCD.

4- Detach the plastic trim around the TV (it snaps off) and separate the metal back with the controller from the LCD glass. You should elevate the metal back with the mounted controllers so that the electronic do not touch the bed and lay it on it's back with the controller side down. You can apply power and see the discoloration on the white backing film.

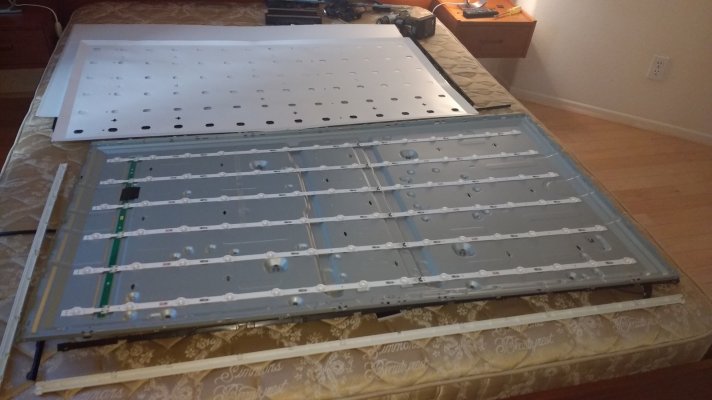
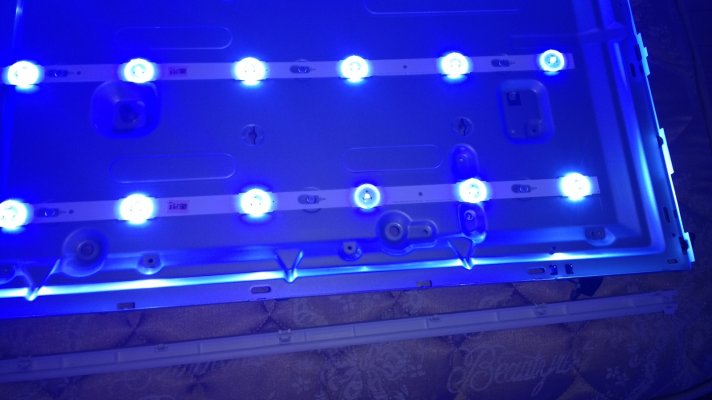
5- Remove the three layers of diffusers and set them aside. and remove the white carboard backing (held down with rotating clips) and set it aside. The LED strips are now exposed and you can see that some are outputting low power with a deep blue color instead of white.

Below are photos I took with my phone while I completed each step. You can see the discoloration of the backlighting. At least one LED was dim and deep blue on each strip. I'll post the results of the repair after I receive the LED strips and install them.
 

Attachments

  • pic 1.jpg
    pic 1.jpg
    353.3 KB · Views: 19
  • Pic 2.jpg
    Pic 2.jpg
    390.9 KB · Views: 17
  • Pic 3.jpg
    Pic 3.jpg
    323.3 KB · Views: 14
  • pic 4.jpg
    pic 4.jpg
    220.1 KB · Views: 16
  • Pic 5.jpg
    Pic 5.jpg
    289.3 KB · Views: 16
  • pic 6.jpg
    pic 6.jpg
    235.7 KB · Views: 17
  • IMG_20221105_101841758.jpg
    IMG_20221105_101841758.jpg
    351.7 KB · Views: 17
  • IMG_20221105_102021342.jpg
    IMG_20221105_102021342.jpg
    360.7 KB · Views: 16
One of our 55" Samsung TVs started exhibiting a purple background on light images. This appears to be a common problem with Samsung TVs as the LED backlighting burns out over time. We bought the TV in 2018 and the LEDs they used clearly did not meet their rated lifetime. The cost of repair was more expensive than what a new 55" TV costs so we bought a replacement TV. However, I didn't want to throw this one away so I decided to see if I could repair it on my own. Since many of you may encounter the same problem or experience a complete burnout of some or all of your LED backlight, I thought I would share how to do this repair. This is part one of the repair. I found a replacement set of LED backlights on eBay for $29 with free shipping. They should arrive next week and I will complete the repair after I receive and install them. Here are the steps to get to the point of installing replacement LEDs.

1- Lay your TV on a flat soft surface (like a bed). with the screen face down and remove the back cover (easiest part of the repair). You should see the power supply and controller board plus the speakers.

2- Remove the speaker cable and speakers and set them aside

3- Remove the metal bezel on the bottom and detach the flat ribbon cables from the LCD.

4- Detach the plastic trim around the TV (it snaps off) and separate the metal back with the controller from the LCD glass. You should elevate the metal back with the mounted controllers so that the electronic do not touch the bed and lay it on it's back with the controller side down. You can apply power and see the discoloration on the white backing film.

5- Remove the three layers of diffusers and set them aside. and remove the white carboard backing (held down with rotating clips) and set it aside. The LED strips are now exposed and you can see that some are outputting low power with a deep blue color instead of white.

Below are photos I took with my phone while I completed each step. You can see the discoloration of the backlighting. At least one LED was dim and deep blue on each strip. I'll post the results of the repair after I receive the LED strips and install them.

It is nothing like I expected about the LED strips... a total surprise !

Looking forward to more progress.
 
Some TVs have edge lit LEDs only but most are arrays like this one. LED backlighting was supposed to be more reliable than florescent backlighting but in reality they don't appear to be. We have a Sharp AQUOS 42" LCD TV from 2004 that is still working fine. These strips were marked Revision 1 and my replacement strips that are coming are marked Revision 1.5. Hopefully they improved the reliability.
 
Wow, they have shrunken the electronics to nuthin'. No wonder they can sell them big TVs so cheap.

Of course, they also know how to make the big glass LCD screen for peanuts.
 
One of our 55" Samsung TVs started exhibiting a purple background on light images. This appears to be a common problem with Samsung TVs as the LED backlighting burns out over time. We bought the TV in 2018 and the LEDs they used clearly did not meet their rated lifetime. The cost of repair was more expensive than what a new 55" TV costs so we bought a replacement TV. However, I didn't want to throw this one away so I decided to see if I could repair it on my own. Since many of you may encounter the same problem or experience a complete burnout of some or all of your LED backlight, I thought I would share how to do this repair. This is part one of the repair. I found a replacement set of LED backlights on eBay for $29 with free shipping. They should arrive next week and I will complete the repair after I receive and install them. Here are the steps to get to the point of installing replacement LEDs.

1- Lay your TV on a flat soft surface (like a bed). with the screen face down and remove the back cover (easiest part of the repair). You should see the power supply and controller board plus the speakers.

2- Remove the speaker cable and speakers and set them aside

3- Remove the metal bezel on the bottom and detach the flat ribbon cables from the LCD.

4- Detach the plastic trim around the TV (it snaps off) and separate the metal back with the controller from the LCD glass. You should elevate the metal back with the mounted controllers so that the electronic do not touch the bed and lay it on it's back with the controller side down. You can apply power and see the discoloration on the white backing film.

5- Remove the three layers of diffusers and set them aside. and remove the white carboard backing (held down with rotating clips) and set it aside. The LED strips are now exposed and you can see that some are outputting low power with a deep blue color instead of white.

Below are photos I took with my phone while I completed each step. You can see the discoloration of the backlighting. At least one LED was dim and deep blue on each strip. I'll post the results of the repair after I receive the LED strips and install them.


Good stuff!

A good number of Youtube videos on fixing LED TVs. Our 40" Samsung had a problem a month or two ago...left half of the screen was black with 5 to 10 vertical red lines.

Long story short - pulled the back off. Those two ribbon (TCON) cables in your photo, each controls half the screen. All I did was disconnect and then reseat the one controlling the left half of the screen, and that resolved it. Unbelievable. Was prepared to buy a new one, now it's good as new.

When you are retired, you have time for these DYI projects. It keeps the mind active. I looked at some videos on YouTube but every model is slightly different but the overall idea is the same. The trick will be to get it back together without breaking something. There are many cables that are very fragile. The most difficult part so far was figuring out how to remove the LED terminal strips from the connector on the terminal PCB. It doesn't just pull off the connector which makes sense since it would disconnect due to vibration. The terminal connectors have a unique locking mechanism that I have never seen before. It requires you two press down two miniature pins while pulling the connector. How TV technology has changed. When I was a child, TVs had tubes, then hybrid tube/transistors, then integrated circuits, and now CPUs, network interfaces, and graphics engines.
 
When you are retired, you have time for these DYI projects. It keeps the mind active. I looked at some videos on YouTube but every model is slightly different but the overall idea is the same. The trick will be to get it back together without breaking something. There are many cables that are very fragile. The most difficult part so far was figuring out how to remove the LED terminal strips from the connector on the terminal PCB. It doesn't just pull off the connector which makes sense since it would disconnect due to vibration. The terminal connectors have a unique locking mechanism that I have never seen before. It requires you two press down two miniature pins while pulling the connector. How TV technology has changed. When I was a child, TVs had tubes, then hybrid tube/transistors, then integrated circuits, and now CPUs, network interfaces, and graphics engines.


I hate those delicate cables. Question: Are those LED strips mounted to the glass of the TV screen? I couldn't quite make that out? If so, any chance of damage to the glass, or does it just pull away?

-ERD50
 
Replacing Insteon Devices

I have been using Insteon devices to control a few lights, a fresh air fan, and a recirculating pump the last few years. It was all controlled with an Insteon adapter for my computer and Home Control Assistant software on my computer. This generally worked well, but any time we have a minor power glitch the Insteon adapter would lose it's connection and I had to climb under my desk, unplug it, and replug it, then reset the controller software. Kind of pain, and not very wife friendly.

The Insteon company shut down earlier this year, but thankfully my existing devices still worked (with the annoyances above). Still, I knew it was time to start looking for a new solution.

So I am currently in the process of switching to TP Link Kasa Smart Devices. On the upside, they are considerably cheaper ($15-20 instead of $50-75 for Insteon). They are set up over my existing WiFi using my cell phone (I hate cell phone controls, but that's the way of the world now). I'm not crazy about devices connecting to the outside world, but the most a hacker could do is turn my lights on and off. If that's your kick, have fun. These new devices are "supposed" to keep working even if the internet goes down. We'll see. I'm also not sure how long they will retain their timer settings when the power goes out. Time will tell.

This weekend I installed the smart outlet for the pump, and the switch for the fan and both seem to be working well. So I ordered two more switches for our remaining lights and hope to do away with the last of my Insteon stuff. I won't miss all the Insteon communication issues, and it will be nice to have the various timers working even if my computer is turned off.

Ironically, by removing my first two Insteon devices the remaining two are no longer communicating with my computer. Figures. I've reset everything multiple times, but no-go. So I guess I'll have to manually switch lights on and off till the new devices arrive.

My only unknown is if my WiFi signal will be able to reach the switch in our garage to control the lights on the garage.

So anyone wanting to turn my lights on can reach me at.... :)
 
I hate those delicate cables. Question: Are those LED strips mounted to the glass of the TV screen? I couldn't quite make that out? If so, any chance of damage to the glass, or does it just pull away?

-ERD50

The LED strips are mounted on the metal backing to the TV on this model and most other LED TVs for that matter except for edge lit TVs. The glass (all black) is now face down on the bed (as shown in the photo). On YouTube videos they are lifting the glass up with suctions and putting it aside. I did not want to do that and chose to lift the back off the glass with it face down. The bed gives me enough working surface for both halves. The LED strips have a copper backing I assume for ESD protection. I have removed all the strip now and am waiting for the replacements to arrive. I will install those strips first and then test with the power on to make sure that the replacements are okay. Then I have to install the white carboard reflector which are held down with 1.8 cm spacers. The reflector makes contact with the LED strips but has cutout holes for each LED in the array. Then a plexiglass diffuser sits on the spacer followed by two more layers of soft flexible diffusers that are separated by about 1mm with edge spaces around the glass. So there is about a 1mm air gap between the glass and diffusers. I have to make sure that there is no contamination (visible dust or hair) as I reinstall each layer. I plan to check dust or hair with power applied to the LEDs as I install each layer on top of the LED strips. I will post pictures of each step as a re-assemble the TV. I have a UPS tracking number now and should receive the parts this week.
 
Our 15yr old Amana dryer started making noise. Thinking it was the idler wheel I ordered a kit with drum wheels, idler wheel and a new belt.
The dryer froze up the day the parts arrived.
Opened it up and found one of the drum wheels was stuck and the belt was creating a pile of belt dust on the bottom of the dryer.
Took the motor out and blew out all the dust and belt particles. Installed the new drum wheels and idler wheel. Started up the dryer and it ran but still squeaking.
Oiled the motor by the shaft since the bearing were sealed. Squeaking stopped but the motor was shot, it would run for only 30 minutes before it would overheat and shutdown. So, ordered a new motor and was able to keep using the dryer until the new motor arrived. (30 minutes at a time)
Installed new motor and it is working like new now.
Wheel kit was $50 and the new motor was $125.
 
Car-mageddon

I recently replaced the catalytic converter in my car. Fairly easy job other than having to jack the car way off the ground to get enough room to swing the exhaust downpipe into place. Unfortunately, about a week after I installed it, the cheap gasket they included started leaking badly. This made the car undriveable.

So, we were driving my wife's car while I waited on a new gasket. On the way back from the grocery store one night, her battery died and we limped her car home.

Since my car wasn't driveable, I pulled the battery out of my car to get hers driveable again (we both drive Jettas). Of course, this time of year it gets dark early, so this was all done with flashlights in the cold at night. Fun.

Picked up a new battery for her car, put my battery back in my car, and one car was back on the road.

Then our daughter called saying her car was leaking coolant. I jacked it up and spent about an hour taking off various covers and climbing underneath trying to see where it was leaking. Finally determined it was coming from the radiator. This was a fairly easy job on our older cars, but on her Jetta the entire front end of the car has to come off to get at the radiator. Bumper, headlights, AC lines, sub frame, etc. Sheesh. That's more work than I wanted to tackle, so I called five different shops to find someone who could get to it the following day. They started early morning and it took them all day to get it up and running again. We picked it up at closing time. Car two back on the road!

Finally, I pulled my car back in the garage. Jacked it up, and proceeded to swap out the leaking downpipe gasket. Naturally, the steering rack prevented the downpipe from dropping the 1/4 inch I needed to slip in the gasket, so I had to disconnect the other end as well to get clearance. Kind of a pain, but I managed to get everything back together with no leaks this time.

I'm not sure what the odds of all three vehicles breaking down at the same time are, but we didn't have the best luck.

So now I have to ship back the old catalytic converter for a warranty refund, and I have another converter coming next week that I will need to ship back also (I originally thought the other new converter was leaking).

It has been a stressful week, but we're all up and running again. Yahoo!
 
Reminds me of why I don't like working on my vehicles. Or other machines. Of course, I do it anyway sometimes.


I recently replaced the catalytic converter in my car. Fairly easy job other than having to jack the car way off the ground to get enough room to swing the exhaust downpipe into place. Unfortunately, about a week after I installed it, the cheap gasket they included started leaking badly. This made the car undriveable.

So, we were driving my wife's car while I waited on a new gasket. On the way back from the grocery store one night, her battery died and we limped her car home.

Since my car wasn't driveable, I pulled the battery out of my car to get hers driveable again (we both drive Jettas). Of course, this time of year it gets dark early, so this was all done with flashlights in the cold at night. Fun.

Picked up a new battery for her car, put my battery back in my car, and one car was back on the road.

Then our daughter called saying her car was leaking coolant. I jacked it up and spent about an hour taking off various covers and climbing underneath trying to see where it was leaking. Finally determined it was coming from the radiator. This was a fairly easy job on our older cars, but on her Jetta the entire front end of the car has to come off to get at the radiator. Bumper, headlights, AC lines, sub frame, etc. Sheesh. That's more work than I wanted to tackle, so I called five different shops to find someone who could get to it the following day. They started early morning and it took them all day to get it up and running again. We picked it up at closing time. Car two back on the road!

Finally, I pulled my car back in the garage. Jacked it up, and proceeded to swap out the leaking downpipe gasket. Naturally, the steering rack prevented the downpipe from dropping the 1/4 inch I needed to slip in the gasket, so I had to disconnect the other end as well to get clearance. Kind of a pain, but I managed to get everything back together with no leaks this time.

I'm not sure what the odds of all three vehicles breaking down at the same time are, but we didn't have the best luck.

So now I have to ship back the old catalytic converter for a warranty refund, and I have another converter coming next week that I will need to ship back also (I originally thought the other new converter was leaking).

It has been a stressful week, but we're all up and running again. Yahoo!
 
Reminds me of why I don't like working on my vehicles. Or other machines. Of course, I do it anyway sometimes.

Yeah, it has lost it's luster for me as well. I still try to do what I can, but we are trying to adapt to taking cars to a shop for repairs. At least for the bigger jobs. We've always fixed everything ourselves, so it's a bit of a sticker shock.

Speaking of which, the battery for my wife's car cost $230 at O-Reilly's. Sheesh, I remember when we used to get car batteries for $40. :)

I also got tired of maintaining all the gas engines in our mower, chainsaw, string trimmer, etc. So I slowly transitioned to all EGO battery powered tools. Sooo much nicer. Just pop in a battery and go.
 
Just finished rebuilding one of our two decks. I had about 100 older landscape timbers in the barn, that were still solid, so I used them and "improvised" as I went along... The original foundation 4x4's, flooring and roofing was still in really good shape, only the sides needed to be redone. Once that was complete I power washed the entire thing and it looks new again and has a new design (Hey the DW likes it)... Still need to apply some deck staining/water proofing, but that's it... Should last another ~15 years. (or longer than me.) :)
 
Last edited:
Maybe Jettas have the same mechanism as fire ants? Fire ants are infamous for setting off a pheromone before they sting you. This coordinates the others to hit you at once. Boom, not just one sting, but a handful simultaneously.

Sounds like VW built something into Jettas to hit you at the same time. :LOL:

I recently replaced the catalytic converter in my car. Fairly easy job other than having to jack the car way off the ground to get enough room to swing the exhaust downpipe into place. Unfortunately, about a week after I installed it, the cheap gasket they included started leaking badly. This made the car undriveable.

So, we were driving my wife's car while I waited on a new gasket. On the way back from the grocery store one night, her battery died and we limped her car home.

Since my car wasn't driveable, I pulled the battery out of my car to get hers driveable again (we both drive Jettas). Of course, this time of year it gets dark early, so this was all done with flashlights in the cold at night. Fun.

Picked up a new battery for her car, put my battery back in my car, and one car was back on the road.

Then our daughter called saying her car was leaking coolant. I jacked it up and spent about an hour taking off various covers and climbing underneath trying to see where it was leaking. Finally determined it was coming from the radiator. This was a fairly easy job on our older cars, but on her Jetta the entire front end of the car has to come off to get at the radiator. Bumper, headlights, AC lines, sub frame, etc. Sheesh. That's more work than I wanted to tackle, so I called five different shops to find someone who could get to it the following day. They started early morning and it took them all day to get it up and running again. We picked it up at closing time. Car two back on the road!

Finally, I pulled my car back in the garage. Jacked it up, and proceeded to swap out the leaking downpipe gasket. Naturally, the steering rack prevented the downpipe from dropping the 1/4 inch I needed to slip in the gasket, so I had to disconnect the other end as well to get clearance. Kind of a pain, but I managed to get everything back together with no leaks this time.

I'm not sure what the odds of all three vehicles breaking down at the same time are, but we didn't have the best luck.

So now I have to ship back the old catalytic converter for a warranty refund, and I have another converter coming next week that I will need to ship back also (I originally thought the other new converter was leaking).

It has been a stressful week, but we're all up and running again. Yahoo!
 
When I was in my teens, I worked and most of that money went to keeping my car running and a bit of partying. I wrenched on cars for about 5 years. Then I started making money that allowed me to pay for repairs. So much better. Now I have more money and drive newer cars that hardly need repairing. Even better. I still do the few easy things like windshield wipers, air filters, top off fluids . . . but I’m so glad I don’t have to deal with that any longer. The main thing I like is that having the financial ability to make it someone else’s problem is such a huge stress relief. Having said that, I have a lot of respect for those who will still do the work on their cars. I can’t even imagine wrenching on a car today given how they cram everything together in the engine compartment. Let alone how computerized everything is.

As for this story, it reminds me of my generators (which I do still maintain/repair myself). We have three in the family, two portable on my whole house. During a major electrical outage, two of them went down, my whole house and one of the portables. For one day, we swapped out the working one between me and my daughter’s house to keep the refrigerators going. Then I got the other portable generator working. That saw us through the outage. The whole house unit needed a new starter which I had to order. Got that swapped out and we’re ready for the next outage. It’s amazing how often stuff happens in unison.
 
Oh boy, working on cars! Nowadays, I long for a simple 4-cylinder engine car that's easy to maintain.

I ran across a YouTube channel called Samcrac, and this guy likes to buy cheap high-performance cars like Ferrari and Lambo to fix up. Gosh, these things are a nightmare to work on. I just can't imagine finding fun in it, but that's just me I guess.
 
Back
Top Bottom