Your recent repair? - 2021 to ?

Great work !

At my rental
Once had a valve/the coil for the A/C go bad.
Cost to fix would be $1,600 but lucky me I had a maintenance agreement that covered it.
Tech told me the system is 10 years old and they could offer $1,500 off the price and just replace the system with a new one.

I went with the free repair (replace the coil) as I figure it will last a few more years , and later found out they often have $1,500 off coupons..

Good job pushing back.

I think it is environmental misconduct that we as a society have come to expect "8 to 10 years until you replace your HVAC system". That's wrong. We should not accept this.

All this churn is bad for our wallets and bad for the environment. These systems should last 20 to 25 years without a major problem. It's not like they are vibrating around like automobile air conditioners. Sure, fans and capacitors go early. I get it. But the narrative has become replace, replace, replace. Why?

I regret having my other system replaced in 2021 at age 22. The blower unit was in such good shape. But alas, I would have had to find someone who could repair the coil since they didn't make them anymore. Very few techs want to repair a coil.

One reason I really hope to keep this R-22 unit going is so that my next system has the next version of refrigerant. If I replaced it today with R-410, it would be "dead unit walking" because everything 410 is going to be obsolete in -- wait for it -- 8 to 10 years. Manufacturers are already shifting to the next gen products. It requires a new design. They won't keep making parts for the old once this gets seriously going.
 
Last edited:
.... Since then I keep a spare capacitor around. At a cost of $7.50 it's pretty cheap insurance. ...

After I get settled into the 'new' place (2007 build), I investigated, and purchased capacitors for compressor, AC fan, and air handler blower. I also bought furnace ignitor/sensor (forgot off hand if it is an all-in-one), and temperature safety switches, and thermocouple for water heater. IIRC, maybe $80 all in.

Each of these is a 10 minute job, and pretty easy diagnosis. Easier than arranging a service call.

DD has had to call a guy in twice, and each was an easy fix. A/C capacitor, and the furnace condensor (as in condensation - not a condensor/capacitor) drain got clogged. I could have gone over to fix them, but time was of the essence, and I didn't want to add time if it was something I couldn't fix right there and then.

Fortunately, we have found a good service guy, doesn't push anything not needed.

-ERD50
 
After I get settled into the 'new' place (2007 build), I investigated, and purchased capacitors for compressor, AC fan, and air handler blower. I also bought furnace ignitor/sensor (forgot off hand if it is an all-in-one), and temperature safety switches, and thermocouple for water heater. IIRC, maybe $80 all in.

I knew there was someone on this board who pre-stocked these items. Now I discover there are at least 2! Pretty good idea. I kind of got lucky to get same day delivery on mine.

We used to have an appliance part business around here that helped retail customers. That guy closed. In later years he was a cranky SOB. I guess Amazon killed him.
 
Made a 7' wooden step ladder into a 6'. Why? because one leg, at the bottom broke off below the bottom rung.
So, saw off the the other three,remove the bottom rstep move stabilizing brackets to the new bottom step, bolt them in place. Should be good for another 40 years. About an hour of fiddling to get it done.
 
I knew there was someone on this board who pre-stocked these items. Now I discover there are at least 2! Pretty good idea. I kind of got lucky to get same day delivery on mine.
I have been known to keep a capacitor stash, and also a stash of engine air filters, cabin air filters.


Today I put a hitch on my old car. Of course it wasn't as easy as in the video I watched before buying the hitch :facepalm:


It turns out that my car wasn't the same as the one in the video and didn't align with the installation instructions, even though the part was sold for my model and year. I made it work ( https://youtu.be/AEeq3V_iTQg if you're curious). They wanted you to remove the exhaust hangers (front and back of the muffler), and mine had a central hanger that looked fairly impossible to remove. So I managed to wrangle the hitch on without dropping the muffler.


It's always good to allocate a full day for a one-hour job :cool:
 
Good job pushing back.

I think it is environmental misconduct that we as a society have come to expect "8 to 10 years until you replace your HVAC system". That's wrong. We should not accept this.

All this churn is bad for our wallets and bad for the environment. These systems should last 20 to 25 year

I agree, it's almost a scam now.

And $15,000 to replace a furnace? It's a $2 - $3k wholesale and usually takes 2 guys a half day to install it (give or take). One of them is a tech, the other guy is basically grunt labour. Do the math.
 
Good job pushing back.

I think it is environmental misconduct that we as a society have come to expect "8 to 10 years until you replace your HVAC system". That's wrong. We should not accept this.

All this churn is bad for our wallets and bad for the environment. These systems should last 20 to 25 years without a major problem. It's not like they are vibrating around like automobile air conditioners. Sure, fans and capacitors go early. I get it. But the narrative has become replace, replace, replace. Why?

I regret having my other system replaced in 2021 at age 22. The blower unit was in such good shape. But alas, I would have had to find someone who could repair the coil since they didn't make them anymore. Very few techs want to repair a coil.

One reason I really hope to keep this R-22 unit going is so that my next system has the next version of refrigerant. If I replaced it today with R-410, it would be "dead unit walking" because everything 410 is going to be obsolete in -- wait for it -- 8 to 10 years. Manufacturers are already shifting to the next gen products. It requires a new design. They won't keep making parts for the old once this gets seriously going.

I probably wouldn't try to have a coil repaired.

Just buy a cased coil for a few hundred bucks and have that brazed in (actually soldering is now easier, see youtube), pull a vacuum, and have it recharged.

I'm seriously thinking of attending the local community college to get the certificate so I can do the above myself on my 15-year-old, R-410A heat pump.

BTW, RS-44b is the preferred drop-in replacement for R-22...you're supposed to evacuate the system but apparently there's no problem mixing the two refrigerants if a top-off is needed.
 
Last edited:
Had a rotting edge of wood on the house. Cleaned it up and fashion a repair mold for the voided area with drywall corner aluminum.

DW reminded me that pro house painters used Bondo, not wood filler for this sort of thing.

Life changing hack!

Once you get the hang of mixing the hardener, you then have to move fast before it hardens.

Filled the void between the wood and the mold edge. Requires a powered sander rough grit to smooth out.

Yes! This really works. Bondo actually makes a product called "wood filler".

I've also combined this with "wood hardener" products when there is some deeper spongy grain still in place. It has lasted many years.

The process feels like dentistry techniques on a large scale.
 
....
Once you get the hang of mixing the hardener, you then have to move fast before it hardens.

Filled the void between the wood and the mold edge. Requires a powered sander rough grit to smooth out.

Yep, Bondo can make an excellent wood filler/repair. Not sure from your post, but the trick is to do most of the shaping/'sanding' before it has fully hardened. When it is about as hard as cheese, a sureform type scraper/file will let you just grate it down to size, and if needed, you could pull a tool through it to natch wood grain.

-ERD50
 
The process feels like dentistry techniques on a large scale.
Never thought of it that way, but yeah, that's it. Getting it filed down before it hardens all the way is important, but it clogs up whatever you are using to smooth it. One key, dentistry style, is decide where you want Bondo and where you don't. IOW, don't try to "feather" down to a thin coat, because it's gonna peel. What I do is cut out the "cavity", and mask off the perimeter with blue tape. Then, in the flurry of activity before the stuff hardens, you look for the blue, and you know you're at the right surface level.

The stuff does hold up well too. Here's a video I did years ago. This was before I perfected my dentistry/masking technique. But even so, I later cut off the peeling thin Bondo, caulked and repainted, and it's still looking ugly (but not rotten).
 
Never thought of it that way, but yeah, that's it. Getting it filed down before it hardens all the way is important, but it clogs up whatever you are using to smooth it. One key, dentistry style, is decide where you want Bondo and where you don't. IOW, don't try to "feather" down to a thin coat, because it's gonna peel. What I do is cut out the "cavity", and mask off the perimeter with blue tape. Then, in the flurry of activity before the stuff hardens, you look for the blue, and you know you're at the right surface level.
I was surprised how fast it hardened. "flurry" indeed.

I got a laugh at your loaded sandpaper. So true, so true. I could have taken that picture.
 
Seek advice on wiring in new push button light sitch in range hood

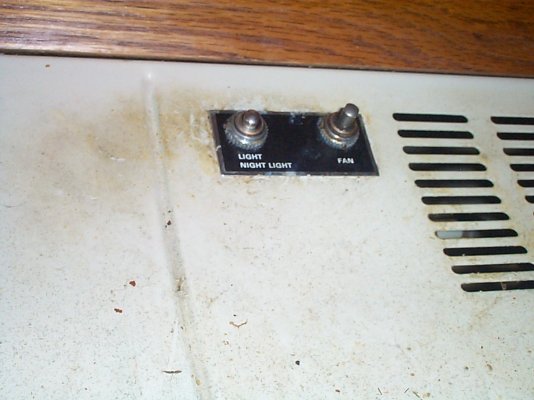
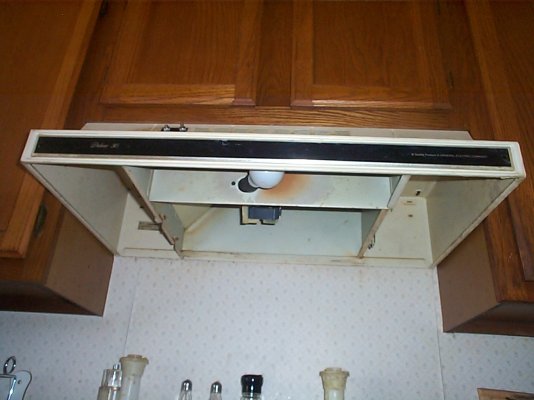
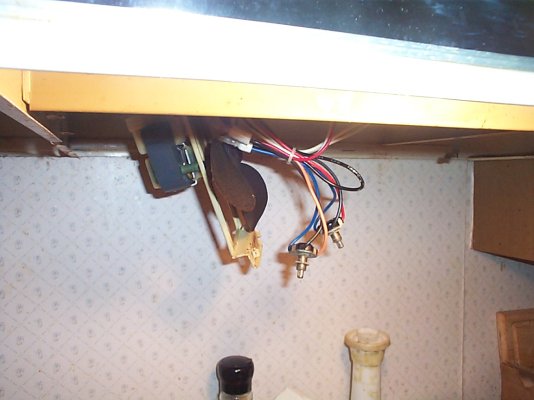
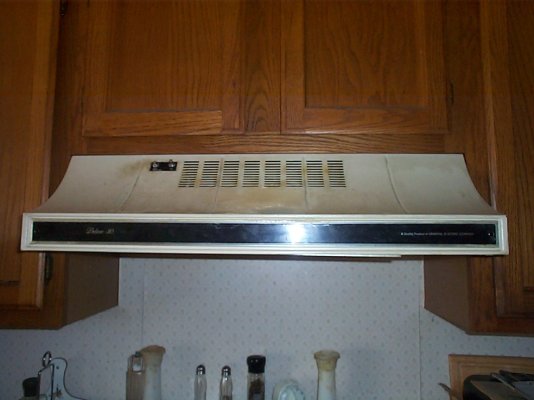
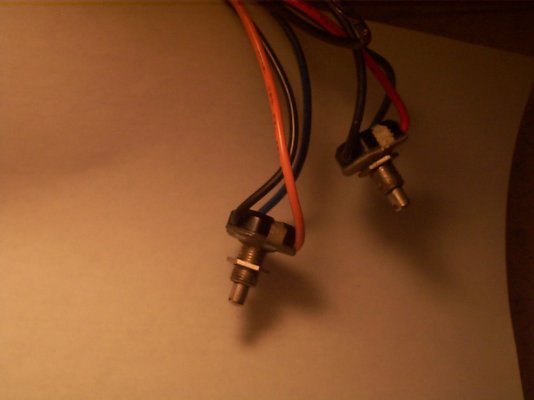
Looking for advice on how to rewire things when replacing a 3-wire push button light switch with a 2-wire push button light switch. The light switch is in a range hood, model J N334 003AD a GE Deluxe 30 from 1986. The light switch is part number is either WB24X5197 or WB7X1478. (2 different sources) I gave up after 4 hours, looking for the exact replacement part. No longer available. Can't even find a generic alternative. Functions of original switch were hi, low, off. Click, click, click. I have the old switch hanging out of the range, accessible for changing. See pics. The old switch has 3 wires attached to it. Black, orange, and blue. The new push button switch I am thinking of buying is just on/off. That's all I want, anyway. Want it come on full blast, or be completely off. New switch has only 2 wires coming out of it, both black, if I recall correctly. My current plan is cut all 3 wires at the old switch, then identify which wire is the 'night light' (dim) wire, and seal it off with electrical tape, or a wire nut, and splice the remaining 2 wires to the 2 wires on the new switch. The wire I plan to seal off, of the original 3 wires, is the orange one, since you can see from the linked pic, that it has a blob on the end of it, which I assume is a voltage reducer, to provide the 'night light' function (which I no longer want). Does it make any difference if I use wire nuts or butt splices to connect the wires? I think all wires involved will be stranded (lots of tiny wires bundled inside the plastic coating). Thanks ! The switch : https://www.repairclinic.com/PartDetail/Switch/WB24X5197/253608 note in the last pic, the switch in question is the one on the left. Black, orange, and blue wires on it.
 

Attachments

  • hood 2.JPG
    hood 2.JPG
    224.2 KB · Views: 20
  • hood 1.JPG
    hood 1.JPG
    203.6 KB · Views: 18
  • hood 7.JPG
    hood 7.JPG
    178.4 KB · Views: 21
  • hood 4.JPG
    hood 4.JPG
    210.6 KB · Views: 18
  • hood 8.JPG
    hood 8.JPG
    127.2 KB · Views: 18
Last edited:
I think it is environmental misconduct that we as a society have come to expect "8 to 10 years until you replace your HVAC system". That's wrong. We should not accept this.

All this churn is bad for our wallets and bad for the environment. These systems should last 20 to 25 years without a major problem...

On the other hand, sometimes you save money and the environment too by replacing still running but obsolete appliances.

I was proud of keeping my pool pump going for more than 15 years, by replacing the motor once.

Then, one day, I discovered that the darn thing ran, but without moving much water. It was so worn out that the spacing between the impeller and the pump body became so large that it could no longer move water.

Arghhh!!! The flow had steadily decreased over the years that it escaped my attention. It's just like the human body that loses abilities with age, but it may be so gradual you just get used to it. Only by reflecting on what you used to be able to do but now fail, that you will realize you are old.

Anyway, when I replaced the pump with a modern variable-speed motor, I immediately appreciated the new quiet operation instead of the racket made by the old worn-out pump. And I was able to program the speed down and used only 550W instead of more than 1000W, yet had the flow so much stronger to operate the pool vac.
 
It's just like the human body that loses abilities with age, but it may be so gradual you just get used to it. Only by reflecting on what you used to be able to do but now fail, that you will realize you are old.


Obviously you're not old yet. Pain is the hint you're old, not lack of ability.
 
Obviously you're not old yet. Pain is the hint you're old, not lack of ability.

Eh, one avoids pain by limiting his activities. :cool:

So, it all comes back to reduced abilities. :D
 
Looking for advice on how to rewire things when replacing a 3-wire push button light switch with a 2-wire push button light switch......
Yeah, that's probably alright. Using the zoom on the unobtainable part's pic, the part crimped onto the orange wire looks like a diode, it has polarization markings on it, so your guess on power reduction is probably correct.

Wire nuts or insulated crimp, whichever.

A half-step you might want to do as a check - Snip off the black, blue, and orange wires to the old 3-wire switch. Strip back the insulation on the black and blue wires coming out of the fan unit for a bit, and temporarily connect them together with a wire nut. Keep the snipped off end of the orange wire clear of the fan unit metal, and your hands.
Turn on the power to the fan unit (at the breaker). The light should be on full brilliance, if the bulb is still good. This checks out the idea, and simulates what the new switch will do when wired in and ON. Before you actually wire it in.
 
Last edited:
Yeah, that's probably alright. Using the zoom on the unobtainable part's pic, the part crimped onto the orange wire looks like a diode, it has polarization markings on it, so your guess on power reduction is probably correct.

Wire nuts or insulated crimp, whichever.

A half-step you might want to do as a check - Snip off the black, blue, and orange wires to the old 3-wire switch. Strip back the insulation on the black and blue wires coming out of the fan unit for a bit, and temporarily connect them together with a wire nut. Keep the snipped off end of the orange wire clear of the fan unit metal, and your hands.
Turn on the power to the fan unit (at the breaker). The light should be on full brilliance, if the bulb is still good. This checks out the idea, and simulates what the new switch will do when wired in and ON. Before you actually wire it in.

Thanks !
 
Looking for advice on how to rewire things when replacing a 3-wire push button light switch with a 2-wire push button light switch. The light switch is in a range hood, model J N334 003AD a GE Deluxe 30 from 1986. The light switch is part number is either WB24X5197 or That's all I want, anyway. Want it come on full blast, or be completely off. New switch has only 2 wires coming out of it, both black, if I recall correctly. My current plan is cut all 3 wires at the old switch, then identify which wire is the 'night light' (dim) wire, and seal it off with electrical tape, or a wire nut, and splice the remaining 2 wires to the 2 wires on the new switch. The wire I plan to seal off, of the original 3 wires,


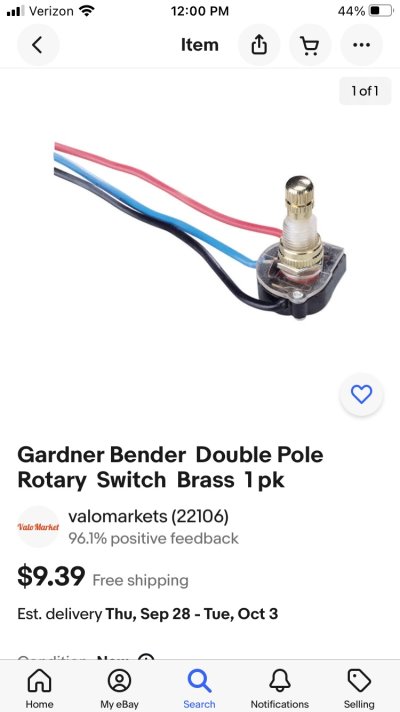
Will this work? A generic 2 pole rotary switch…
IMG_2341.JPG


https://www.ebay.com/itm/3839511034...DPtetYDTgC&var=&widget_ver=artemis&media=COPY

I would use wire nuts. Butt splices can be used but there’s a wide variety and redults can vary.
 
Last edited:
Will this work? A generic 2 pole rotary switch…
View attachment 47171


https://www.ebay.com/itm/3839511034...DPtetYDTgC&var=&widget_ver=artemis&media=COPY

I would use wire nuts. Butt splices can be used but there’s a wide variety and redults can vary.


I did not see in the description in the eBay listing whether the above switch is "On-On" (2 stops), or "On-Off-On" (3 stops).

The OP said the "Functions of original switch were hi, low, off." So, he would want a rotary switch with 3 stop positions, meaning either "Off-On-On", or "On-Off-On".
 
OP here. Thanks for the suggestions! I stopped agonizing over my decision, and went down to my local hardware store, and bought a toggle switch, a simple 'off/on' switch, which I think is called an SPST switch. It had just two screw terminals on it, which I like, since it looks easy to just hook the existing wires up to the terminals (cap one wire and hook up the other two). No butt splices or wire nuts needed. Went to insert it into the range hood, and the threaded part of the switch was too big. It was a half inch diameter. I measured the hole in my range hood, and it was 3/8 inch. My new challenge is to find a switch, any switch, that has a 3/8 inch thread diameter. Been looking online, can't find any yet. Seems to very non standard.
 
Last edited:
OP here. Thanks for the suggestions! I stopped agonizing over my decision, and went down to my local hardware store, and bought a toggle switch, a simple 'off/on' switch, which I think is called an SPST switch. It had just two screw terminals on it, which I like, since it looks easy to just hook the existing wires up to the terminals (cap one wire and hook up the other two). No butt splices or wire nuts needed. Went to insert it into the range hood, and the threaded part of the switch was too big. It was a half inch diameter. I measured the hole in my range hood, and it was 3/8 inch. My new challenge is to find a switch, any switch, that has a 3/8 inch thread diameter. Been looking online, can't find any yet. Seems to very non standard.

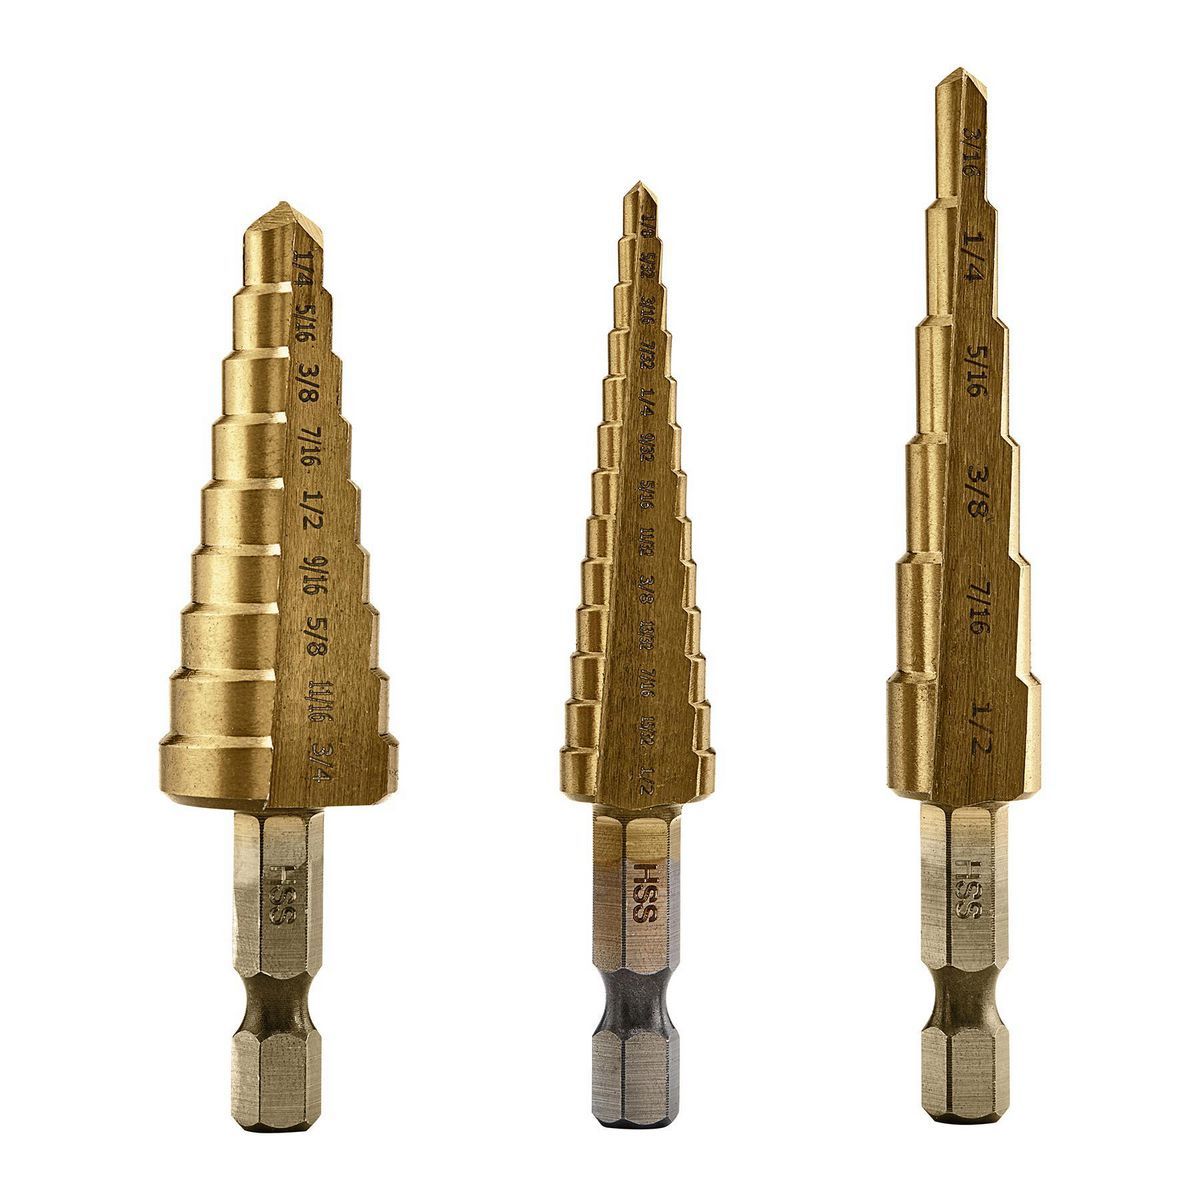
Get yourself a set of these. Incredibly handy, lots of uses (on sale now for $9):

https://www.harborfreight.com/power...oated-high-speed-steel-step-drills-91616.html

91616_W3.jpg


-ERD50
 
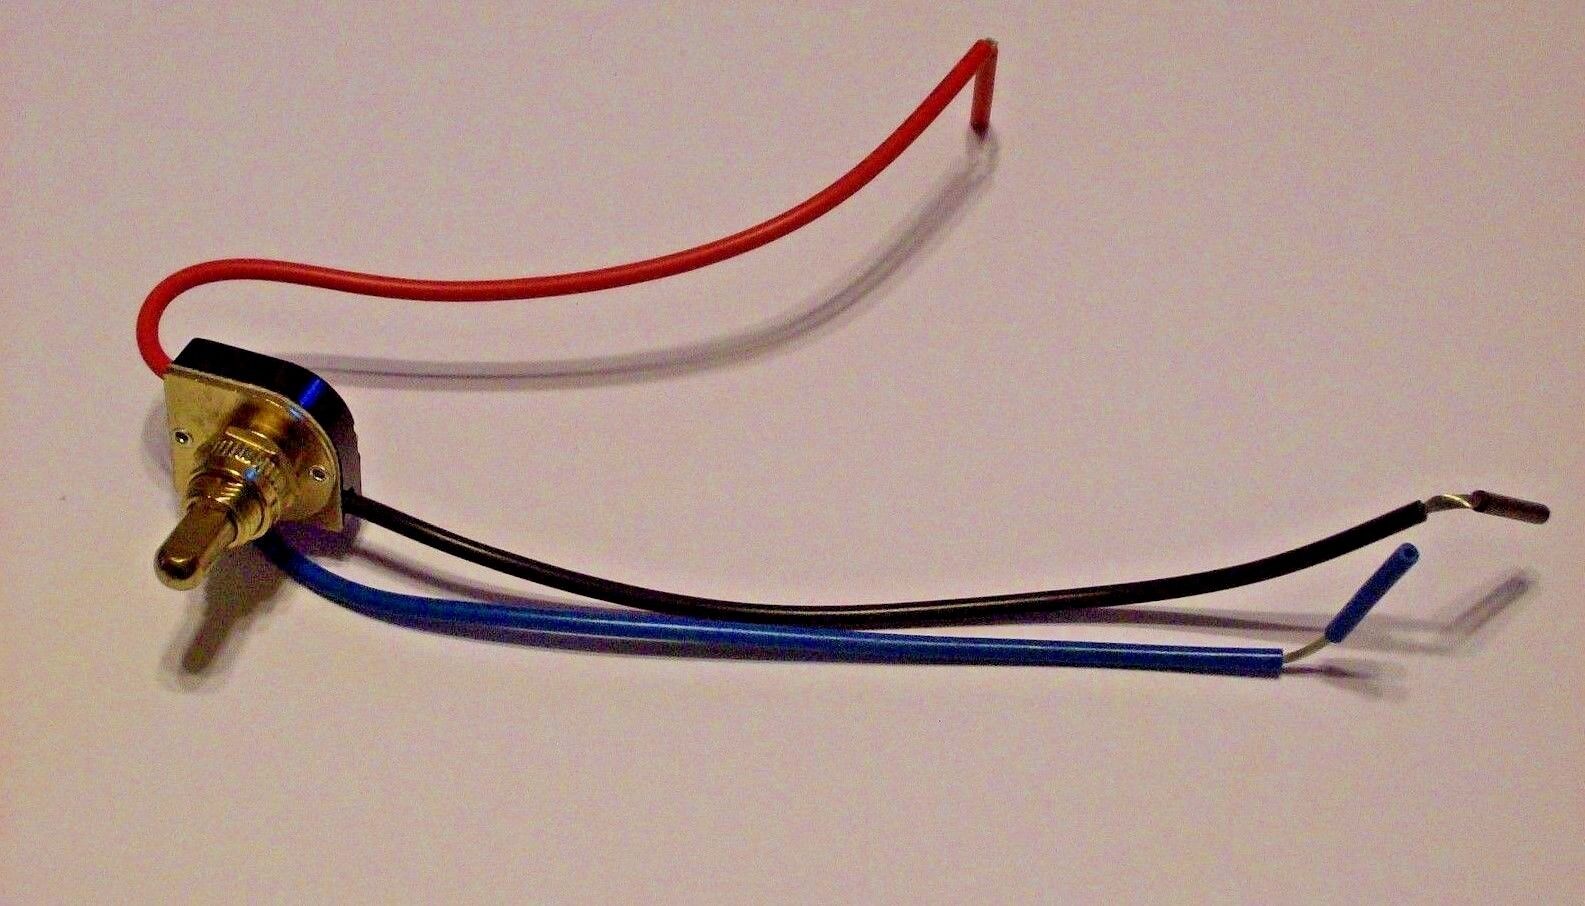
I found a 3/8" shank push button switch on eBay. In fact, I saw several offerings from different vendors.

However, the ones I looked at are all 4-position switches. That means, with consecutive button pushes, the sequence is "Off - On 1 - On 2 - On 1+2".

If you use this switch, then the light will go "Off - Low - High - High", or "Off - High - Low - High", depending on how you attach the wires.

https://www.ebay.com/itm/1626116887...mtps9MlLpm9/pLyZ+c7z4WaQ==|tkp:Bk9SR7rW07DVYg

s-l1600.jpg
 
Back
Top Bottom