What We're Making

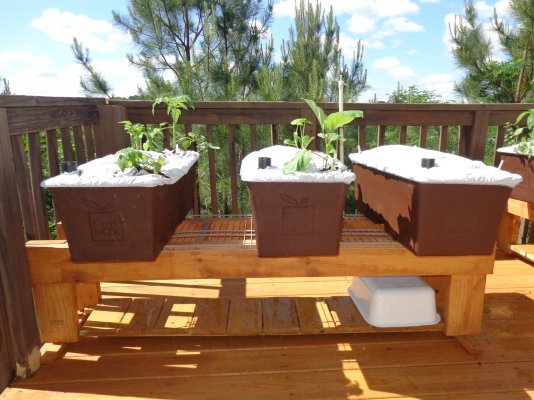
Here's a pic of raised planter stands hubby made for me (and of my container veggie garden). I love them!
 

Attachments

  • DSC02960.jpg
    DSC02960.jpg
    658.2 KB · Views: 42
My guess is that the blankie keeps the soil warm, while the tube allows water to reach the deep roots.

I do not need the first where we live, but the watering tube is an idea I keep forgetting to implement
 
I like the wheelbarrow!

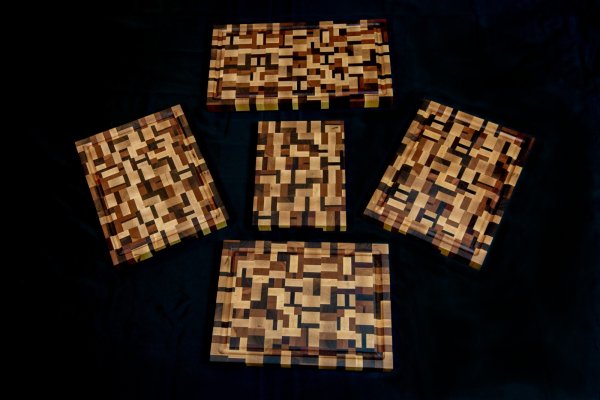
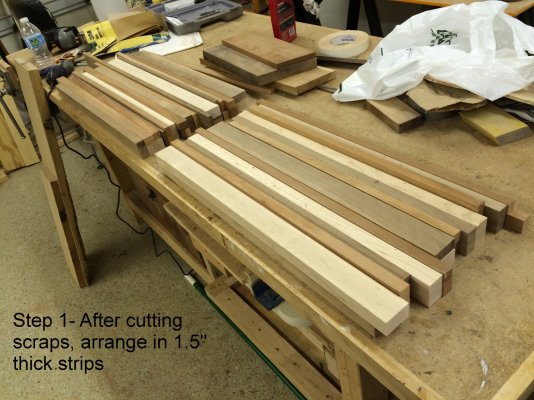
Finished up the shelves/cabinets in the tv room. Here are a couple of pictures.

Glad to see you were smart enough to hang a fixed screen instead of one that goes up/down. The motorized ones are cool but no matter what you spend its impossible to get a completely flat screen. You'll always have some kind of wave or ripple. Nice work.
 
Very nice planter stands!


I'm not a gardener - what is the white planter covering and what looks like a black tube coming out of the top for?

Thank you!

Those planters are called earthboxes (Home page EarthBox® - Homegrown Vegetables Without A Garden®). I LOVE them! There is a water reservoir in the bottom - holds several gallons - and a plastic aeration screen that the potting mix sits on. There are two "wicking" chambers that go down into the water reservoir and are packed with potting mix. In this way, the earth draws water up into the roots of the plant.

You can never overwater as there is a bit of space between the aeration screen and the water - so the roots never get waterlogged.

The plastic cover serves multiple purposes: (1) helps keep moisture in (2) never get weeds (3) when it rains, the water runs off the planter, so the fertilizer strip I put in in the center doesn't get washed out by rain.

These boxes can produce a ton of veggies/sq foot of space.
 
Oh and yes the water tube goes straight down into the water reservoir.
 
Here's a pic of my garden near the end of summer last year. I can grow 6 bell pepper plants in each box (I plant 2 full boxes of peppers each year - we love them).

The gray box on the right in the pic is my homemade earthbox, which I have since retired as the plastic tubs only last about 3 or 4 years in the sun before they start cracking. I have switched to professional earth boxes completely this year. I'm on another forum just for this, and members there have had their boxes last 15 to 20 years.

I've also attached a pic of some of the beautiful bounty from my garden last year. It is amazing what I am able to grow on my deck!
 

Attachments

  • 12029850_10207684919910993_4284479070303031423_o.jpg
    12029850_10207684919910993_4284479070303031423_o.jpg
    100.3 KB · Views: 39
  • 12140040_10207737080734981_3481059218069907914_o.jpg
    12140040_10207737080734981_3481059218069907914_o.jpg
    111.3 KB · Views: 39
Simplegirl, Nice Earth boxes. How's your deck holding up to all that weight?


Hermit, Nice box for the chess set.
 
+1

Earthbox are great. Got two last year, going to pick up tomatoes and herbs to transplant this afternoon.

I learned about them from my cousin. They have a wonderful summer home on Seneca lake but you have to walk down the cliff. They grow their own all summer on what is just shale. Sure beats packing them down the cliff.
 
Simplegirl, Nice Earth boxes. How's your deck holding up to all that weight?


Good question. It did occur to me! Each box, according to the website, weighs around 80# when full and watered. So, I only have 6. I should hope my deck would be rated to hold the weight of 6 children plus me and hubby! :D If not, yikes that's a problem! :ermm:
 
Good question. It did occur to me! Each box, according to the website, weighs around 80# when full and watered. So, I only have 6. I should hope my deck would be rated to hold the weight of 6 children plus me and hubby! :D If not, yikes that's a problem! :ermm:

You also have to count the weight of the plants and fruit, weight when the plants get wet from rain, weight of the beautiful plant stands dry and wet. A friend had his Earth box pull his second floor deck away from the wall of the house. Hope you have no problem.
 
Good question. It did occur to me! Each box, according to the website, weighs around 80# when full and watered. So, I only have 6. I should hope my deck would be rated to hold the weight of 6 children plus me and hubby! :D If not, yikes that's a problem! :ermm:

Decks are often designed to hold a hot tub, which can weigh well over a thousand lbs, or a hundred lbs/sq ft. So unless your deck is substandard you shouldn't have a problem. I mean, seriously, a standard deck can easily hold 10 drunken college boys and a couple of kegs without collapsing. A few bell peppers and some basil should do OK.
 
Decks are often designed to hold a hot tub, which can weigh well over a thousand lbs, or a hundred lbs/sq ft. So unless your deck is substandard you shouldn't have a problem. I mean, seriously, a standard deck can easily hold 10 drunken college boys and a couple of kegs without collapsing. A few bell peppers and some basil should do OK.

A new deck, maybe but looking at the pictures of the wood deck flooring from last year and the hand rail from pictures this year (looks like the deck floor may have been replaced or new deck flooring laid over old flooring and adding additional weight to the support structure) that is an old deck. If this is similar to the deck in a previous picture of her friend/herself toasting with a drink it's also not a large deck. Just wanted to make sure that simple girl was aware.
 
A new deck, maybe but looking at the pictures of the wood deck flooring from last year and the hand rail from pictures this year (looks like the deck floor may have been replaced or new deck flooring laid over old flooring and adding additional weight to the support structure) that is an old deck. If this is similar to the deck in a previous picture of her friend/herself toasting with a drink it's also not a large deck. Just wanted to make sure that simple girl was aware.

I appreciate the input so much! I am concerned. Hubby doesn't think it is an issue. He says the deck is well bolted to the house. He did replace the entire floor of the deck (he didn't lay new flooring over old, he replaced all of the boards) and one of the joists (after inspecting the deck earlier this spring). He is an engineer, but not a structural engineer. Perhaps I should have someone come inspect the deck. :confused:

The deck was built in 2005.
 
Just get a fat guy to come over and jump up and down a few times.
 
Ignore my painting efforts but attached is a small 3D carving I cut on the CNC. Nothing special except that it's the first 3d model I've ever done. Using Aspire software from Vectric, the process is straight forward but some artistic talent is helpful, not my strong point.

I attended a camp a couple of weeks back where I saw some workshops on making models and finally had a few minutes to try. This is the logo for our local Peach Festival held each year- it's only 3 1/2" diameter so the writing was really too small and I should have used a different font but as a modeling exercise, I'm happy how it turned out. Blown up to about 10" or so, it should carve fine. The model is about .4" thick so I carved it from a .5" piece of MDF.
 
Last edited:
I'm going to do some GoPro time lapse videos. I saw a gizmo online that panned the GoPro as it took the series of still photos to comprise the time lapse. Made from a kitchen timer and fasteners to connect the tripod to the timer to the go pro. As the timer clicks down the time, it rotates and pans the camera.
 

Attachments

  • Screen Shot 2016-06-02 at 9.53.08 PM.png
    Screen Shot 2016-06-02 at 9.53.08 PM.png
    1.5 MB · Views: 39
Whipped up some cutting boards from some scrap pieces of cherry, walnut, maple and mahogany
 

Attachments

  • cutting boards b.jpg
    cutting boards b.jpg
    311.7 KB · Views: 54
  • cutting boards a.jpg
    cutting boards a.jpg
    398.5 KB · Views: 52
Ronstar, they look amazing !
did you glue all those pieces together? any pictures of the process?
 
Thanks Exit. I didn't take too many photos, but here's the process:

1. Cut scraps
2. Glue up small scraps to 1.5” thick. Strips need to be same length. Random width.
3. Plane/sand strips
4. Glue up / bar clamp 1.5” strips into 12” wide boards. All strips need to be same length. Make several boards with different patterns.
5. Plane/sand strips
6. Crosscut 12” wide boards to 1.5” wide strips, 1.5” thick.
7. Mix up crosscut strips into a variety. Turn strips sideways so end grain is up and glue together. 1.5”thick x 12” wide x16”(or 20”) long
8. Sand
9. Trim edges, Cut juice groove and handles
10. Finish with multiple coats of mineral oil, then beeswax.
 

Attachments

  • 1.jpg
    1.jpg
    622.6 KB · Views: 34
  • Screen Shot 2016-07-23 at 11.28.37 AM.jpg
    Screen Shot 2016-07-23 at 11.28.37 AM.jpg
    447.9 KB · Views: 30
  • 2.jpg
    2.jpg
    542 KB · Views: 33
  • 7.jpg
    7.jpg
    444.4 KB · Views: 29
Wow...a regular production line.....are you contemplating going robotic so that you can sit back and watch them churn out? :)
 
Back
Top Bottom