Your recent repair? - 2021 to ?

Good luck and glad the case is not damaged. When I rebuilt engines (many of them, including VW of your vintage), I checked the rod and main bearing clearances with Plastigage before I buttoned it up. Plus, I used a bit of Lubriplate or similar on the bearing/crank interface. I wonder if the problem had to do with improper bearing clearance of oil too hot type failure?


I think maybe proper attention wasn't paid to the bearing clearances. When it ran, it ran well, but (lack of) oil pressure was a problem early on with me now suspecting a large bearing "gap" somewhere (probably on #4 crank journal) not allowing pressure in the system to build up properly. STP oil treatment was used as an assembly lube, a "sticky" oil really, like Lubriplate. Didn't find any evidence of metal particles in the sump, so that is good.

The engine never over heated, I checked it often and have had air cooled VWs for now 40+ years, so I know about that. Actually kind of fun, I am re-kindling my love of engine tinkering and again realizing just how simple these engines really are.
 
Last edited:
Actually kind of fun, I am re-kindling my love of engine tinkering and again realizing just how simple these engines really are.

I had a '62 split window with a 40hp motor. I learned how to do repairs on the side of the road a lot.

Did you know if you had a VW bus that had a bad fuel pump. You can take the fuel line off the fuel tank and plug it directly into the carb. But stay off the inclines.

Or if you had a small wiring harness fire, that a 3ft wire from the battery to the coil would get you to Barstow.
 
I think maybe proper attention wasn't paid to the bearing clearances. When it ran, it ran well, but (lack of) oil pressure was a problem early on with me now suspecting a large bearing "gap" somewhere (probably on #4 crank journal) not allowing pressure in the system to build up properly. STP oil treatment was used as an assembly lube, a "sticky" oil really, like Lubriplate. Didn't find any evidence of metal particles in the sump, so that is good.

The engine never over heated, I checked it often and have had air cooled VWs for now 40+ years, so I know about that. Actually kind of fun, I am re-kindling my love of engine tinkering and again realizing just how simple these engines really are.

Yes, they are simple and fun. I have been messing with VW's since the mid 1960's and probably have had 20 of them in various flavors and a 1971 bus. I probably have rebuilt a dozen VW engines over the years. When you put that one back together, make sure the crank end clearance is shimmed properly too.

The worst mess I have ever had was with my bus engine. I was cruising along a Connecticut country road one afternoon in the summer of 1974 and at about 45 MPH, the bus started slowing down on its own. When I looked in the rear view mirror, all I saw were clouds of blue smoke and shortly there after I pulled the bus over and had it towed home.

When tore the engine down, the failure was #3 exhaust valve (broke off) and the piston proceeded to beat itself and the cylinder head to death. Pieces of piston rings also got sucked into the remaining cylinders and reeked havoc. What a disaster. Heads were shot, jugs done too. And of course the pistons were all mangled.

The culprit, as anyone could guess that knows these engines, was probably heat. The oil cooler sits over #3 jug and that cylinder must have gotten real hot back there and somehow the valve, over time, failed (head broke off). Somehow, the camshaft and the crank were good.

I dropped in a used engine (they were plentiful for a song back then) and rolled along.

Three years ago, I found a "decent" stock 71 Super Beetle which needed more than I thought,:facepalm: and I rebuilt over 12 months it and drove it for a while. However, living in a concrete paradise (north of Houston, Texas), I realized these old Beetles are best driven on low traffic, low speed limit, country roads. Around here, Big Truck Country, one feels definitely "at risk" driving amongst the Giants!

So I sold it to a young man that was going to keep it "stock" except for the engine. I at least got my investment back, but not the labor hours I put in.

Oh well. :)
 
I had a '62 split window with a 40hp motor. I learned how to do repairs on the side of the road a lot.

Did you know if you had a VW bus that had a bad fuel pump. You can take the fuel line off the fuel tank and plug it directly into the carb. But stay off the inclines.

Or if you had a small wiring harness fire, that a 3ft wire from the battery to the coil would get you to Barstow.

You can go pumpless in a Beetle too as long as your tank is full and you don't go down hills.


Split rear windows ended in '53, a '62 would have had a rectangular rear window, and '62 was the first year for the stock gas gauge.
 
Yes, they are simple and fun. I have been messing with VW's since the mid 1960's ......


Yes, #3 exhaust has to be watched carefully and clearances set often. When I finished the resto on the '57 22 years ago, I used to log the clearances that I found when setting the valves, and over time I could see #3E "stretching" in the data. It required repeated adjustments to keep at 6 thousands. If the exhaust valve doesn't get its due time to rest firmly against the head casting, it can't transfer all the heat built up in it to the head and it burns/breaks. Keep them adjusted and they are very reliable engines.
 
Yes, #3 exhaust has to be watched carefully and clearances set often. When I finished the resto on the '57 22 years ago, I used to log the clearances that I found when setting the valves, and over time I could see #3E "stretching" in the data. It required repeated adjustments to keep at 6 thousands. If the exhaust valve doesn't get its due time to rest firmly against the head casting, it can't transfer all the heat built up in it to the head and it burns/breaks. Keep them adjusted and they are very reliable engines.

If my memory serves me right, I was not that diligent at such a young age, but learned my lesson.:blush:
 
I've literally found dead mice in my blower causing the same noises. They ate all the cabin air filter as well and nested in there. The noise was from the fan not running well but what worse was the awful smell I had until I cleaned everything out:facepalm:

No smell in this case, but still might be a nest in there. In my other car, my Trans Am, chipmunks built a nest inside or near the blower motor, and I had to take the underside of the dash apart somewhat to clean it all out. I think the blower was making a noise for that one too. No in-cabin filter to worry about. I keep my Trans Am in the garage and now also keep the hood up, have a lamp on the engine with the light on at all times. Also keep a bag of some laundry freshener on top of the engine. Rodents hate the smell. So far, so good, knock on wood. Gonna give the cabin filter in the Versa another try today. Might get lucky.
 
Just changed the battery on my Polaris ATV. Took me a good hour to wrestle the old one out and fasten in the new one. Not much space in there.
 
You can go pumpless in a Beetle too as long as your tank is full and you don't go down hills.


Split rear windows ended in '53, a '62 would have had a rectangular rear window, and '62 was the first year for the stock gas gauge.

Whoops, yea a split window bus.
 
My 2009 Nissan Versa has developed a hum from the blower motor fan (heater, vents, a/c) in position 3 and 4. Looked at Youtube videos. ....... Will have to look again at more Youtube videos, I guess. The Youtube videos used to be so useful, what happened?

I do find you tube videos vary a LOT in quality, and even though I search for X.34 it returns X.09 , X, Y, Z instead of a blank 'not found' page.
Annoying as sometimes its hard to tell if the video is even the right model.

Then there are the ones that are wrong, and are only posted because the fellow was lucky enough not to get killed. I saw some of those on changing the garage door coil spring. :facepalm:

Keep looking, you might get lucky. :popcorn:

Or they leave out some important detail that you need to know. Like 'just take out one screw' but where is the screw? Just to say one positive thing about Youtube, though, I did find a long, detailed and concise tutorial on there about how to repair headlight motors in a 1988 Trans Am. But I had to get the exact search words from a Trans Am website, to be able to find it on Youtube.
 
My 2009 Nissan Versa has developed a hum from the blower motor fan (heater, vents, a/c) in position 3 and 4. Looked at Youtube videos. The 2 suggestions were to check for clogged in-cabin air filter, and clogged fan. Both supposedly easy. Tried filter first. Grab, pull, twist, yank, finagle, wiggle, curse. Nothing. Won't budge. Afraid to break it. Gave up for now. Then tried removing the fan. Just supposed to twist it clockwise and pop it out. Nope. Same problem. Won't budge, afraid to break it, or sprain a tendon. Stumped so far. Living with hum. Will have to look again at more Youtube videos, I guess. The Youtube videos used to be so useful, what happened?

I've Nissan Versa 2011 hatchback (very similar to 2009). Its a pain to remove the air filter in Versa because Versa is so compact.I have managed to replace the air filter twice so far. It is a struggle every time. This is the video I often watch for this:


when trying to take it out.. you have to tilt it up a little. Its still painful because plastic parts don't move easily there.
 
Replaced the garbage disposal. Quit running and I found it was leaking from the bottom a little. They say the life of one is 5 or 10 years, this one was 9. Stuck with Insinkerator, all I had to do was disconnect 2 drain lines, unplug the power and turn the unit to unscrew it. No need to replace the flange or ring that sits in the sink. Just move power cord from old unit to new, screw on and connect lines. Not my idea of fun, but I'm sure a handy person would charge at least $100 to do the job. I do like saving money on easy stuff.


Glad we have that plastic spill catching tray under the sink, saved the cabinet from water damage.
 
Replaced the garbage disposal. Quit running and I found it was leaking from the bottom a little. ....


Glad we have that plastic spill catching tray under the sink, saved the cabinet from water damage.

Very clever.
If I had thought of that, I would not have needed to replace the floor of my sink cabinet, which took many hours to do and then paint. :facepalm:
 
I've Nissan Versa 2011 hatchback (very similar to 2009). Its a pain to remove the air filter in Versa because Versa is so compact.I have managed to replace the air filter twice so far. It is a struggle every time. This is the video I often watch for this:


when trying to take it out.. you have to tilt it up a little. Its still painful because plastic parts don't move easily there.

Thanks, but I already saw that one, lol. The guy does some sort of finagling with the tab at the top, but you can't tell where the pressure is going. I already replaced the cabin air filter a few years ago, so you would think I would remember how I did it, but no. The video does help me out in one way though, which is that it shows how the tab on the bottom fits in, which I had forgotten about. This time around, I will take 2 minutes to write up a 'how to' and store it in the glove compartment, lol.
 
Very clever.
If I had thought of that, I would not have needed to replace the floor of my sink cabinet, which took many hours to do and then paint. :facepalm:


Don't feel too clever, or recall where I got the idea. But we put in new cabinets and gutted the kitchen, which was not cheap. I figured sooner or later there is bound to be a leak or spill under there. A few bucks for plastic trays was nothing compared to the $20k+ we spent in the kitchen.
 
Don't feel too clever, or recall where I got the idea. But we put in new cabinets and gutted the kitchen, which was not cheap. I figured sooner or later there is bound to be a leak or spill under there. A few bucks for plastic trays was nothing compared to the $20k+ we spent in the kitchen.
I don't feel clever at all :(

My recent repair was to tear out the press-board floor under the kitchen sink, which swelled up due to a leak.

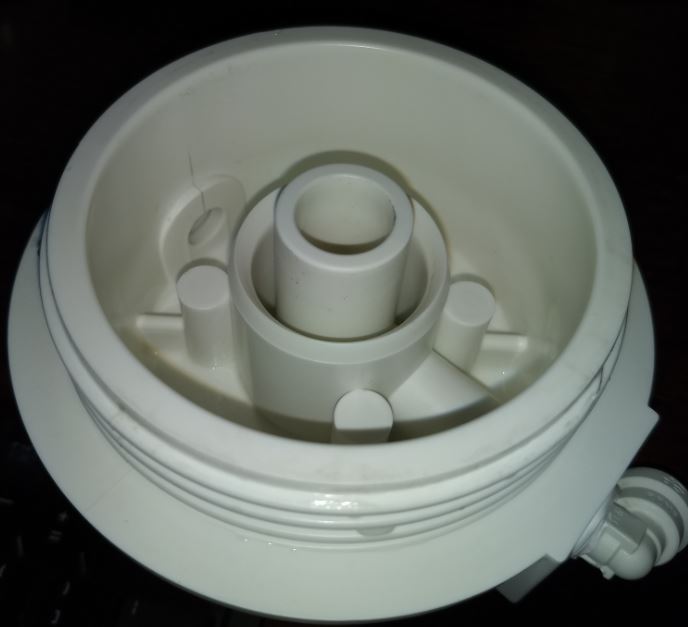
My RO system (https://i.stack.imgur.com/8Y4om.jpg) developed a leak due to a crack in the plastic:

zVg4t.jpg


The manufacturer said we don't sell that as a replacement part, and because the system lifetime is 8 years (and the system is 7), they said "buy an entire new system". They don't know me. I did drop $27 on a new filter sleeve with the screw top, so I can just not use the filter sleeve body.

No pictures of the actual repair, but I used the jigsaw to cut the soggy cabinet bottom out, then I cut 10, 24 inch T&G cedar boards (left over from sauna project) and put those on the toe kick / cleat. I didn't even nail them down (they went in pretty snugly).

And now the RO system is set in it's own aluminum tray, which I made from left over aluminum flashing from the deck project. Should have been in a tray all along, and I wouldn't have had this problem!

The project isn't "done", but the system is running, just with 2 stages of pre-filtering instead of 3. I'll add back the 3rd stage when I get the new part. Hopefully my RO membrane will survive a few days of less pure water. And if it doesn't, I'll go with the recommendation of buying a whole new system...BTD!
 
Last edited:
because the system lifetime is 8 years (and the system is 7), they said "buy an entire new system"


Beats the lifetime warranty where they send you out back with Vito because your lifetime warranty is over. So, sorry. :LOL:


Second most recent repair, valve cartridge on Delta kitchen faucet with "lifetime" warranty. I guess that cartridge life is < 9 years, because that's how long it lasted before leaking. All the visible parts look good. Not bad for 9 yo. Easy diy repair.
 
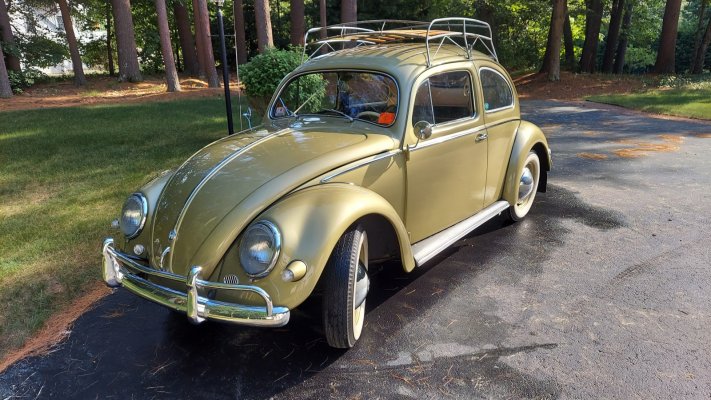
With less than 2 hours running time, the "loaner" engine in my 1957 VW Beetle was pissing oil. This on movie sets that we have been hired to take part in. Suspecting the oil cooler, I pulled the fan shroud and found that the oil cooler seals had massively failed. Replaced them with different ones, pressure tested the cooler at 90psi and will re-build the engine's peripherals tomorrow for a movie shoot on Thursday, if Ida rains don't shut it down.
 

Attachments

  • 20210830_203357[1].jpg
    20210830_203357[1].jpg
    333 KB · Views: 34
With less than 2 hours running time, the "loaner" engine in my 1957 VW Beetle was pissing oil.

Let’s see a picture of that ‘57 VW.

I still have my old ‘55 VW in my shop. My little brother squeezed a 1835 cc motor in it when he had it. Brother gave it back to me a dozen years ago and it’s in the back of my shop now. I should charge the battery and take her for a spin.
 
Couple pics. Finished the restoration 22 years ago this month. Got it's original engine back in it last fall.
 

Attachments

  • 20210609_171914.jpg
    20210609_171914.jpg
    777 KB · Views: 32
  • DSCN2877.jpg
    DSCN2877.jpg
    677.5 KB · Views: 31
What kind of money do you make by parking it in a movie scene, or having someone drive it through a movie scene? Just curious.
 
I do find you tube videos vary a LOT in quality, and even though I search for X.34 it returns X.09 , X, Y, Z instead of a blank 'not found' page.
Annoying as sometimes its hard to tell if the video is even the right model.

Then there are the ones that are wrong, and are only posted because the fellow was lucky enough not to get killed. I saw some of those on changing the garage door coil spring. :facepalm:

Keep looking, you might get lucky. :popcorn:

Update: Finally found a Youtube video that showed the guy extracting the blower motor, with all the separate twists and turns, where the tab goes, sequence. I spent 3 solid hours surfing through the Youtube videos, picking up bits of info here and there, but this last one was the best. I did finally get the blower motor out. It had nest materials in it. Leaves and insulation. No dead rodents. I the found a Youtube video showing how to get the in-cabin air filter out, too! Bonus. You grab it with a big vice grips and just pull. Nothing breaks. Same story. Nesting materials. Leaves and insulation. Spent an hour meticulously dragging debris out of the hole the filter goes into, and out of the filter itself. IUsed a vacuum cleaner as well as just scraping debris off the filter. I was able to reuse it since it wasn't actually ruined. No holes, just discolored a bit. Now I have the fan blowing normally, with no more annoying hum, and I know the ducts are nice and clean again. I guess the way to prevent this in the future is to drive the car every day, or maybe just turn the fan on every day to scare whatever is in there away.
 
Last edited:
What kind of money do you make by parking it in a movie scene, or having someone drive it through a movie scene? Just curious.


Roughly $250-$300 a day after taxes. I have to go get a COVID test 2 days before, and get fitted for clothes, but they pay me a bit for that time to. If it is driven in the shoot, I am the one driving it. So far out of 4 shoots, I got to drive it in 2. Was really fun, and kind of unorganized/chaotic, but fun. I'll let on what the production is when it has aired, probably won't be until Jan '22 I am told.


Back in city for a shoot tomorrow if the Ida rain doesn't screw things up.


I guess I can't say I'm retired anymore huh? LOL
 
Update: Finally found a Youtube video that showed the guy extracting the blower motor, with all the separate twists and turns, where the tab goes, sequence. I spent 3 solid hours surfing through the Youtube videos, picking up bits of info here and there, but this last one was the best. I did finally get the blower motor out. It had nest materials in it. Leaves and insulation. No dead rodents. I the found a Youtube video showing how to get the in-cabin air filter out, too! Bonus. You grab it with a big vice grips and just pull. Nothing breaks. Same story. Nesting materials. Leaves and insulation. Spent an hour meticulously dragging debris out of the hole the filter goes into, and out of the filter itself. IUsed a vacuum cleaner as well as just scraping debris off the filter. I was able to reuse it since it wasn't actually ruined. No holes, just discolored a bit. Now I have the fan blowing normally, with no more annoying hum, and I know the ducts are nice and clean again. I guess the way to prevent this in the future is to drive the car every day, or maybe just turn the fan on every day to scare whatever is in there away.

Do you still have the link to video for "extracting the blower motor"? If so, could you please paste the link here?
 

Latest posts

Back
Top Bottom