Your recent repair? - 2021 to ?

Patching stucco and will continue for a few more days. We figure if we can get 5-10 years with a bit of a Jackson Pollock look fixing cracks and holes then we can better plan on the spend for a complete restucco.

When you think of a complete restucco, remember that you can change to something else instead (unless not allowed by HOA) like siding, etc..
 
More DIY repairs

The past few months, I've been noticing that the agitator in our top-loading washing machine was slipping and barely moving the clothes. After some research, I learned that within the agitator mechanism, there are 4 little plastic inserts called "dogs" (they look like dog ears), that grab into the agitator spindle to move it. Over time these wear down. On our 20 year old washing machine, not unexpected. A pack of 4 of them on Amazon is $5, or a 12 pack for $7.75. I received them next day. I took the agitator out, swapped the dogs, reinstalled, and it's agitating like new. Little doubt it would have run $150 had we called a repair person to come and do it. For the washer and the matching 20 year old dryer, I've already told DW that once I am no longer able to DIY repair them, we'll get a new set. I've said that for the past 10 years, and each minor fix gives them each new life. Youtube DIY videos and cheap parts from Amazon continue to keep them alive.

Next project...my 2011 Chevy HHR has developed a problem with the fuel line. It is a well-known design problem on the HHR and Cobalt (very similar chassis design), NHTSA opened an investigation about 18 months ago, but has not closed it yet, and so there hasn't been a recall for it. In any case, I call the local Chevy dealer I trust(ed). I already made the appointment online to bring the car in later in the week, and just wanted to get an estimate. They say they can't give me an estimate without paying them $175 to do their own diagnostics to determine the problem. The $175 is in addition to whatever work they do to fix. I tell them I know the problem and want to have the fuel line replaced, just tell me the price. They refuse. I cancel the appointment. Other folks online have indicated prices anywhere from $600 with an independent garage up to $1000 if Chevrolet does it. I purchase $80 kit online that is specifically to repair the issue - which the manufacturer(s) obviously created because the design flaw is affecting so many folks. Kit should arrive in a few days.

What DIY home projects have you worked on recently or plan to take on in the near future?
 
Last edited:
I do most of our repairs. Here are a few recent ones.

1) Replaced start cap in secondary AC unit. Ordered spares for Primary in anticipation
2) Replaced noisy seal on pool pump
3) Replaced rollers on both 9' patio doors, (Very heavy)
4) Rebuilt pool cleaner
5) Put auto water filler in new coffee maker reservoir.
6) Repaired RF Universal Remote
7) Replaced sealed window pane in breakfast room window.
8) Hung 50" TV in my Office.
9) Extended sprinkler heads to clear shrubbery.
10) Installed 8 wired (No Wireless Security in our home) POE Cameras and Controller around the house.

The list goes on and is never ending in a 3k+ square foot home. Considering selling while prices are high and renting. But then what would I do?

Oh, I forgot, helped with next door neighbor's chores:

11) Repaired their garbage disposal.
12) Fixed starter motor on their Jeep.
13) Unclogged their ICE maker
14) Replaces hot water valve in their master bath
15) Cleaned out the dust from their Fridge (Fan was out of balance & noisy)
 
Last edited:
posts moved to annual ongoing repair thread
 
posts moved to annual ongoing repair thread

What does this mean? I'm confused. Did you move a post to this thread from somewhere else? Or did you move a post on this thread to another thread?
 
What does this mean? I'm confused. Did you move a post to this thread from somewhere else? Or did you move a post on this thread to another thread?


It means this main thread already existed, but I missed it and started a new one earlier today. So my new thread was merged in to this one. See above post "More DIY repairs" from earlier today.
 
I have found I'm becoming expert at the minor task of repairing the broken guide wheels on the lower rack of the dishwasher. I think there are 8 wheels and I've repairs four of them with a screw, washer and a locknut each. First one took some experimentation to come up with the parts "recipe". Now I just keep the parts handy. So far none of the repairs have failed.
 
Last edited:
The past few months, I've been noticing that the agitator in our top-loading washing machine was slipping and barely moving the clothes. After some research, I learned that within the agitator mechanism, there are 4 little plastic inserts called "dogs" (they look like dog ears), that grab into the agitator spindle to move it. Over time these wear down. On our 20 year old washing machine, not unexpected. A pack of 4 of them on Amazon is $5, or a 12 pack for $7.75. I received them next day. I took the agitator out, swapped the dogs, reinstalled, and it's agitating like new. Little doubt it would have run $150 had we called a repair person to come and do it. For the washer and the matching 20 year old dryer, I've already told DW that once I am no longer able to DIY repair them, we'll get a new set. I've said that for the past 10 years, and each minor fix gives them each new life. Youtube DIY videos and cheap parts from Amazon continue to keep them alive.
I had the same problem and made one of the youtube videos. I wonder if you saw mine: "Fixing Loose Agitator on Washing Machine Kitchenaid Whirlpool Kenmore Roper"
 
I had the same problem and made one of the youtube videos. I wonder if you saw mine: "Fixing Loose Agitator on Washing Machine Kitchenaid Whirlpool Kenmore Roper"


I hadn't seen yours, but a couple others...yours was in worse shape than mine. Really good job with your video.

I did encounter one problem along the way - pulling the top half of the agitator off once it was out of the machine. When mine was manufactured, there was some extra plastic extruded on the top of the 4 splines that snap the top piece down. So, the top would not come off. I had to use my solder gun on it to melt away the extra plastic, then it came off with a good tug.
 
I changed the bottom seals on my 2 garage doors today. We've lived in this house for 5 years, but I think it was last placed 10 years before then. We were starting to get some water leakage with recent rainstorms. The job was pretty easy. Used diluted Dawn dishwashing soap as a lubricant. Home Depot only had 9 ft or 18 ft long seals, but my garage doors are 10 feet wide. So I went long and trimmed the excess once installed.
 
My daughter asked if I could reverse the door on her LG dryer. I said, "Sure, that's an easy job".

After I stared at it for a while, I realized that I'd need instructions and luckily there was an LG YouTube video for the task. It is a trick door that hinges on the side or tilts open hinging from the bottom. It turns out that the entire door needs to be disassembled and all the linkages inside the two halves reversed as well as all of the external hinging parts on the dryer body itself. So, an hour later, I did get it all back together and functioning. Slow learner.
 
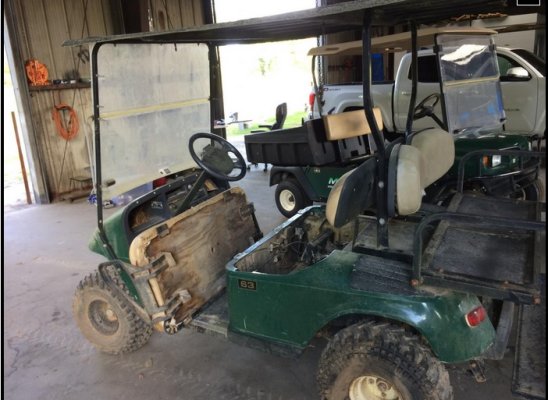
I buy old run down ezgo gas golf carts and make them look new again.

Here is the end results of my 2003 ezgo TXT with the 295 cc engine which I also completely rebuilt

My 10 year old granddaughter loves it.

I just didn't like being retired :cool: Sleep better at night.
 

Attachments

  • before pictures of my ezgo.jpg
    before pictures of my ezgo.jpg
    128.7 KB · Views: 36
  • ezgo updates.jpg
    ezgo updates.jpg
    147.8 KB · Views: 36
  • cart.jpg
    cart.jpg
    232.3 KB · Views: 34
  • My build with back seat installed.jpg
    My build with back seat installed.jpg
    971.9 KB · Views: 38
Last edited:
I buy old run down ezgo gas golf carts and make them look new again.

Here is the end results of my 2003 ezgo TXT with the 295 cc engine which I also completely rebuilt

My 10 year old granddaughter loves it.

I just didn't like being retired :cool: Sleep better at night.

That's really nice.
 
Low voltage transformer on our under the counter kitchen lights. Very straightforward. One length was flickering. Wiring OK, had to be the transformer.
 
Next project...my 2011 Chevy HHR has developed a problem with the fuel line. It is a well-known design problem on the HHR and Cobalt (very similar chassis design), NHTSA opened an investigation about 18 months ago, but has not closed it yet, and so there hasn't been a recall for it. In any case, I call the local Chevy dealer I trust(ed). I already made the appointment online to bring the car in later in the week, and just wanted to get an estimate. They say they can't give me an estimate without paying them $175 to do their own diagnostics to determine the problem. The $175 is in addition to whatever work they do to fix. I tell them I know the problem and want to have the fuel line replaced, just tell me the price. They refuse. I cancel the appointment. Other folks online have indicated prices anywhere from $600 with an independent garage up to $1000 if Chevrolet does it. I purchase $80 kit online that is specifically to repair the issue - which the manufacturer(s) obviously created because the design flaw is affecting so many folks. Kit should arrive in a few days.

A few weeks ago I mentioned this was my next project. Vendor first sent the wrong item, so had to wait for them to reship. They sent it by FedEx, which caused more delays.

In any case, the kit arrived earlier in the week, and this was my project for the weekend. Thankfully it was a success! No more fuel leak. Let it run for a while in the driveway, took it on a short drive, and all is well.

Best $80 (plus about $40 for other items to complete the job) I've spent in a long while.
 
I broke the stem of the pool filter backwash valve. I attempted to remove it to inspect the o-rings on the two discs, and to relubricate them. The valve piston was stuck, and I applied too much force in trying to pry it out. I ended up with the bottom disc stuck 12" down from the top opening of the valve body. ARGHHHH! This sucks.


s-l300.jpg


After spending 15 minutes contemplating the task of cutting the valve body off the 2.5" PVC pipes to which it was glued, and then mounting a new valve onto the Rube-Goldberg-like mess of PVC pipes, I had an idea.

What if I drilled a hole in that stuck disc, and tried to hook it and pull it out with a long rod?

A quick drive to Harbor Freight, and I was a proud owner of a 20" long drive bit of 1/2" diameter. It took a hell of a long time to drill through that 1/4" thick plastic disc. What did they mix into that plastic when they molded it? Tungsten or titanium powder? You would not believe it until you had to do it yourself, I kid you not. I have had much faster time drilling through 1/4" steel. I think the water down there acted as a lubricant, and made it harder for the drill to bite into the plastic.

After getting myself a 0.5" hole in the 2" disc, I needed something to hook that disc and pull it out. I went to Home Depot to get a 24" long threaded rod of 1/4", and put a couple of nuts on one end. When the nuts got threaded through the hole in the disc, they allowed the rod to hook the disc, to pull it up. This part was easy.

A replacement stem costs $60 on Amazon. Cheap enough, but lemme see what's on eBay. Son of a gun! They have a stainless steel one for a mere $99. The stem, which broke, and the two valve discs welded onto the stem are all SS. I wanted that!

Installing the new stem was a 2-minute job, and I can run the pump again.

What started this fiasco was that I observed that I had to refill the pool water more often than I did during the summer. The difference was that I had the pool mostly covered with shade sails, which have been removed. The shade sails kept the pool out of the sun, but it was hotter then, and it is cool now. Is evaporation affected more by sun/shade, or by the air temperature?

Or could it be that the backwash valve suddenly leaked water into the filter backwash outlet, causing water loss when the pump ran? Hence, the attempt to pull the stem for inspection, and the fiasco that followed.

The valve appeared to work OK, by inspection after I pulled the stem out. Prior to my breaking it that is.

And the 3 days when the pool pump was not run while waiting for the part, the pool water dropped just as fast, proving positively that the valve had nothing to do with it.

Darn! I spent one grievous morning and $130 total for nothing. In the old days, I would regret wasting money, but nowadays, I swear at the lost time and wasted effort.
 
Last edited:
Seems like everything on the motorhome we live in broke in September. This month I replaced the solar panels and controller, replaced microwave oven, and replaced whole house vent fan. Still need to fix the mirror that is a door covering the stacked washer and dryer, and outdoor awning spring.
In August someone backed their trailer into the side of it so I repaired that mostly by covering it with an aluminum plate. His insurance gave me $4200 for damages.
Travel on!
 
I broke the stem of the pool filter backwash valve. I attempted to remove it to inspect the o-rings on the two discs, and to relubricate them. The valve piston was stuck, and I applied too much force in trying to pry it out. I ended up with the bottom disc stuck 12" down from the top opening of the valve body. ARGHHHH! This sucks.

After spending 15 minutes contemplating the task of cutting the valve body off the 2.5" PVC pipes to which it was glued, and then mounting a new valve onto the Rube-Goldberg-like mess of PVC pipes, I had an idea.

What if I drilled a hole in that stuck disc, and tried to hook it and pull it out with a long rod?

A quick drive to Harbor Freight, and I was a proud owner of a 20" long drive bit of 1/2" diameter. It took a hell of a long time to drill through that 1/4" thick plastic disc. What did they mix into that plastic when they molded it? Tungsten or titanium powder? You would not believe it until you had to do it yourself, I kid you not. I have had much faster time drilling through 1/4" steel. I think the water down there acted as a lubricant, and made it harder for the drill to bite into the plastic.

After getting myself a 0.5" hole in the 2" disc, I needed something to hook that disc and pull it out. I went to Home Depot to get a 24" long threaded rod of 1/4", and put a couple of nuts on one end. When the nuts got threaded through the hole in the disc, they allowed the rod to hook the disc, to pull it up. This part was easy.

A replacement stem costs $60 on Amazon. Cheap enough, but lemme see what's on eBay. Son of a gun! They have a stainless steel one for a mere $99. The stem, which broke, and the two valve discs welded onto the stem are all SS. I wanted that!

Installing the new stem was a 2-minute job, and I can run the pump again.

What started this fiasco was that I observed that I had to refill the pool water more often than I did during the summer. The difference was that I had the pool mostly covered with shade sails, which have been removed. The shade sails kept the pool out of the sun, but it was hotter then, and it is cool now. Is evaporation affected more by sun/shade, or by the air temperature?

Or could it be that the backwash valve suddenly leaked water into the filter backwash outlet, causing water loss when the pump ran? Hence, the attempt to pull the stem for inspection, and the fiasco that followed.

The valve appeared to work OK, by inspection after I pulled the stem out. Prior to my breaking it that is.

And the 3 days when the pool pump was not run while waiting for the part, the pool water dropped just as fast, proving positively that the valve had nothing to do with it.

Darn! I spent one grievous morning and $130 total for nothing. In the old days, I would regret wasting money, but nowadays, I swear at the lost time and wasted effort.
Excellent! I've often wondered what would happen with a disc or piston rod break way down there!

I have a Pac-Fab, now Pentair, piston valve. Once a year I take the filter top off, leave the filter grids in place. I used to take them out as an assembly, disasemble, spray each one off carefully, then reassemble. Now I just open it up once a year and spray down good with a hose with a slim brass nozzle on it in fan spray. The once-a-year deep-clean, beyond the usual backwashes. Anyway, when I have it all apart, I also pull out the piston shaft, clean up/check O-rings, lube them up, and re-install. For lube, I now use what Pentair recommends -- Dow Corning Molycoat 111 in a 5.3 oz. (by weight) tube I got on Amazon. It seems to fight off the gritties and sticking pretty good. A lot better for that purpose than what I used to use as lube there, which is Magic Lube II, the red cap. Magic Lube II is fine for the rest of the O-rings in the system. But it seemed like the piston rings needed something higher-performance, which the Molycoat 111 does.
 
^^^ That Dow Corning Molycoat 111 is twice as expensive as Magic Lube. When my tube of Magic Lube runs out, will give that Molycoat a try.


I replaced the radiator on the Honda CRV today. My wife still prefers to drive it more than the big Nissan SUV, and the new GM SUV. Two months ago, as she came home from an errand, as she drove the car up the driveway, coolant was pouring out from the front of the car. I popped the hood, looked down at coolant and steam coming out from around the radiator, and told my wife I would look at it when the weather got cooler.

And now it's the time to get that car running again. I filled up the radiator, then started the engine. No leak. Hoses looked good. I let the engine idle for 10 minutes for it to warm up, and the coolant system to build some pressure. Ah hah, water was coming out from the radiator bottom.

With the radiator out of the car for an inspection, it was easy to see a crack in the plastic bottom end cap of the radiator. Nothing else to do, but to get a new one from NAPA. I replaced the radiator 5 years ago, and remember seeing "Made in China" printed on the carton. This time, I spent a few more bucks to get a Denso radiator, in hope it will last longer.

It took 45 min to remove the radiator, and only 30 min to put the new one in. This car is so easy to work on. Tomorrow, I will change the engine oil, and my wife has her favorite car to drive again. It still has only 178K mi on the odometer. It should last a few more years.
 
Not really a repair, but a rebuild. I previously made one of my decks 6" bigger so it could hold a larger gazebo. Today was a pleasant (for here) 12C and mostly sunny so I rebuilt three 6' sections of railing. This required me to measure, mark, and drill about 90 holes in pressure treated 2x4's to hold the aluminum balusters.
 
Not so much a repair. More like a maintenance project. Put new front rotors and pads on one of my daily driver cars, 2008 Ford Edge with 177K miles. While apart I cleaned and painted the calipers and bracket that holds the pads. Also painted the non-wear areas on the new rotors to keep from rusting. Just satisfies my appearance concerns more than function. Then flushed brake fluid through the system. All pretty easy work and car is ready for many more miles.
 
Came home after 5 days away and the fridge door wouldn't open! Finally got it open. Wiped down all mating surfaces, even though they looked clean. Rest of the day door was OK. Next morning, stuck again, although not as badly as before. The lower left corner is sticking. Feels like it is glued on. But I have wiped the surfaces clean with water and paper towel. First opening in the morning is the hardest. Easy all day, until next morning, stuck again. Clues wanted! Thanks.
 
Came home after 5 days away and the fridge door wouldn't open! Finally got it open. Wiped down all mating surfaces, even though they looked clean. Rest of the day door was OK. Next morning, stuck again, although not as badly as before. The lower left corner is sticking. Feels like it is glued on. But I have wiped the surfaces clean with water and paper towel. First opening in the morning is the hardest. Easy all day, until next morning, stuck again. Clues wanted! Thanks.


It might be something that is non soluble in water. I would suggest rubbing alcohol and a paper towel.
 
Back
Top Bottom