Your recent repair? - 2021 to ?

That's why I'm going to keep my extension springs (safely contained in a cable) until I die or leave this house. Super easy and safe to replace.

They do flail about when they break, so I have the cable and replace proactively every 10 years.
 
I remember when one of our extension springs broke. We have an attached garage and heard a loud bang, had know idea what it was. I went in the garage and started looking around, then found the broke spring. It broke right at the hook. I bent a new one and put it back in service. It lasted 8+ years before we had a hurricane that damaged garage and door. Insurance bought us new, higher wind rated door.
 
That's why I'm going to keep my extension springs (safely contained in a cable) until I die or leave this house. Super easy and safe to replace.

They do flail about when they break, so I have the cable and replace proactively every 10 years.

Had extension springs at our previous home. Only replaced a couple of 'em (3 single doors, so 6 springs) over a 29 year period. They just got weak, never had one snap. But I had read about how they can do damage when they break, so I added those safety cables (which just run loosely down the center of the spring, and keep it more/less in place if it snaps).

I guess the torsion springs just provide a neater look? Otherwise, all I see is disadvantages. The extension springs are a really cheap/easy DIY repair.

-ERD50
 
Not a repair, but it is a repair-preventing activity. Changing my oil. The I was noticing a louder than usual engine noise for the last 3 months or so. I had changed my oil with a fully synthetic oil 16 months ago, and had 9,000 miles on it. It is supposed to be 'good' for 12 months or 10,000 miles, whichever comes first. I thought 'can the extra noise from the engine possibly be from the oil degrading after 16 months and 9,000 miles?' Since I needed something to do today, I changed the oil, replacing it with the same synthetic stuff. Sure enough, the engine is quieter now. By the way, the 'louder than usual' engine noise was only audible when inside the car. Outside, the engine sounded normal. Interesting, eh ?
 
Not a repair, but it is a repair-preventing activity. Changing my oil. The I was noticing a louder than usual engine noise for the last 3 months or so. I had changed my oil with a fully synthetic oil 16 months ago, and had 9,000 miles on it. It is supposed to be 'good' for 12 months or 10,000 miles, whichever comes first. I thought 'can the extra noise from the engine possibly be from the oil degrading after 16 months and 9,000 miles?' Since I needed something to do today, I changed the oil, replacing it with the same synthetic stuff. Sure enough, the engine is quieter now. By the way, the 'louder than usual' engine noise was only audible when inside the car. Outside, the engine sounded normal. Interesting, eh ?

I sure wouldn't think so. You aren't at any extreme, you are within the 10,000 mile range, and 4 months past the recommended time. But reccs like that are rarely any sort of immediate problem if you exceed them.

Unless the oil had a *lot* of dilution from gasoline or water, I'd be hard pressed to imagine a change in engine noise from an oil change. Oil dilution can occur when you have lots of cold starts and short trips and is made worse by bad rings. Unburnt oil gets past the rings and into the oil.

How many miles/years on the car? There are tests you can do on the oil to see if it has been diluted. I don't recall exactly, some DIY type tests, or send the oil in for analysis.

-ERD50
 
4 cylinder car. 2009. 127,000 miles. I had used conventional oil since day one, and my previous oil change was my first ever use of synthetic oil. The Walmart stopped selling conventional, so I bought the synthetic. Since it was the first batch of synthetic to run through the engine, I imagined lots of sludge being dislodged and deposited who knows where, and maybe that was causing the louder than usual noise. But... thankfully, no debris in the drained oil.
 
4 cylinder car. 2009. 127,000 miles. I had used conventional oil since day one, and my previous oil change was my first ever use of synthetic oil. The Walmart stopped selling conventional, so I bought the synthetic. Since it was the first batch of synthetic to run through the engine, I imagined lots of sludge being dislodged and deposited who knows where, and maybe that was causing the louder than usual noise. But... thankfully, no debris in the drained oil.

I dunno if that would make a difference, lots of myths out there. It's getting up there in years and miles, but plenty of cars with no engine problems well beyond those numbers.

You can usually find some good info at the following site, but as always, you need to separate the wheat from the chaff:

https://bobistheoilguy.com/forums/

-ERD50
 
Last edited:
Not a repair, but it is a repair-preventing activity. Changing my oil. The I was noticing a louder than usual engine noise for the last 3 months or so. I had changed my oil with a fully synthetic oil 16 months ago, and had 9,000 miles on it. It is supposed to be 'good' for 12 months or 10,000 miles, whichever comes first. I thought 'can the extra noise from the engine possibly be from the oil degrading after 16 months and 9,000 miles?' Since I needed something to do today, I changed the oil, replacing it with the same synthetic stuff. Sure enough, the engine is quieter now. By the way, the 'louder than usual' engine noise was only audible when inside the car. Outside, the engine sounded normal. Interesting, eh ?


Maybe it was just low on oil?
 
Maybe it was just low on oil?

Nope, almost full. When you let off the gas, it felt like the car was 'engine-braking' a bit, instead of coasting. Like the thick oil was dragging down the speed. It doesn't do that any more. Hard to imagine synthetic oil would get thicker than it is supposed to be, just after 9,000 miles and 16 months, but....
 
Nope, almost full. When you let off the gas, it felt like the car was 'engine-braking' a bit, instead of coasting. Like the thick oil was dragging down the speed. It doesn't do that any more. Hard to imagine synthetic oil would get thicker than it is supposed to be, just after 9,000 miles and 16 months, but....


No, that doesn't make sense at all. That oil would need to be so thick (how thick was it Johnny?), you'd never get it out through the drain plug! That car wouldn't be able to idle w/o pushing the gas pedal half way down.

Something else was going on.

-ERD50
 
Latest repair might be my digital multimeter. I bought it one year ago at Harbor Freight. It's a Centec 61593. I got it for theMicrofarads it can test on capacitors.


I used it successfully a few months ago to test some capacitors.


Just tried it yesterday and the microfarads read zero on 2 different capacitors. I was expecting a non-zero result on one of them.


The voltage testing still works, and also the ohms.


Could the capacitance part of it go bad while the rest still works?


I checked the 9 volt battery with another tester and it read 9.1 volts, so it is OK.


As I move the selector into the capacitance zone, the numbers bounce all around on the screen, then settle down to zero, as they should. I then touch the probes firmly to the terminals of the cap, and the reading stays at zero. Same thing for both capacitors.


A zero reading in capacitance across the capacitor terminals implies a shorted out capacitor, I think. I know one of the capacitors was reading 5 microfarads last time I checked it. Now zero.

The instruction manual says you can remove the back of the meter to look at any fuses that might be there. I tried to do that but the screws seem to be cemented in. Got a good bite with a small phillipshead, but the screws aren't budging. A note on the back of the unit says there are no customer-serviceable parts inside, though.

Clues welcomed!
 
Last edited:
If the capacitor wasn't completely discharged when tested, that will surely fry some circuitry in the DVOM.
 
If the capacitor wasn't completely discharged when tested, that will surely fry some circuitry in the DVOM.
I discharged the cap with a screw driver. There wasn't even a spark. It's possible I fried the multimeter somehow due to carelessness, but never heard a pop or smelled anything burning, and no smoke. I'm generally very careful about instruments.
 
We had high winds and about a foot of snow about 9 days ago followed by several days around 40 degrees and rain which slowly melted the snow. Last Thursday, I noted debris on the back lawn later went to check out what it was and in was 7 shingles from my roof. Couldn't get the ladder out of the garage as my son cleaned out his apartment and it was all in the garage. Finally, this past Saturday we moved all his stuff into the basement, got the ladder out, and got up on the roof. The shingles had blown off the ridge just above the master BR exposing a roughly one inch slit in the roof decking. Got on the roof, located spare roofing nails, and replaced the shingles. Lucky that I had the correct number of shingles and only one was damaged. Picked up a tube of roofing cement and next decent day I need to get back up and do some sealing. Second time this has happened in the past ten years. Roof is now 17 years old so may need to start monitoring and planning for a replacement.
 
Replaced Shower Heads

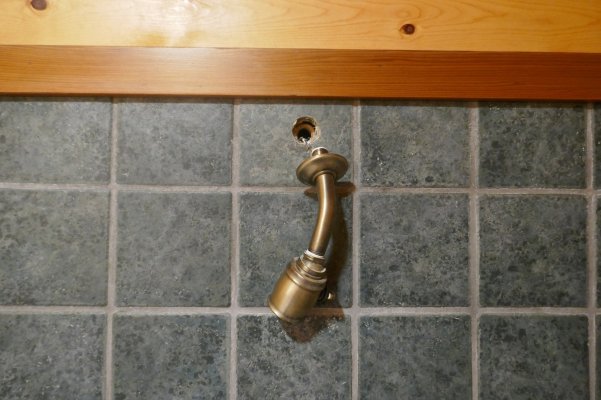
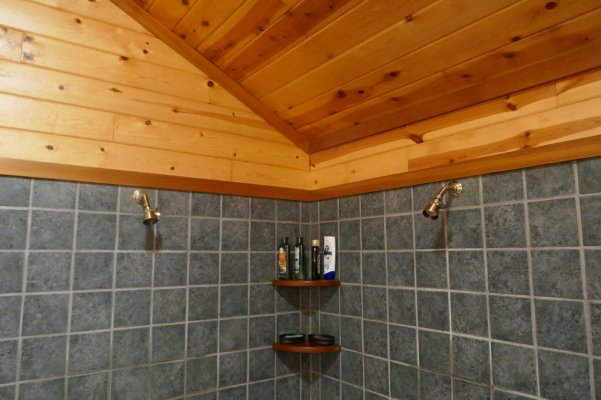
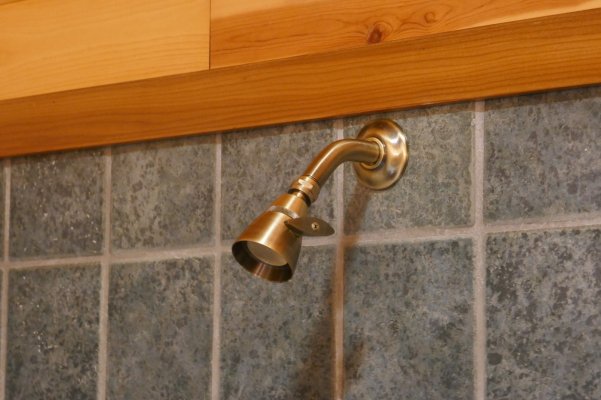
After 20 years of use the shower heads in our master bath were clogged and spraying all over the place. I tried several times to clean them, including soaking in vinegar, but nothing helped. I couldn't find any way to disassemble the heads without breaking them, so I decided just to replace them.

Unfortunately, when I went to unscrew the shower head, the shower arm broke off inside the wall instead. Basically, the threaded end kind of unraveled into a long thread of metal. So I had to replace the arms as well.

I also ordered a 1/2" NPT tap to clean out the corrosion and remaining pipe fragments from the threads. I was really worried about damaging the elbow inside the wall, but with a little patience I was able to clean up the threads in both elbows and install the new arms and shower heads. So we're back in business now...
 

Attachments

  • 2024-01-20 145703 - Shower arm broke when replacing master shower head.jpg
    2024-01-20 145703 - Shower arm broke when replacing master shower head.jpg
    540.1 KB · Views: 9
  • 2024-01-28 121604 - New shower heads and arms.jpg
    2024-01-28 121604 - New shower heads and arms.jpg
    489.3 KB · Views: 5
  • 2024-01-28 121700 - New shower heads and arms.jpg
    2024-01-28 121700 - New shower heads and arms.jpg
    460.1 KB · Views: 4
Eliminate Leaking Faucet

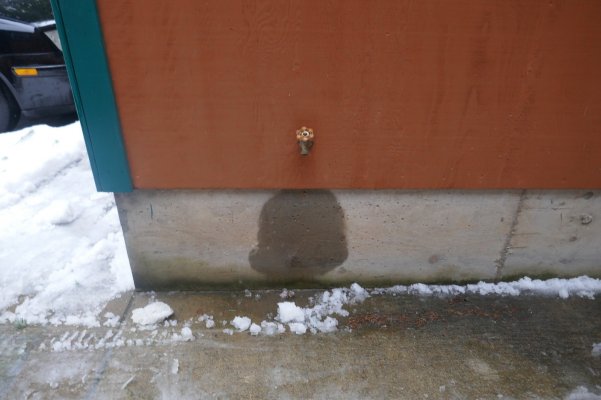
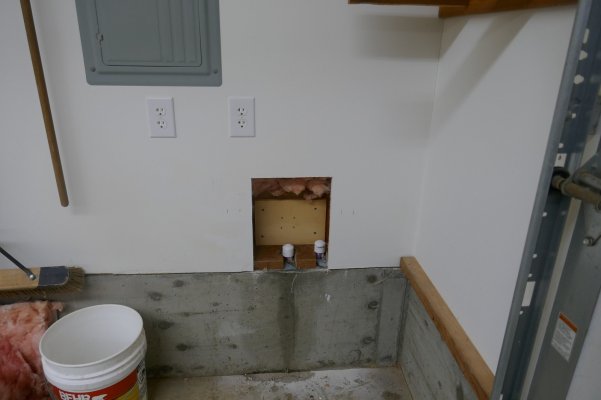
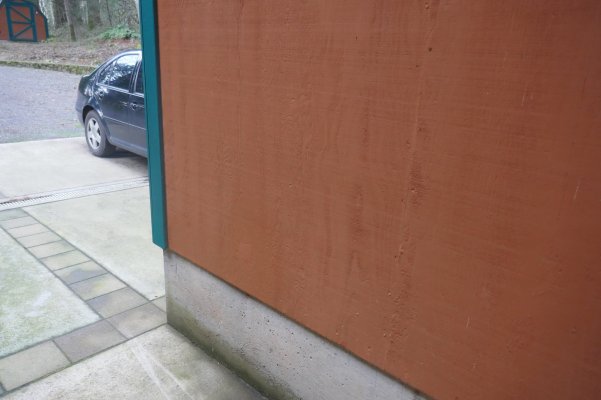
We built our garage about 23 years ago and installed an outdoor faucet to have water down there until we built our house. I had always shut down that water line during the winter, but in recent years I forgot/didn't bother.

A few weeks ago we had a long record cold spell (down to 10 degrees F), and that faucet developed a small leak when things started thawing. We now have a frost proof faucet just a few feet away on our house, so I was already planning to eliminate the faucet on the garage. The freezing weather leak just made it more of a priority. :)

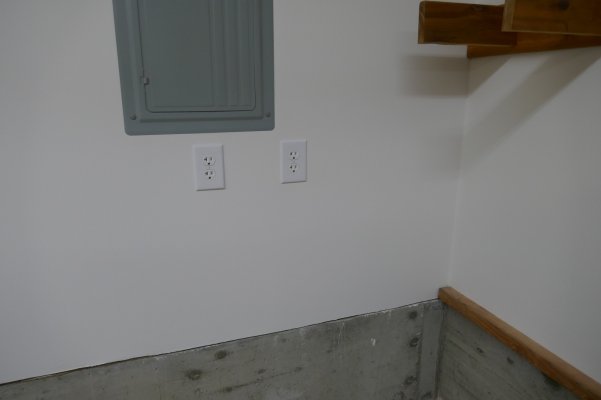
I had to cut the wall open inside to remove the faucet and cap the water lines. Then insulate really well, repair the drywall, and repaint inside and out.
 

Attachments

  • 2024-01-18 151004 - Repairing leak from frozen garage faucet.jpg
    2024-01-18 151004 - Repairing leak from frozen garage faucet.jpg
    417.4 KB · Views: 7
  • 2024-01-20 124402 - Repairing leak from frozen garage faucet.jpg
    2024-01-20 124402 - Repairing leak from frozen garage faucet.jpg
    298.6 KB · Views: 8
  • 2024-01-29 152105 - Repairing leak from frozen garage faucet.jpg
    2024-01-29 152105 - Repairing leak from frozen garage faucet.jpg
    451.5 KB · Views: 6
  • 2024-01-28 105202 - Repairing leak from frozen garage faucet.jpg
    2024-01-28 105202 - Repairing leak from frozen garage faucet.jpg
    199.8 KB · Views: 7
Added Exterior Light

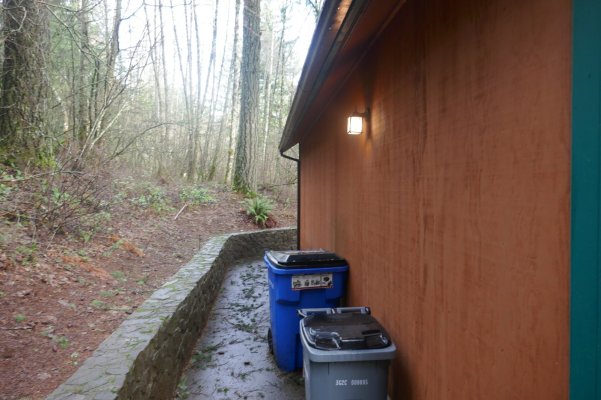
Several years ago we started storing our garbage cans on the back side of our garage. Unfortunately, it is really dark back there at night. It was always a little unnerving walking back there not knowing if we would run into a bear or other critter.

I installed a small battery powered light back there a couple years ago, but it wasn't very bright and the motion sensor didn't turn the light on until we were already around the corner of the garage in the dark.

So I decided to add a new exterior light, tapping into the light fixture on the front of the garage. I had to cut some holes in the sheet rock to drill holes and pull new cable, then repair and repaint the drywall. It took a few days overall, but it turned out nice. It's a little less scary running garbage out to the can after dark. :)
 

Attachments

  • 2024-01-23 131203 - Adding exterior light on garage over garbage cans.jpg
    2024-01-23 131203 - Adding exterior light on garage over garbage cans.jpg
    555.9 KB · Views: 4
  • 2024-01-23 131303 - Adding exterior light on garage over garbage cans.jpg
    2024-01-23 131303 - Adding exterior light on garage over garbage cans.jpg
    281.6 KB · Views: 6
  • 2024-01-28 105205 - Adding exterior light on garage over garbage cans.jpg
    2024-01-28 105205 - Adding exterior light on garage over garbage cans.jpg
    261.3 KB · Views: 5
^^^^ mountainsoft is "on a roll"! Well done!
 
Nice job!. Helps that the walls were white so you didn't have to worry about matching colors with the paint.
 
Last edited:
We have a deep dig coming up with some known hard conditions. The corner teeth are looking a little nubby on the 2' bucket.
PXL-20240123-231947110.jpg


I picked up a couple of new twin tiger teeth for the corners and installed them yesterday.
PXL-20240129-214822262.jpg
 
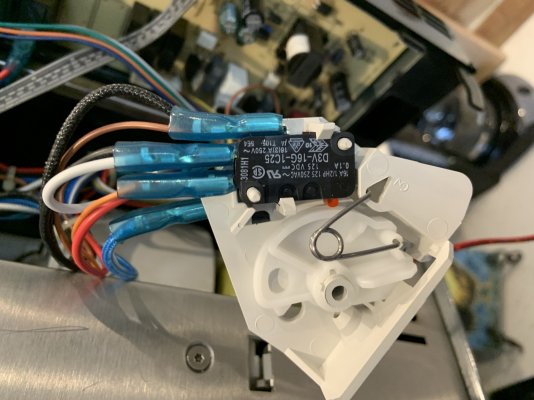
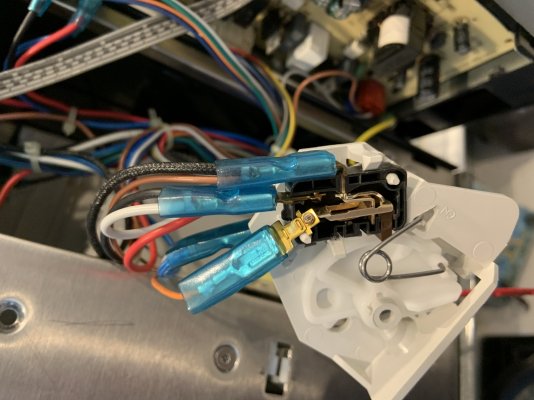
My recent (following the refrigerator freezer rebirth) was repairing a really nice Kitchenaid combo convection/microwave.

I had disassembled the door safety mechanisms a couple of years ago and it worked well for a year, then I replaced the plastic brackets and rotator assemblies, and it worked well for a year. Posted on this last bit in 2023.

Tenants notified me a couple of weeks ago - the door open/closed warning and not working, again.

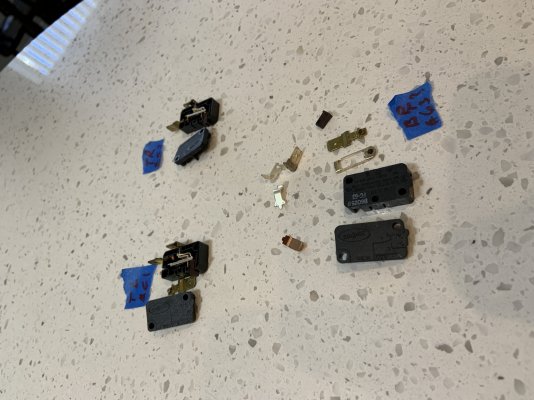
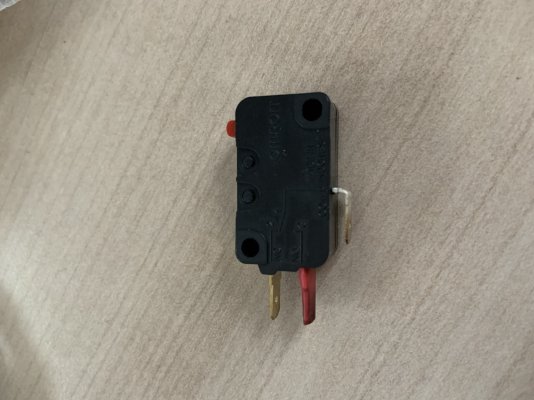
More research, and since I had replaced everything except the switches themselves, I focused on the switches. Several folks had done this repair - and, a couple of them noted the terrible quality of the switches that they removed. One of these provided a hint by saying to find better switches. More research - apparently there are several large companies that manufacture quality switches - Honeywell and Omron, included.

Another tidbit is that the three "different" door switches (these are for safety) are the same switch, with different terminals removed to make them either single throw or double throw - and to make them operate as normally open or normally closed.

So, ordered a couple extra from Mouser - I shrink wrapped the terminals I didn't want to use to code me during the replacement (sort of like removing the terminal you don't want) ... note that ALL the switches simply fell apart as I was handling or removing them ... only thing holding them together was the tw small plastic clips.

Been working for a couple of weeks!
 

Attachments

  • IMG_2743.jpg
    IMG_2743.jpg
    452 KB · Views: 2
  • IMG_2751.jpg
    IMG_2751.jpg
    530.1 KB · Views: 3
  • IMG_2740.jpg
    IMG_2740.jpg
    450.5 KB · Views: 4
  • IMG_2721.jpg
    IMG_2721.jpg
    455.3 KB · Views: 3
Nice job!. Helps that the walls were white so you didn't have to worry about matching colors with the paint.

I always take photos of the cans and paint codes when we paint so it's easy to have matching paint mixed up when we need it again. Occasionally we'll need a paint brand that is no longer available, but so far it has been easy to cross reference to a new brand using the paint codes.

As for the garage, it's Glidden "Antique White". I already had a can of the exterior stain from a repair last year, so I didn't need to buy more of the stain.
 
Two recent repairs, small but still left me feeling like I conquered a mountain :LOL::

1. I have an larger extension cord reel, one that can hold up to 150 feet of electrical extension cord, that is at least 15 years old. There is a plastic tab on the reel axle that you snap one end of the extension cord in, so that as you turn the handle it reels in the cord. Over the years, the plastic gets brittle, and at the last snowfall, having it outside in the cold, the the tab snapped off, making it almost impossible to reel cord onto it without doing something like tying the end of the cord into a knot around the axle.

At first I figured it was BTD time and bought a replacement, which now costs about 3 times what I paid for it in the past. However, on the way home from the store (maybe due to the music I was listening to at the time :D), I realized that I could do something with Velcro tape and screws I already have home. Sure enough, I screw it an strip of Velcro tape on the axle, and it works like a charm - just put the strip of Velcro around the cord end, it holds it to the axle and the cord can be reeled it (or pulled out) without issue. I returned the reel I had bought, so back to frugality :).


2. I have s step-on wastebasket at the desk that the step broke, leaving a metal bar that I had to step on. Since the bar is smaller it is easier for one's foot to miss it or slip off. This happened several months ago. I finally took a closer look at the step part. It has 2 round plastic pieces on the back of the part that hook into openings over the metal bar. One of the pieces had broken off. However, since it is solid plastic, I fixed it by using a screw into the broken side, so that the screw is now in place of the broken off plastic part. With a little jiggling, I was able to fit the step back into place. It works fine, and since the openings are within the step slot the screw is hidden and all is normal.
 
Back
Top Bottom