Your recent repair? - 2021 to ?

Glueing concrete - who knew?

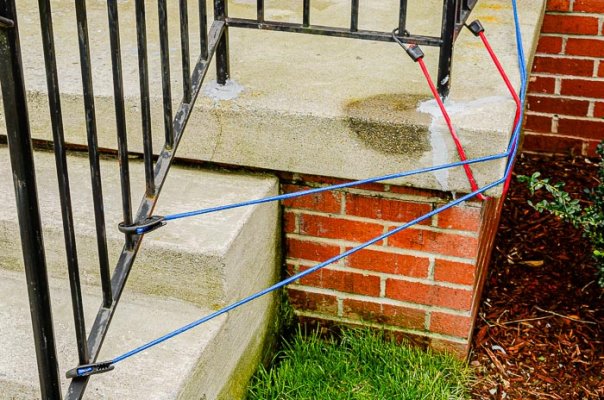
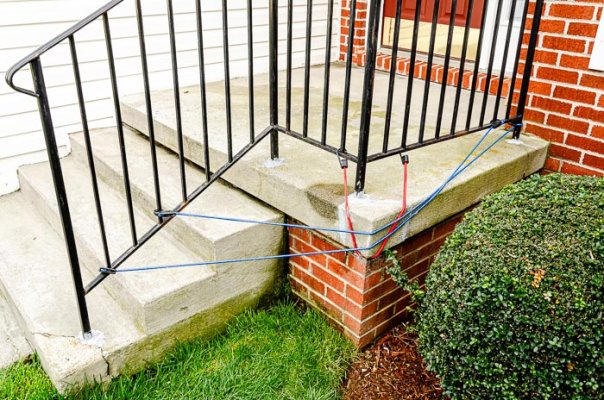
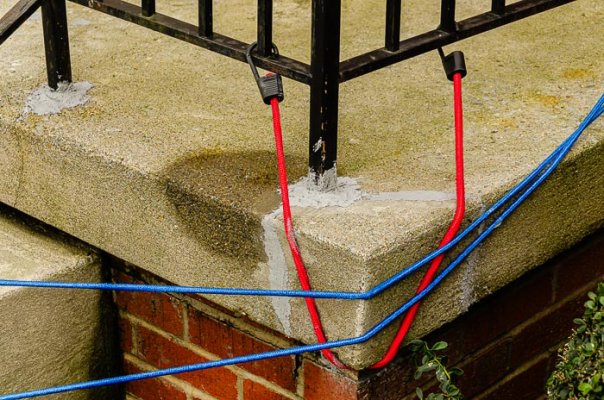
A few months ago a corner of the concrete front porch fell off because water had been draining in a depression where a supporting post of the steel railing was embedded. Naturally with freeze/thaw cycles it froze off and when I touched it, it fell to the ground, missing my foot by about an inch.

Last month (March) I started making phone calls about getting it fixed, but as I suspected no one was interested in a small job like that. I know how to do it, but with back and shoulder issues I was and am perfectly willing to pay someone to build the form and pour a little bit of concrete. But along the way, a few people suggested the below solution, using a concrete epoxy to reattach the broken off piece. I'd never heard of this and was more than a bit skeptical. Finally a neighbor across the street who works in construction suggested it too. This guy has been playing with the full size Tonka Toys (his words) since high school so he has some credibility.

So I got some masonry epoxy from Home Depot, mixed it up and we applied it yesterday. The directions say three to four hour cure time but because of the temperatures being at the low end of the acceptable range (40° to 50°F) I'm going to leave the bungee cords on for a couple of days. It might help, can't hurt.

But if this works, I'm happy with it. I never would have guessed that there was a way to glue chunks of concrete back on. If it doesn't work, I'm only out some time and about $50.

And yes, I know I have some tuck pointing to do there too, but we're forecast to have rain every day for the next week or so, so that project will have to wait on decent weather. Also pressure washing, the porch is on the north side of the house and never sees direct sunlight.
 

Attachments

  • Front porch repair (1 of 3).jpg
    Front porch repair (1 of 3).jpg
    169.3 KB · Views: 11
  • Front porch repair (2 of 3).jpg
    Front porch repair (2 of 3).jpg
    185.5 KB · Views: 12
  • Front porch repair (3 of 3).jpg
    Front porch repair (3 of 3).jpg
    166.1 KB · Views: 11
Interesting, I have a large crack in my garage entrance wonder if it would fix that.
I tried putting some thinset I had in there but it didn't hold.
Are you going to fix the crack in the bottom step?
 
WARNING: there is some stiff language in this video, so don't view it if that is offensive to you.

For the rest of you crass codgers, Ricky from the Trailer Park Boys, a Canadian show from some years back, demonstrates his skill with tools in the home.

http://https://youtu.be/lfyaftYvFGg

Exaggeration is the heart of comedy, but as a friend said, "Kind of reminds me of pulling apart a kitchen faucet handle to replace the washer, instantly realizing I forgot to shut the water off. Had water shooting off the ceiling...".

Think we all have a story or two, mine include a toilet supply valve in our home broken off by falling objects stored above the toilet, another that a tenant stepped on (why:confused:), and a copper water line that I improperly routed that another tenant managed to drive a picture hanging nail through.
 
Are you going to fix the crack in the bottom step?

There are several more cracks there and elsewhere that I intend to fill with epoxy and the more common crack fillers. The one on the bottom step is a previous repair that is almost separated for the same reason. It won't actually separate because there is some rebar inside that will prevent it from falling off. DW's brother, a genius with masonry and tile, did that years ago but health issues prevent him from doing it now. I watched carefully and learned from him. I do intend to fill that crack though.

PC Products makes the same stuff in "caulking tube" that mixes while it exits a special nozzle. It can use a regular caulking gun. I didn't see that product on Home Depot's web site but Amazon had it. There are also other expoxies that are much thinner for narrow cracks. Sika makes one.

Right now I'm mostly waiting for weather to improve, we've had almost 3.5" of rain in the last couple of days and yesterday was a window of two days with warm air and no rain. It poured more today and will until Friday.
 
WARNING: there is some stiff language in this video, so don't view it if that is offensive to you.

For the rest of you crass codgers, Ricky from the Trailer Park Boys, a Canadian show from some years back, demonstrates his skill with tools in the home.

http://https://youtu.be/lfyaftYvFGg

I'm getting the message "trouble finding site" with that link.
 
I'm getting the message "trouble finding site" with that link.

Hmm. disappeared. Went hunting again and found this, which has a little intro to the bathroom upgrade scene and gets way saltier and more implausible after 3:45., maybe consider bailing out there.

 
Yesterday, I fixed a mistake I made when I was winterizing the lawn mower. I kinked the fiber gasket for the carburetor bowl and had to replace it because the mower was surging (both at idle and at low load) when I first started it a couple of weeks ago.

I took advantage of the opportunity to clean the carburetor, but decided it wasn't worth the risk of removing the balky main jet.
 
Repaint the Living Room

After 20 years in our "new" house, we had quite a few nail pops and stress cracks in our living room. My wife is out of town this week so I figured it would be a good time to make a mess of the house. Overall it took me about four days to prep, do the drywall repairs, sand, clean, mask, paint, and get the house back in order. I always joke with my wife "if I do a good job it will look like I didn't do anything". By that measure it seems like a success... :)
 

Attachments

  • 2024-04-03 131801 - Patching cracks and nail pops in the living room.jpg
    2024-04-03 131801 - Patching cracks and nail pops in the living room.jpg
    188.3 KB · Views: 7
  • 2024-04-04 111000 - Patching cracks and nail pops in the living room.jpg
    2024-04-04 111000 - Patching cracks and nail pops in the living room.jpg
    177.3 KB · Views: 8
  • 2024-04-05 105005 - Patching cracks and nail pops in the living room.jpg
    2024-04-05 105005 - Patching cracks and nail pops in the living room.jpg
    181.9 KB · Views: 9
  • 2024-04-05 105100 - Patching cracks and nail pops in the living room.jpg
    2024-04-05 105100 - Patching cracks and nail pops in the living room.jpg
    228.8 KB · Views: 10
A backdoor retired neighbor wanted a deck refresh and a buddy & I knocked out the deck demo and rebuild portion & rain chains in 3 days. I am reminded about every 2 years why I don't do many decks... Thankfully it's 75 & low humidity in N TX.
 

Attachments

  • IMG_20240402_091534076.jpg
    IMG_20240402_091534076.jpg
    796.8 KB · Views: 12
  • IMG_20240405_135632645.jpg
    IMG_20240405_135632645.jpg
    700.9 KB · Views: 11
Our blender broke again after I had fixed it 10 years ago, so spent ~6 for parts from Amazon.
The part came with a tool to hold the threaded shaft still, while I used pliers to unscrew the coupler.
The coupler is reverse threaded , but easy to unscrew going in the proper direction.
With the 2 spare parts, I'm good for another 20 years :LOL:
 

Attachments

  • blend1.jpg
    blend1.jpg
    516.8 KB · Views: 7
  • blend2.jpg
    blend2.jpg
    387.4 KB · Views: 10
  • blend4.jpg
    blend4.jpg
    428.9 KB · Views: 6
Our blender broke again after I had fixed it 10 years ago, so spent ~6 for parts from Amazon.
The part came with a tool to hold the threaded shaft still, while I used pliers to unscrew the coupler.
The coupler is reverse threaded , but easy to unscrew going in the proper direction.
With the 2 spare parts, I'm good for another 20 years :LOL:

Impressive that you can get the parts. Like you, once I find them, I buy spares.

-ERD50
 
After 20 years in our "new" house, we had quite a few nail pops and stress cracks in our living room. My wife is out of town this week so I figured it would be a good time to make a mess of the house. Overall it took me about four days to prep, do the drywall repairs, sand, clean, mask, paint, and get the house back in order. I always joke with my wife "if I do a good job it will look like I didn't do anything". By that measure it seems like a success... :)

One of the few jobs I don't enjoy - the sanding and dust are headaches. Good job!
 
I bought a circuit breaker finder tool from Klein and it worked like a charm. Much better than flipping breakers until you find the right one.

Once you trace the circuits down, label the panel for future reference. Someday a spouse or child may need to turn off the power and won't have your tester handy. :)
 
One of the few jobs I don't enjoy - the sanding and dust are headaches. Good job!

I held my shop vac hose under my sanding block as I was sanding and had very little dust on the floor or in the air (fine filter bag in the vac). Of course, I was just doing small areas in one room. It wouldn't be very convenient for sanding an entire house. I did that 20 years ago and I came away looking like a white ghost. :)
 
Fence Cleaning

We built a privacy fence about two years ago and it was starting to look dirty and grey. So I spent a day earlier this week cleaning the fence. Light pressure wash, spray with 30 second cleaner, another light pressure wash, spray on "wood prep", and another final light pressure wash.

We're supposed to have nice weather this week, so maybe we can reapply new stain again.
 

Attachments

  • 2024-04-02 131805 - Cleaning the fence - Before.jpg
    2024-04-02 131805 - Cleaning the fence - Before.jpg
    561.6 KB · Views: 14
  • 2024-04-02 152205 - Cleaning the fence - After.jpg
    2024-04-02 152205 - Cleaning the fence - After.jpg
    541.8 KB · Views: 16
Simple little job yesterday - changed out a gfi outlet that went bad. I’m so glad that I can still do these smaller projects. More important is that I used a new tool I recently acquired. I bought a circuit breaker finder tool from Klein and it worked like a charm. Much better than flipping breakers until you find the right one.

https://www.homedepot.com/p/Klein-Tools-Circuit-Breaker-Finder-Tool-Set-2-Piece-80016/316406030

Just a FYI for those with the older GFCI outlets with no LED.

I had to replace the one in the master bath which protects several other bathroom outlets.

Couldn't figure out why the new one (with LED) wouldn't reset until I switched the "load" & "line" pairs.

Since the original had been hooked up backwards...also have had to swap mis-wired "hot" & "neutral" on other outlets (different homes) over the years.
 
Last edited:
Just a FYI for those with the older GFCI outlets with no LED.

I had to replace the one in the master bath which protects several other bathroom outlets.

Couldn't figure out why the new one (with LED) wouldn't reset until I switched the "load" & "line" pairs.

Since the original had been hooked up backwards...also have had to swap mis-wired "hot" & "neutral" on other outlets (different homes) over the years.

Yes, important to actually test the downstream outlets. Some of the little 3 neon bulb plug-in testers have a button for that, I have a light bulb and socket with wires attached that I can insert into a plug. So I test from hot to ground to make sure that fires the GFCI.

I use that bulb on non-GFCI outlets the same way, to make sure the ground has a good contact that can handle some current. Those little testers draw just a trickle current, not enough to really test for a solid ground connection.


-ERD50
 
We built a privacy fence about two years ago and it was starting to look dirty and grey. So I spent a day earlier this week cleaning the fence. Light pressure wash, spray with 30 second cleaner, another light pressure wash, spray on "wood prep", and another final light pressure wash.

We're supposed to have nice weather this week, so maybe we can reapply new stain again.


Nice job! Beautiful fence.
 
Still working in between rainstorms, I filled in the rest of the cracks in the concrete front porch with concrete epoxy. It was dry enough yesterday and today to get the concrete mostly dry and the epoxy will be cured by this evening. I'm limited to working on it 20 to 40 minutes at a time because of back issues and then I have to stop.

Next up is one on the garage floor and the approach to it.

I'll get a break though, we're forecast for more rain the next several days.
 
My 14 year old fancy Samsung front loading washing machine displayed "not draining". $900.- when new. Late wife choose it, it is the most complicatd beast of the genre.

Checked filter, no significant blockage, cleaned. BTW, when removing removing filter about 4 gallons of water drains, had bucket handy to catch most of it.

It has done it a few times in the past, so knew what to expect.
A quick youtube search had the general opinion thet the pump motor is the culprit.
Took apart the machine to get to the pump. Using cheater cord applied 117AC, pump ran fine. Hmmmmmm.........
All the functions of the machine are via a Control board.

Extensive search revealed Control board as unobtanium. MFR no longer makes it. If available would be around $270.-
The various solenoids and the motors are controlled via some relays on said Control board. Thus the likelyhood of this one function is a 12volt relay switching AC to the drain motor.
After opening the machine it really is beatifully made, squeaky clean inside, not even dust, be a shame to junk it for a likely $5 relay failing.
Onward:
Not looking easy to remove the control board, came up with a temporary fix.
From my vast collection of stuff rounded up a DPDT switch, some zip cord with an AC plug on one end, some more zip cord.
Cut AC feed wires to the drain motor, wired in the DPDT switch. Drill hole in side of machine for the switch, label the positions as AUTO and MANUAL DRAIN.
Re-assemble machine. Load in dirty clothes, select normal wash, hit start.
After 30 minutes it dinged, Not Draining. Switch to manual drain, after emtying wash water, machine cycle coninued. Switch back to AUTO. Finished the wash and rinse cycles and drained itself.


So, temporary fix works. When I get around to it, will figure out how to remove the control board, and replace the relay.
Or, bite the bullet and blow some dough on a new washing machine. Decisions, decisions.......
 
Last edited:
It's amazing how many problems come down to a worn-out relay.

E.g., the A/C on a 15-year-old older vehicle was cycling on & off.

Which many would diagnose as too low a refrigerant charge, but after replacing the original under-hood A/C relay it runs just fine again.
 
Just wanted to say that ls99's repair of the Samsung washer was very ingenious. NASA would be proud.

I predict that you will tire of having to flip that switch and eventually will revisit the relay problem.
 
About relays. The guys online who were helping my fix my heat and cool system were saying it might be a relay. I was skeptical, but yep, it was the relay.


I had time, being retired, so I was able to carefully take things apart, and replace the relay in the air handler and get the fan motor to come on again. One set of contact points was 'worn out' as in corroded from decades of electricity arcing over them each time they closed.


I learned a lot about testing electrical components.


I was surprised to find that there were lots of websites selling the original equipment relay (vintage 1986). It was a Trane part that they used and still use in lots of their stuff. I tried to get a generic $10 relay, but nothing quite fit in well enough, so I went 'BTD' and bought an OE relay for $44 including shipping.
 
Last edited:
This post just cost me $50 ;-)

....Cause now I'm going to have to go buy one of these!

Recent electrical work made current breaker labels obsolete and this will make the relabel job way easier.

Thanks for the tip!

Simple little job yesterday - changed out a gfi outlet that went bad. I’m so glad that I can still do these smaller projects. More important is that I used a new tool I recently acquired. I bought a circuit breaker finder tool from Klein and it worked like a charm. Much better than flipping breakers until you find the right one.

https://www.homedepot.com/p/Klein-Tools-Circuit-Breaker-Finder-Tool-Set-2-Piece-80016/316406030
 
Back
Top Bottom