What We're Making

Nice job on those cabinets and sewing table. That mahogany is going to look even better as it ages.

Agreed. Should have done this, but client just took some Barkeepers to the pulls & dramatically better...
 

Attachments

  • Screenshot_20230831-155644.png
    Screenshot_20230831-155644.png
    1.3 MB · Views: 59
Went to Cheyenne Frontier Days in late July. Went to Glacier National Park a few weeks ago. Found a Cheyenne Frontier Days poster at Wall Drug on the way home from Glacier. Had some leftover barnwood and turquoise, added a little hardware.
 

Attachments

  • IMG_1394.jpeg
    IMG_1394.jpeg
    1.5 MB · Views: 50
Last edited:
Went to Cheyenne Frontier Days in late July. Went to Glacier National Park a few weeks ago. Found a Cheyenne Frontier Days poster at Wall Drug on the way home from Glacier. Had some leftover barnwood and turquoise, added a little hardware.

Nice table too...
 
Nice table too...

Thanks. The table was a chore. Based on Tom Fidgen's Unplugged Workshop version, except he used all hand tools to make his. I used all power tools. His has a wood half circle top adjustment bracket, where I went to a metal fabricator and had one made.
 

Attachments

  • Screenshot 2023-09-09 at 11.31.21 AM.png
    Screenshot 2023-09-09 at 11.31.21 AM.png
    1.6 MB · Views: 30
Wow-had been awhile since I had come back to this thread-was looking for the cookies 😉. I have finished a few afghans-last one is called Seaside Serenity
 

Attachments

  • IMG_20230731_070643428.jpg
    IMG_20230731_070643428.jpg
    913.1 KB · Views: 35
Wow-had been awhile since I had come back to this thread-was looking for the cookies 😉. I have finished a few afghans-last one is called Seaside Serenity

That is very nice!!!! Thank You for sharing your work and talent.

Surewhitey and Ronstar I love your work and talents as well.

Well done!!!
 
We got the bridge abutments set yesterday using these fancy wall blocks. They're 2x2x4 but only weigh 1370 lb due to the voids.
PXL-20230909-180233167.jpg


I had set the near abutment, then tossed the two for the far side as far as I could reach so I did not have to pack them around.
PXL-20230909-183730073.jpg


I had picked up a few tons of 4x8 quarry spalls to beat into the soil and firm it up, then some fine gravel for grading it out.

It's all set for filling with concrete and rebar and setting j-bolts.
PXL-20230909-210304155-3.jpg
 
Last edited:
Thanks. The table was a chore. Based on Tom Fidgen's Unplugged Workshop version, except he used all hand tools to make his. I used all power tools. His has a wood half circle top adjustment bracket, where I went to a metal fabricator and had one made.

Reminds me of my old drafting table, but mine came from a factory.
 
Soft-close Slides for Kitchen Base Cabinet

After seeing my sister's place and watching my BIL work on some cabinets, I got motivated to work on our kitchen...I bought 10 pairs of 22" soft-close slides to make it easier to get stuff out of the base cabinets in the kitchen.


They need to be installed fairly precisely if the slide is going to work right, so for the first one, I made a Sketchup model. I looked at a bunch of videos, but most of them spent most of the time on making a fancy box in the wood shop. I was tempted to just go with a "shelf on slides", but ended up with a simple box: 3/4 plywood with some leftover 3.5 x 0.5 cedar from my earlier sauna project. I just cut the cedar on a 45 and glued/nailed to the plywood. Here's a six minute video of the process, should you have time to waste listening to me yammer on about my project:
I did put the gist of the project in the first few seconds of the video.


One thing that I discovered was that the stuff in the cabinet wouldn't fit on the new pull-outs. The cabinet had been packed to the gills, was disorganized, and mostly we didn't even know what was tucked away in the back. Now we can see everything, and easily get anything out that we want, but I'd say 10% of the stuff wouldn't fit unless we started making it pretty ugly (stacking). And balancing one thing on another, as was without the slides, didn't seem desirable or workable. The good news was we found that the 10% that wouldn't fit could be thrown out!
 
sengsational >> very nice narrative detailed and informational tutorial. Looks like you did a professional job!

I remodeled our kitchen completely in the first week of July. I had to install all hardware and the slides you used where exactly like the one I used.

I was glad the project is complete all the crawling around and in and out of those cabinets was a job.
 
Update on my cedar strip kayak. I'll finish the bottom, flip it over and start on the top in a few days.
 

Attachments

  • Screenshot 2023-09-26 at 10.45.10 PM.jpg
    Screenshot 2023-09-26 at 10.45.10 PM.jpg
    906.4 KB · Views: 45
I just noticed this thread and have enjoyed seeing the nice [-]work[/-] projects which members have posted. There’s a lot of talented people here.

I retired last year from a nice career as a professional photographer. I would often need to build projects for my studio such as shelves, storage, apple boxes. My woodworking skills were rudimentary but good enough for what I needed. As my work slowed down over the last few years I started working on nicer projects for my home and honing my skills. I enjoy designing projects in Sketchup and then bringing them to life in my shop. Woodworking and golf are now my 2 passions in retirement.

I sold my old Jet tablesaw and bought a SawStop tablesaw with the incredible technology that shuts down the blade in a millisecond if your hands contact it. Since I work out of my garage, it’s on a mobile base so I can park 2 cars at night. I built a flip top cart for my planer and benchtop jointer, and I also have a benchtop band saw and drill press. I really love using my hand planes, and have learned how to make hand cut dovetails with saws and chisels.

OK, sorry if this has gone too long. I’ll leave with a few or my projects over the last 2 years. Thanks for looking.
 

Attachments

  • IMG_0275.jpg
    IMG_0275.jpg
    663.7 KB · Views: 41
  • IMG_0260.jpg
    IMG_0260.jpg
    901.7 KB · Views: 41
  • IMG_0223.jpg
    IMG_0223.jpg
    386 KB · Views: 39
  • IMG_0179.jpg
    IMG_0179.jpg
    638.3 KB · Views: 38
  • IMG_0571.jpg
    IMG_0571.jpg
    569 KB · Views: 39
  • IMG_0301.jpeg
    IMG_0301.jpeg
    125.7 KB · Views: 36
Ronstar, thanks for the update what an interesting project. Please keep us posted with pictures. Outstanding!!!

Fotodog, that is some beautiful work you have done. Thank you very much for sharing your professional work.
 
Ronstar, thanks for the update what an interesting project. Please keep us posted with pictures. Outstanding!!!

Fotodog, that is some beautiful work you have done. Thank you very much for sharing your professional work.

++
 
Very nice Fotodog!! Unique design and great builds. Looks like you like the walnut/ curly maple combo. They look great together.
 
Thanks for the nice responses. You’re right Ron, I love that combination. The curly maple can be a bear with tearout, but I love the results. You have some beautiful work yourself, as well as some very nice photography.
 
Thanks for the nice responses. You’re right Ron, I love that combination. The curly maple can be a bear with tearout, but I love the results. You have some beautiful work yourself, as well as some very nice photography.

Thanks. Yes I've noticed the curly maple tearout also. Big time tearout running it through a planer.

Just curious, what finish do you use on the walnut/maple pieces?

I like to use oils now on walnut, but I don't think oil would be best on maple. But I'm not sure because I haven't oiled maple.
 
Last edited:
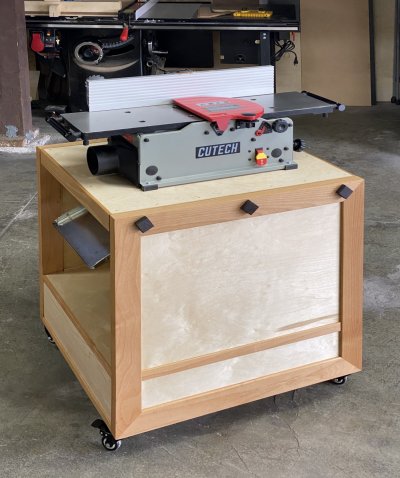
Ron, you’re right about the electric planer tear out. I take very light passes, and then put a new sharp edge on my Lie Nielsen 4 1/2 smoothing plane which produces a nice result. But I still finish up with some sanding.

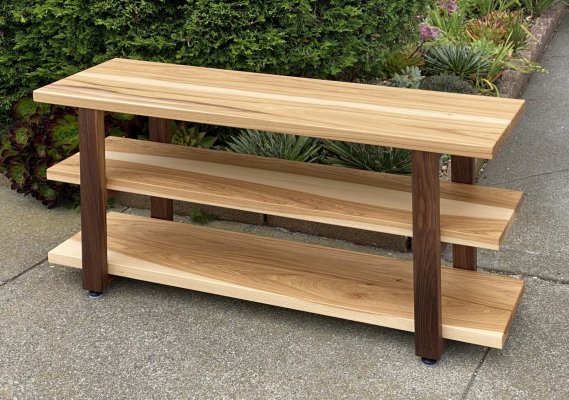
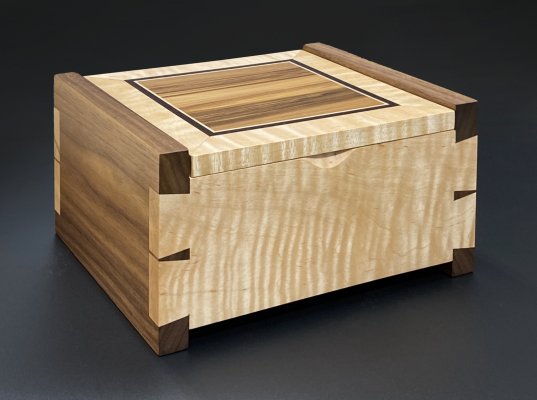
As for finishing, I am a big fan of the hard wax oil finishes. I have tested Rubio monocot, Osmo Polyx,, Tried, and True, and Odie’s oil. My go-to for Maple is Osmo, because it is the least yellowing of them all. If I finish a piece that is solid walnut where a little warmth looks good, I like the Tried & True finish. The Rubio Monaco finish is too flat for my taste. The others produce a nice soft satin finish with a couple of coats.

If you haven’t used a hard wax finish before, be sure to follow the manufacture directions. With Osmo, you rub in a light coat and then remove every bit of residue within five or 10 minutes. If you leave it on too long. It gets too tacky.
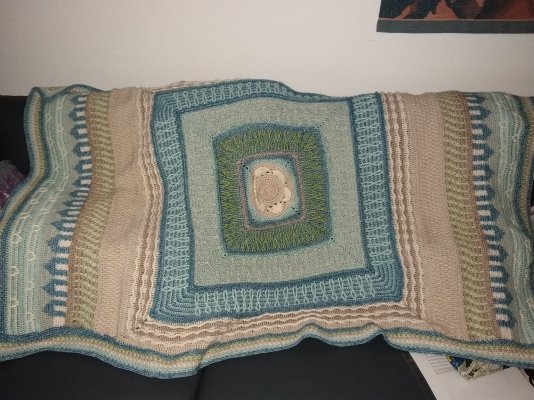
 
Nice work everyone. Welcome to the party Fotodog. Been a little busy building drawer base cabinet and custom dresser to fit a specific space. Boring stuff, but I got humbled to slow down and double measure on some of the drawers. Forgot to allow the 1" for side glides on one of the projects. :facepalm:

I've heard a good cabinet guy is one who can pivot and make modifications to the mistakes made...
 
Thanks for the welcome Whitey. It’s funny what we find interesting what other people would find very boring. And talk about coincidence, I’m in my shop at this very moment, working on some drawers.
 
Back
Top Bottom